Get Premium
Dark mode theme is available exclusively for premium users. Learn more about the benefits of subscribing.
No fees, cancel anytime.

 Dark Mode Ad-Free Browsing Unlimited Content
 Ad-Free Browsing Unlimited Content Dark Mode
Join 1.2 million Panda readers who get the best art, memes, and fun stories every week!
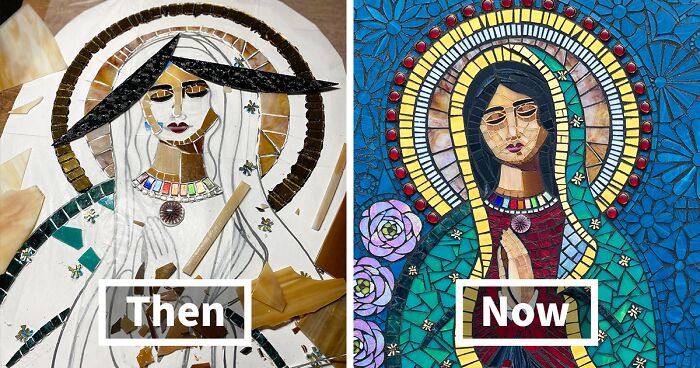
My name is Anne Marie Price, and I am a mosaic artist and mosaic art teacher in Southern California. I love to show work-in-progress photos of what I create.
I’ve been creating mosaic art since 2003 and regularly share my process and progress on social media, enjoying the feedback I receive while completing each step to assemble a piece of mosaic art.
For this commissioned project, my subject was “Mary” from religious stories in the Bible. I was given artistic freedom to create my version of Mary and enjoyed every moment of envisioning how my Mary would look. I was inspired by past renditions of this iconic figure created around the world, cherished by so many.
Each photo shows the work put into creating a 24” x 24” mosaic using stained glass, glass beads, and Venetian gold Smalti.
You can follow more of my work on my website and on all my social media platforms.
More info: AnneMariePrice.com
3Kviews
Share on FacebookI love progress photos and videos! Thank you for sharing. This is beautiful work!
I love progress photos and videos! Thank you for sharing. This is beautiful work!


 No fees, cancel anytime


35
21