Bored Panda works better on our iPhone app
Continue in app Continue in browser

BoredPanda Add post form topAdd Post
Tooltip close

The Bored Panda iOS app is live! Fight boredom with iPhones and iPads here.

Epoxy Countertops: Everything You Need To Know
User submission
3.7K

Epoxy Countertops: Everything You Need To Know

ADVERTISEMENT

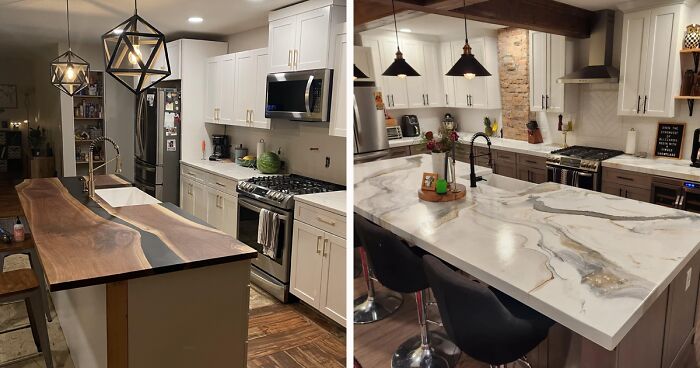
When thinking about the design of the countertop, we usually think of traditional materials like wood, marble, or granite. However, it seems like epoxy has recently been coming to the spotlight. Yes, it’s not the first choice that comes to mind, but epoxy countertops may be the next big thing. 

Making an epoxy kitchen countertop is fun and exciting. Still, it could turn into a mess if you’re not careful. Before you decide if epoxy countertops are the best solution for your project, let’s look at all the pros and cons of installing one in your home. 

Image credit: Ziggy_zaggy_oi_oi_oi

RELATED: 30 Modern Kitchen Designs: How To Give Your Kitchen A Timeless Look

Why Get an Epoxy Countertop?

One notable advantage of epoxy is the creative freedom it offers. Instead of a rigid slab, epoxy starts as a fluid mixture. Traditional epoxy comes in two liquid-filled tubes—one with epoxy resin and the other with a hardener. Mixing them creates a flexible material that is easy to handle and transport, but the benefits don’t stop here.

Pros of Epoxy Countertops

Image credit: PapiFresh

Epoxy countertops offer several benefits—some you may already know, while others might surprise you.

  • Toughness: Once settled, your epoxy countertop will be as strong as a marble one. With proper installation, it can last for years—a lifetime if maintained well. While not entirely scratch-free, fixing the damaged epoxy is relatively easy (more on that later).
  • Budget-friendly: Epoxy isn’t cheap but is more cost-effective than premium materials like quartz. And if you opt for a DIY approach, you’ll only ever need to pay for the components.
  • Low maintenance: Thanks to their plastic-like properties, cleaning epoxy countertops is a breeze.
  • Customizability: Want the look of marble without the hefty price tag? Epoxy allows extensive customization. Add specialized pigments to achieve the desired design. 

RELATED: Marble Countertops: The Crowned Champion Of Your Kitchen

Cons of Epoxy Countertops

Image credit: nocab_09

ADVERTISEMENT

While there are obvious advantages to epoxy countertops, it’s essential to be aware of the drawbacks.

  • Messy installation: The application process can become messy, especially for beginners. Epoxy poses challenges during installation, with spillovers on surfaces that aren’t part of the countertop.
  • No room for adjustments: Once set, epoxy becomes solid. Thorough preparation before mixing is crucial; once the setting process starts, there’s no way back.
  • Maintenance challenges: Spills can damage the epoxy, causing stains that won’t come off with water and a towel. Being cautious of this is key to avoiding issues with your countertop.

Using epoxy for your countertop has its benefits and drawbacks. Just don’t let the shortcomings alone guide your decision. Know that if you choose the right materials and follow the necessary steps, you can easily mitigate all the challenges and enjoy the benefits of epoxy countertops.

Choosing the Right Epoxy

Image credit: Stylux Design and Construction

Before going for a generic brand, let’s explore crucial considerations to guarantee the best outcome for your project:

  • Type of epoxy: Epoxy isn’t a “one-size-fits-all” material. Manufacturers produce epoxy with a purpose in mind. For example, UV epoxy doesn’t get damaged from prolonged exposure to sunlight. Before getting your generic epoxy, read the labels to be extra sure. For this project, we suggest getting epoxy for countertops.
  • Amount of epoxy: Get your calculator ready. Less is often better when it comes to epoxy. Calculate the correct amount, considering your countertop size and other relevant factors. Being precise means avoiding wastage.
  • Consistency of epoxy: Epoxy is a chemical blend. Achieving the perfect balance between epoxy resin and hardener is critical. While the standard ratio is usually one-to-one, always check the product instructions for the recommended ratio.
  • Self-leveling: Simplify your project by choosing a brand with self-leveling properties. Let the epoxy do the work, ensuring a smooth and even surface without the manual effort.
  • Brand name: Not all epoxy brands are created equal. Navigate past marketing gimmicks and opt for a brand with positive reviews (from friends or online sources).

If you’re unsure which epoxy to choose, consider consulting a contractor. Their expertise can prevent the headache of potential mistakes, offering valuable assistance for a successful countertop project. Remember, a little help can go a long way.

A Handy Guide to DIY Epoxy Countertops

Image credit: Stone Coat Countertops

Building an epoxy kitchen countertop is a challenge to any DIY fan. While you don’t have to be an expert, you must be savvy enough to avoid making your kitchen a mess. Before you proceed, we suggest first familiarizing yourself with the tools, materials, and steps you need to take to build your unique epoxy countertop.

ADVERTISEMENT

Tools

Image credit: Karolina Grabowska

  • Safety Gear: Gloves, additional clothing, and a mask.
  • Surface Preparation/Finishing: Sandpaper (medium and fine grit) and a knife to smooth out bumps. A vacuum keeps things tidy.
  • Mixing: A sturdy plastic container and rod for effective mixing.
  • Applying: A paintbrush to shape the edges, a foam roller to eliminate bubbles, and a heat gun to ensure a smooth finish.
  • Measuring: A simple cup will do the job.
  • Leveling: Specialized tools for leveling epoxy surfaces.
  • Clean Up: Acetone and alcohol to easily clean epoxy off tools.

Materials

Image credit: John Malecki

  • Epoxy resin and hardener: Use the manufacturer’s instructions for the correct ratio. 
  • Primer: Increases adhesivity of the countertops, so the epoxy sticks better.
  • Epoxy dyes: Instead of going for one color, mix it up and add some specialized dyes. You can even get some glitter dyes to make the countertop pop in the eyes even more.
  • Painters tape and releasing agent: Prevent epoxy from sticking where it shouldn’t.
  • Drop cloth: To protect your floor.

Step-by-Step Instructions

Let’s make a DIY epoxy countertop. Follow these steps carefully, and we promise you’ll save time and money on your kitchen project. For more instructions, you might want to check our video below.

ADVERTISEMENT

1. Prepare the surface: Clean off dirt and grease, then create a rough surface by sanding for better epoxy adhesion.

2. Apply primer (Optional): Apply primer and let it dry.

3. Level and mask the surface: Use painter’s tape where needed and level out the surface for an even epoxy distribution.

4. Prepare the epoxy: Follow manufacturer instructions to create an epoxy mixture.

5. Add some color (optional): Introduce epoxy dye for a colorful result.

6. Apply the epoxy: Start with the edges using a paintbrush. Pour the rest and level with a leveling tool (if needed). 

7. Removing bubbles: Use a foam roller and heat gun to eliminate bubbles.

8. Curing: In most cases, one to two days is enough for epoxy to set. However, each manufacturer may have different suggestions—always check the label.

ADVERTISEMENT

9. Finishing touches: Sand the surface with fine-grit sandpaper to remove imperfections.

10. Clean up: Remove painter’s tape, clean the work area, and use acetone or alcohol to clean the tools and the mixing container.

Ways to Fix Your Epoxy Countertop

Image credit: PioneerStig, Parkland_EDC

In most cases, sandpaper and more epoxy will solve all the problems. However, like with most new challenges, you may sometimes need a different solution.

  • Scratches or surface imperfections. Sand the affected area. For deeper scratches, consider applying a layer of epoxy.
  • Bubbles in the epoxy. Use a heat gun to bring out the bubbles. If there are too many of them, you should apply a new coat of epoxy.
  • Uneven or dull finish. Sand the area with fine-grit sandpaper and apply a fresh layer of epoxy for a smoother finish.
  • Stains. Mild stains can be cleaned with vinegar and water. For more annoying stains, sand the area and recoat with epoxy.
  • Peeling. Sand the area you are working on, clean it, and apply some primer. After it dries, apply some epoxy.
  • Chips and damaged edges. Sand the affected area. For more extensive damage, apply epoxy putty and sand it.
  • Yellow spots. UV damage can be addressed by sanding the affected area and applying UV-resistant epoxy.
  • Too thick or thin epoxy. If it is too thick, sand the surface to the desired level. If it is too thin, apply a coat of epoxy and sand the surface.

Enjoy Your New Countertop!

Image credit: Leggari Products

Congratulations. You have completed your DIY project! Now you can pair it with other furniture in your kitchen. Decided to go for a marble finish? Get some white cabinets to match your new countertop. Maybe you have a beautiful island? A new epoxy countertop can be a great way to give it a fresh look.


4Kviews

Share on Facebook
You May Like
Popular on Bored Panda
Join the conversation
Add photo comments
POST
scarlet-patience avatar
Noname
Community Member
4 months ago DotsCreated by potrace 1.15, written by Peter Selinger 2001-2017

"That word-- I don't think it means what you think it means".

scarlet-patience avatar
Noname
Community Member
4 months ago DotsCreated by potrace 1.15, written by Peter Selinger 2001-2017

"That word-- I don't think it means what you think it means".

Popular on Bored Panda
Trending on Bored Panda
Also on Bored Panda