Get Premium
Dark mode theme is available exclusively for premium users. Learn more about the benefits of subscribing.
No fees, cancel anytime.

 Dark Mode Ad-Free Browsing Unlimited Content
 Ad-Free Browsing Unlimited Content Dark Mode
Join 1.2 million Panda readers who get the best art, memes, and fun stories every week!
Taking care of the environment falls upon each of our shoulders. Even a small step towards green living can positively impact our ecosystem. Recycling organic waste into compost is one such step that can benefit our beloved planet.
But people often think that composting is difficult. We assure you, it’s not. And the best part about it is that you don’t have to be a pro; anyone can do it! Hence, if you are intimidated by composting, there’s no need to feel that way.
Once you read this guide, you will understand how easy it is and wonder why you haven’t started earlier! So, let’s go step-by-step and understand what is composting and how to do it.
Image credit: Mary Jane Duford
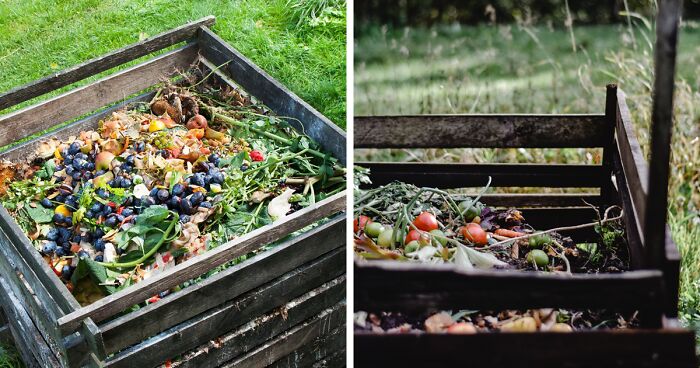
Composting is basically recycling for food scraps and plants. You toss in stuff like fruit peels, veggie leftovers, and yard waste, and over time, it breaks down into super nutritious dirt that’s awesome for helping plants grow.
As per the natural cycle, any growing organic matter must decompose. Composting just gives a gentle nudge to increase the speed of this process by creating a suitable environment for the decomposing organisms (bacteria, fungi, worms, etc.). Basically, composting provides a helping hand to create a cozy atmosphere so decomposing organisms can complete their work faster and in peace.
When the organic matter decomposes, it becomes a valuable fertilizer that looks like dirt but is extremely nutrient-rich. This valuable fertilizer is called compost. Farmers and green thumbs lovingly call it ‘black gold’ as it enriches the soil and is extremely useful for gardening, agriculture, and horticulture.
RELATED: Scientists Create Zero-Waste Packaging That Composts Just Like Vegetables
Image credit: sorich.in
Apart from giving you a valuable fertilizer, composting has other vital perks. Here are some of them:
Image credit: wallpaperflare.com
Food scraps and yard residue are major components of our daily waste. When they end up in landfills, wasted food can generate powerful greenhouse gasses like methane that negatively impact the environment.
According to the U. S. Environmental Protection Agency (EPA), wasted food causes 58% of methane emissions from public landfills. However, using food scraps and yard residue for composting can help reduce methane emissions and personal food waste.
Image credit: Eva Bronzini
Compost contains three essential nutrients: nitrogen, phosphorus, and potassium. They are vital for the healthy growth of garden plants. Using compost is much better than opting for chemical fertilizers, as compost improves the soil’s health and the crop’s productivity. It can also break the compacted soil and improve the soil structure, reducing the risk of erosion.
Image credit: kaarelp2rtel
The Journal of Soil and Water Conservation states that adding organic matter to the soil can help retain moisture. With compost, gardeners and farmers don’t have to constantly water the plants and crops as compost helps preserve moisture.
The right organic matter or ingredients play a crucial role in composting. So, here is the complete list of what you can and can’t compost. Check it properly before you start composting.
YES ✅
NO ❌
*These organic materials might attract animals.
^Although you shouldn’t compost these organic materials at home, community composting facilities might accept them. Check with your local composting facility in advance.
Source: U. S. Environmental Protection Agency (EPA)
Composting can be done both outdoors or indoors, depending on the available space, type and amount of waste, and the time you can dedicate to it. When you compost at home, you get all the benefits right on your doorstep. Sounds highly convenient, doesn’t it? Well, if it has piqued your interest, let’s learn how to make compost in your own backyard and enjoy its benefits.
First, it’s important to distinguish that there are two major types of composting for your backyard: cold/passive composting and hot/active composting.
Cold/Passive composting: Cold composting is a slow and primarily anaerobic* process that doesn’t require much effort or maintenance from your end. It’s your go-to process if you have less waste and less time. However, this process might not reach the required temperature to eliminate the pathogens during decomposition. Due to this, your compost might contain some residual harmful pathogens.
*Anaerobic refers to the process where the decomposing organisms can live without air or oxygen.
Hot/Active composting: Hot composting is a faster, controlled, and aerobic* process that requires proper attention and management. It requires the appropriate balance of air, water, carbon, nitrogen, and the right temperature. If everything is balanced correctly, the high temperature will destroy harmful pathogens, giving you the perfect compost.
*Aerobic refers to the process where the decomposing organisms need air or oxygen.
Although hot/active composting requires active management, it’s typically faster, kills pathogens and weed seeds, and retains more nutrients. Hence, it’s often considered more advantageous. Thus, let us guide you on how to manage this type of composting:
Image credit: Trish Walker
Carbon-rich materials (“browns”), nitrogen-rich materials (“greens”), air (oxygen), and water (moisture) are essential for the decomposing organisms. Carbon is present in all compostable materials. The trick is to balance it with the right nitrogen ratio and an adequate air and water supply; and voila, the best-quality compost is ready at your fingertips! Two to four parts brown materials to each one part green materials is the perfect carbon-to-nitrogen ratio for your compost pile.
Nitrogen is one of the fundamental and essential elements for the life and development of plants and animals. Fresh organic materials or greens often exhibit a higher nitrogen-to-carbon ratio. The right amount of nitrogen in your home compost pile will ensure faster growth and reproduction of the decomposers. Some household greens include fruit or vegetable scraps or coffee grounds. Use a closed container to store them in your kitchen.
Note: Too many greens might create a slimy and stinky pile. To avoid that, don’t go beyond the recommended ratio.
Carbon is the essential food that keeps the decomposers alive while they do their work. Brown plant materials exhibit a higher percentage of carbon. Some common browns include dry leaves, twigs, and branches. You can keep an area outside to store them.
Image credit: SuSanA Secretariat, CC BY 2.0 DEED
Consistent aeration will create an aerobic environment for the decomposers to work quickly. For an ideal air flow, ensure all the materials are broken or chopped into small pieces and layered into a pile that you turn regularly. During summers, turn your pile at least once a week. Come winter, you can reduce it to once every three or four weeks. Aeration also helps in reducing the odor.
Ensure your pile is as wet as a wrung-out sponge to maintain moisture. In case of a dry pile, you can add a little bit of water. However, if the pile gets too wet, it might create an anaerobic environment for the decomposers, slowing the process. In that case, just add carbon-rich browns.
Image credit: pxhere.com
When the materials decompose, the compost pile’s temperature will rise, particularly at the center. The temperatures of a well-maintained pile can peak up to 130° to 160°F. High temperatures accelerate the aerobic composting process and kill lingering pathogens or weed seeds. If the pile’s temperature doesn’t rise, add some greens and turn the pile.

Image credit: Alan Levine
A 3-foot cube is a perfect size for a backyard pile. The central decomposers won’t get enough air if the pile exceeds five cubic feet. Your compost location should be dry and shady with good drainage so it doesn’t get too soggy during monsoons. The shaded spot will keep the pile from getting too dry during summer, so you don’t have to water it constantly. A spot with direct sunlight during winter is also ideal.
Image credit: Maja Dumat, CC BY 2.0 DEED
Step 1: Build or buy a compost bin and determine its location.
Step 2: Start your compost pile by adding a four to six-inch layer of browns. This base layer will elevate your pile and help absorb extra liquids while allowing proper air circulation at the pile’s base.
Step 3: Start layering your greens and browns in the right ratio (the volume of browns should be twice or thrice for each volume of greens). Keep the food scraps covered and buried with around eight inches of browns.
Step 4: Examine the pile for maintained moisture, aeration, temperature, and odor. Make adjustments and additions as necessary.
Step 5: Occasionally, turn and mix your compost pile to speed up the decomposition.
Step 6: Mixing or turning will no longer heat the pile after a while. When food scraps are no longer visible, let your pile cure or finish. Curing might take more than four weeks. After curing, the pile will reduce to one-third of its initial size.
Step 7: A properly maintained pile will turn into finished, ready-to-use compost in about three months. Sometimes, it might take longer than that. It should smell and look like fresh soil. However, if you notice any materials that didn’t break down, sift the finished compost.
Note: Ensure your pile is safe from flies, pests, and rodents. Use fly traps to protect your indoor compost pile. Maintaining the balance of browns, greens, air, and moisture will keep deterring most pests. To prevent animals from accessing the pile, use a lid and a floor, and avoid adding meat, dairy products, or greasy food.
You can pick the right compost bin depending on the amount and type of organic material you intend to compost, as well as the space available. Here are the most common types of compost bins:
Buy Open Compost Bin by GEOBIN
Buy Closed Garden Compost Bin by EJWOX
Buy VIVOSUN’s Outdoor Tumbler Compost Bin
Buy iDOO Electric Compost Machine
If you are looking for cheaper bin options for composting, here are a few DIY hacks you can try!
DIY Idea #1. Upcycle your old products like garbage cans, wine crates, plastic bins, and wooden dresser drawers into compost bins. Ensure you drill proper holes for airflow and drainage. However, the holes should not be so large that rodents can enter the bin!
Image credit: homemadecatalog
DIY Idea #2. Using wooden pallets, you can create an affordable bin for permanent composting. Use hardware to keep the pallets together. You can make it close or open and use it for hot or cold composting.
Image credit: beckches
DIY Idea #3. Another budget-friendly option is to drive wooden posts into the soil and wrap the posts using wire fencing. Depending on the amount of compost, you can always change the size of this open compost bin.
Image credit: makerscorners
Worm composting, aka vermicomposting, is another composting process that works indoors or outdoors. This process requires low maintenance and, when done properly, gives a nutrient-rich vermicompost.
It requires bedding material (dry leaves, straw, shredded paper, or shredded cardboard), worms, food scraps, and, of course, a bin. You can either build your own bin or buy one. Here are the steps for vermicomposting:
Step 1: Determine its location after you build or buy a bin. If you keep it outdoors, keep it warm with blankets during winter. The worms thrive in temperatures 59° to 77°F. However, if you give them a minimum of four inches of bedding, they can endure temperatures from 32° to 95°F.
Step 2: Once you place the bin at the fixed location, start with the bedding. Take dry leaves, non-glossy paper, or cardboard and shred them. Soak these materials for ten minutes, then wring them out. It should feel like a moist sponge. Fill the bin almost halfway with this moist bedding and top it with a fistful of soil.
Step 3: Purchase ‘red wriggler’ worms (Eisenia fetida), which are ideal for vermicomposting. Initially, place around 1000 worms on the bedding.
Step 4: Give some time (a day or two) for the worms to settle into the new environment. Then, you can start feeding them with small amounts of fruit and vegetable scraps, crushed egg shells, coffee grounds, paper filters, and paper tea bags (remove the staples). Don’t feed them citrus fruits, greasy or odorous food, dairy products, pet waste, or bones.
Step 5: Cover the food scraps with two inches of bedding every time.
Step 6: Once the worms start reproducing, you can increase their feeding amount. However, ensure they have eaten the previous food scraps before giving them new food.
Step 7: You can harvest the vermicompost within three to six months and use it immediately, as it doesn’t require curing.
Image credit: EcoDruid
Burying your organic materials directly into the soil is called trench composting. It’s probably the easiest composting method as it requires no maintenance. Once you bury the organic matter, the microorganisms and earthworms take care of it without an intervention from your end. Trench composting enables the nearby plants to develop a root system that conserves water.
As the waste is underground, it doesn’t stink. You can do trench composting any time of the year, provided that the soil remains manageable. As you bury the waste deep under the ground, you can even compost small volumes of cooked food waste like meat, grains, and dairy products. Unlike the other composting methods, this one is unlikely to attract animals and insects.
Here are the easy steps to start trench composting today:
Step 1: You can’t harvest the end product in trench composting. So, pick a spot where you want the nutrients to enrich the soil. Avoid digging next to established root systems, as this could harm plants that grow there.
Step 2: After choosing an ideal location, take a shovel and dig an elongated hole of around 12 to 24 inches.
Step 3: Ensure your organic waste is moist enough and place it in the hole.
Step 4: Cover the hole back with the soil and mark the spot so you won’t compost there again.
Step 5: If you live in a dry region, maintain moisture by watering the soil on the trench whenever necessary.
Note: Like all cold composting methods, trench composting is slow. It’s not ideal for ongoing composting as it requires digging your yard regularly. It also takes up a lot of space as you can’t compost in the same spot twice. Moreover, you can’t plant anything above the trench top as the soil sinks during decomposing.
Image credit: WhyIIzHere
Unfinished compost can potentially damage the plants and attract pests and animals. Only cured compost, which is finished and ready for use, ensures optimal benefits. Finished compost will be crumbly and look and smell like fresh soil with a dark and rich color. Here’s how you can use it:
Note: Old compost might lose some nutrients. However, compost can never go “bad.”
Image credit: mindfulofmango
See, composting isn’t as difficult as you thought, is it? We hope you had fun learning what composting is, how to compost at home, and discovering the multiple ways to do it. Whether you are an environmentalist or a green thumb who enjoys organic gardening, we hope this guide made your mind a little clearer, your life a little greener, and your heart a little happier! So, are you ready to make this black gold?
If you start composting, let us know in the comments which method you use and whether you get the perfect end product. Also, share this with your gardener pals who think composting isn’t for them. Make their green living and recycling a little easier, too!
RELATED: 63 Recycling Facts Everyone Should Know
Cold composting is the easiest way to compost since it’s so low maintenance, but it’s got its downsides. It tends to retain harmful pathogens and is extremely slow.
Meat can be composted in trench composting as it gets buried underground. However, avoid composting it in an outdoor bin as it might attract insects and animals.
You can keep a regular compost bin in the sun. Just ensure to add a little water if it gets too dry. Moreover, if you live in a hot region, you can build a shade over the compost bin so it receives indirect light. Shaded spots are better for worms and vermicompost bins.
2Kviews
Share on Facebook


 No fees, cancel anytime


22
0