Moss Rugs: Complete Guide for DIY Moss Bath Mats and Rugs
In the interior, only one element can evoke such a serenity and natural aesthetic—moss rugs. The humble, unassuming moss plant and its visual inspiration have become a cherished ally in transforming living spaces into soothing, organic sanctuaries that look like traditional Japanese gardens.
With almost 15,000 varieties, moss is one of the most resilient plant species. It’s so cool that it can thrive without roots on virtually any surface and gather all its nutrients from the air. In addition to its visually appealing aesthetic, moss serves as an efficient air purifier that helps to remove pollutants and enhance the overall air quality.

Image credits: Soil and Margaritas.
With its eco-friendly appeal and timeless allure, moss has won the hearts of eco-conscious homeowners and design enthusiasts. Moss and moss-like textures have long been incorporated into design from ancient times to contemporary art, such as biophilic design—one of the trendiest interior styles.
As one of the forms of biophilic design, moss and its visual aesthetic offer a unique and refreshing perspective that challenges conventional decor norms. Moss green rugs, whether fashioned from natural moss itself or meticulously designed with yarn to mimic nature’s carpet, embody the essence of sustainable living.
As environmental concerns loom larger, these designs stand as a statement of creative eco-design. From stunning moss walls that bring nature indoors to unique rugs made from yarn (of course, inspired by moss-like patterns!) and natural moss bathroom mats that greet your foot with soft velvet—the possibilities are as diverse as they are captivating.
Types of Moss Rugs: How Can I Make My Own Rug?
It’s time to delve into the enchanting design of moss carpets, rugs, and mats! Regarding the history of classic rugs, it is considered that they originated in Armenia in the 7th century BC. With the long history of rugs serving warmth and comfort, their purpose is still the same and relevant today.
Despite all the domestic reasons, moss-inspired carpets can add stunningly beautiful colors to your place. In this comprehensive guide, you’ll find all you need about DIY moss rugs from yarn (aka pom-poms) and natural moss mats for your shower.
Whether you’re willing to craft a moss-inspired rug or a live moss mat for your bathroom, it’s possible! Don’t know how to make a moss rug? Don’t worry. We’ll provide you with a material list, all the steps, instructions, and caring tips. This is where your moss rug DIY journey begins!
DIY Pom Pom Rug: How To Make a Moss Rug?

Image credits: AbsoluteOngein.
The technique is relatively simple to create by hand, making it an accessible DIY project for craft enthusiasts. In a creative twist on this technique, some artisans, such as Alexandra Kehayoglou, make moss green rugs using pom poms, offering a unique fusion of natural wool elements in home decor.
Pom pom rugs, known for their soft and cozy appeal, involve attaching small, fluffy balls (so-called pom poms) to a base fabric. Moreover they come in various colors and shapes. Pom poms are a great way to add texture to your home, are easy to make, and require low maintenance. These handmade rugs add a unique and charming touch to any decor, so you may wonder how to make a moss rug with pom poms. Let’s look at how to create them!
Materials
To craft your very own moss rug from pom poms, you’ll need these essential materials on hand.
- Yarn of different colors and thicknesses. To compose a moss rug, opt for different green shades of wool yarn. You can also add grayish or brownish undertones to create a forest vibe. Use scrap yarn or buy new—it’s up to you! For a 24 x 42 inches (60 x 106 cm) rug, you will need about 15 skeins of yarn, depending on how much one skein weighs.
- A non-slip rug pad or plastic canvas. It will serve as the base of your rug. You can cut it to the desired size and shape it using scissors. If you want to extend your carpet, use a bigger rug pad.
- A large pom pom maker or a pair of toilet paper rolls. These will help you make the pom poms. A pom pom maker is a tool that allows you to wrap the pom pom yarn around it and tie it in the middle, then cut the loops to form a pom pom. You can also use paper towel rolls, cardboard circles, or your hands.
- Scissors to cut the yarn. You will need sharp scissors that can cut through multiple layers of yarn without fraying it.
- A needle and thread or a hot glue gun. These will help you to attach the pom poms to the rug pad or plastic canvas. A needle and thread are more secure and long-lasting, but it may take more time and effort. A hot glue gun is faster and easier, but it may not be as durable as sewing.
Step-By-Step Guide
It’s time to make one yourself! After gathering your materials to create a fabulous pom pom rug, follow these helpful moss rug DIY instructions. Let’s get started!
1. Make the pom poms. Use the yarn and the pom pom maker or the toilet paper rolls.
How to make a pom pom using a pom pom maker?

Image credits: Stephanie Klauck.
1. Wrap the yarn around one arm of the pom pom maker until complete. Cut the yarn and close the arm.
2. Repeat the same process with the other arm of the pom pom maker.
3. Cut along the middle of both arms using scissors.
4. Tie the yarn tightly and securely around the center of the pom pom maker.
5. Open the arms and separate the two halves of the pom pom maker. Fluff up your pom pom and trim any excess yarn.
How to make a pom pom using toilet paper rolls?

Image credits: Ayup_April.
1. Cut two toilet paper rolls in half and tape them together to form a circle.
2. Wrap the yarn around the circle until it is thick and full. Cut the yarn and leave a long tail.
3. Cut another piece of yarn and tie it around the middle of the circle, ensuring it is tight and secure.
4. Cut through the loops of yarn on both sides of the circle using scissors.
5. Remove the toilet paper rolls and fluff up your pom pom. Trim any excess yarn.
You can make as many pom poms as you want, depending on the size of your rug. To create moss-inspired, colorful, and textured rugs, choose yarn in different shades of green and make pom poms of various thicknesses.
2. Lay your rug pad or plastic canvas on a flat surface. Arrange your pom poms on top of it in your desired pattern. Decide how dense, thin, or thick you want the rug to be. You can use pins to temporarily hold them in place.
3. Make a pom pom rug. Attach your pom poms to your rug pad or plastic canvas. Do that using a hot glue gun or a needle and thread.

Image credits: Jasmin LeChel.
- Using a hot glue gun, apply a small amount of glue to the bottom of each pom pom and press it tightly onto the rug pad or plastic canvas.
- Using a needle and thread, sew through the middle of each pom pom and secure it with a knot.
4. Complete the design of your rug. Trim any excess yarn around your moss rug using scissors.
If you prefer visual demonstration or want to ensure you understood the steps correctly, feel free to watch the video of the pom pom rug tutorial.
Caring Tips
Seriously, pom pom rugs are so cute and oh-so-comfy to rest your feet on! While they may accumulate some dust and dirt over time, don’t worry—there are plenty of simple steps you can take to keep them looking and feeling super fluffy. Let us share some tips with you on how to properly care for and clean your beloved pom pom rugs.
- Shake your pom pom rug regularly to remove loose dirt and dust. You can also use a rubber broom or a vacuum cleaner to gently sweep the rug’s top.
- Clean up any stains or spills using a damp cloth and mild soap to spot-clean the affected area. Blot the area gently and let it air dry. Don’t rub or scrub the pom pom rug. This can damage the fibers.
- Wash your pom pom rug occasionally in cold water on a gentle cycle. Use a mild detergent and a laundry softener to keep the rug soft and fluffy. Don’t use bleach or harsh chemicals, as they can fade or damage the rug.
- Dry your pom pom rug on a low setting in the dryer, or lay it flat on a clean surface and allow it to air dry. Don’t wring or twist the rug, as this can cause it to lose its shape. Fluff the pom poms with your fingers or a comb after drying.
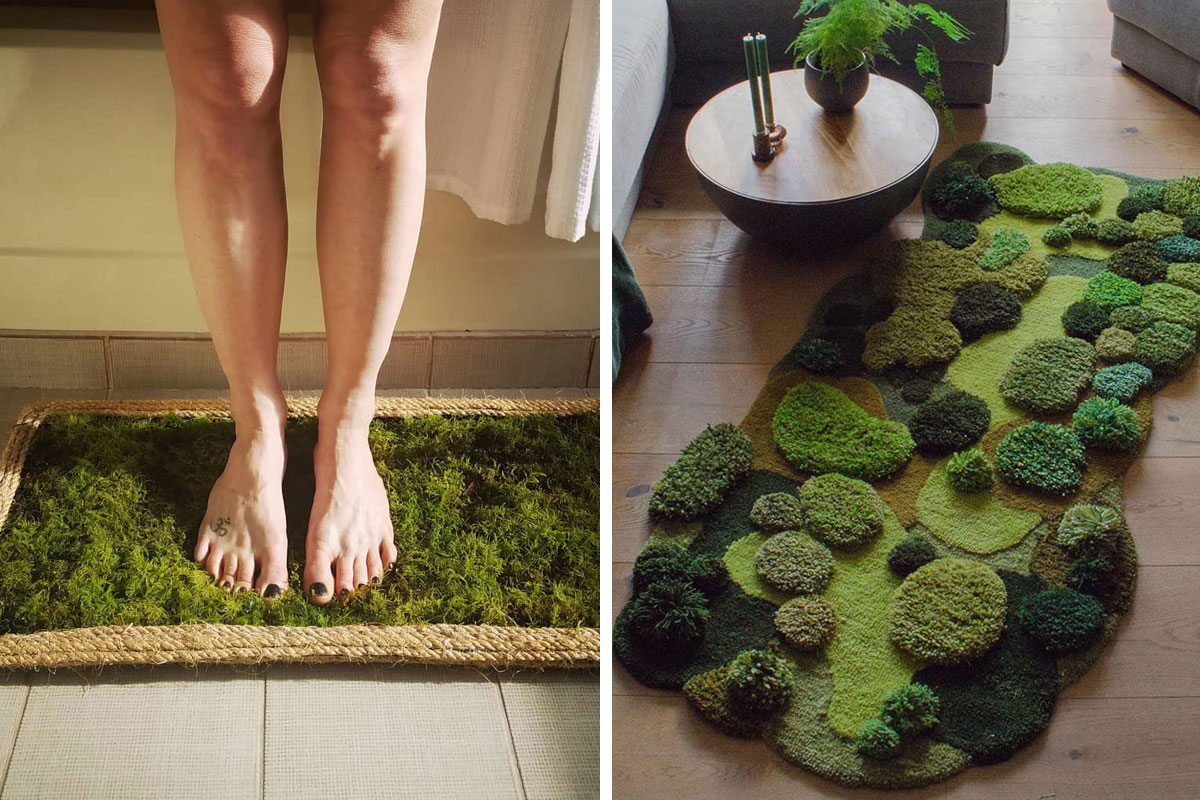
DIY Moss Bath Mat: How Do You Make a Moss Mat?

Image credits: thelivingnarrative.
Moss, with its lush and vibrant green appearance, has become a popular choice for those looking to infuse their living spaces with a touch of natural elegance. Many moss decor items incorporate light fixtures, such as night lamps. One more fascinating example of moss usage in interior design is stunning moss walls.
These decor elements offer a seamless blend of nature and interior design, transforming your home into a peaceful retreat. Whether a full-scale moss installation or a small accent piece like a mat, live moss adds an enchanting, organic element to your indoor decor. Let’s explore how to make a DIY moss rug, mat (or carpet, whatever you call it) for the bath, turning your daily showers into a refreshing, nature-inspired experience.
Materials
To craft the shower or bath mat using natural moss, you must have the following materials.
- A base to form a mat. Use a cork bulletin board that measures around 17 x 23 inches (43 x 58 cm). You’ll also need cork tiles 0.25 inch (0.6 cm) thick.
- Moss clumps. Opt for live or preserved moss of different types and colors, such as sheet moss, cushion moss, fern moss, or reindeer moss. You can gather them in your own yard or nearby areas, purchase them online, or at flower shops.
- Moss adhesive. You should use a strong adhesive, such as Moss-tac. This product is ideal for securing entire live moss clumps or adhering fragmented moss to various surfaces. It serves as a valuable binding and lubricating agent, facilitating the growth and transplantation of moss, whether it’s in whole clumps or from fragments.
- Non-slip shelf liner. It’ll help to ensure the mat won’t slide.
- Ruler or tape measure. You’ll need a ruler or tape to measure cork bulletin boards.
- Scissors or a knife. You’ll need scissors or a knife to cut cork bulletin boards to form the hollows for moss clumps.
- Waterproof glue. You’ll use it to glue cork tiles to a cork bulletin board.
- Marker. You’ll need a marker to trace around the moss shapes.
- Spray bottle. A spray bottle with water to keep the moss moist.
Step-By-Step Guide
Are you wondering how to make a lush moss rug using these preserved or live mossy plants? To create a fabulous moss bath mat, follow these step-by-step instructions after gathering all your supplies.
1. Measure and cut the non-slip shelf liner to the size of the bulletin board. Then, glue a shelf liner to the back of the bulletin board to prevent the mat from sliding.

Image credits: Lanium.
2. Once the glue has dried, turn the bulletin board right side up. Then, place cork tiles on top of the board to cover the entire surface inside the frame. You’ll likely need to cut a few tiles to ensure they fit perfectly.
3. Place the moss clumps onto the cork and arrange the moss pieces in your desired design. Trace the shapes of moss with a marker.
4. Remove the moss pieces and cork tiles from the bulletin board. Use a knife or scissors to cut out the shapes you traced on the tiles.
5. Place the cut cork tiles back on the top of the bulletin board and stick them in place using waterproof glue.
6. Sprinkle moss adhesive. It should cover each hole cut in the cork tiles. If you’re using preserved moss, you don’t have to use moss adhesive.
7. Place each moss piece into the corresponding hole on the cork tiles. While doing so, press/shape them to fit within the hole’s shape. If your moss pieces are dried, soak them in water for 15 seconds to add extra moisture. There’s no need to water preserved moss; simply glue the moss pieces inside each corresponding hole.

Image credits: Soil and Margaritas.
We recommend watching a moss mat tutorial. It’s helpful for those who prefer visual learning or want to double-check their know-how!
Caring Tips
Natural moss mats are an eco-friendly option and an extraordinary accessory suitable for any bathroom, at the same time serving the beauty of nature and serenity vibes for you to relax. However, they also require special care to keep them fresh and in good condition.
- Water your mat regularly to keep your moss moist and healthy. You can mist the moss with a spray bottle or soak the mat in water weekly. Before placing the mat back on the floor, ensure it has dried entirely by draining any excess water.
- Keep moss mat in a well-ventilated area to prevent mold and mildew. Avoid direct sunlight, heaters, fireplaces, and air conditioners.
- Ensure your mat can receive indirect sunlight because it needs some light to photosynthesize and grow. You can place moss mats in a window that receives about two hours of morning light or use artificial light sources such as fluorescent or LED bulbs.
- Occasionally, feed your natural moss mat with an acid-loving plant fertilizer once a year. You can also use a solution of water and buttermilk or water and powdered milk to maintain the acidity and provide nutrients to the moss.
Have Doubts About Moss Rugs? We’ve Got You Covered!
To conclude, we’ve gathered some frequently asked questions (FAQ) about a unique and intriguing addition to home decor—moss rugs. We’ll provide some insights to ensure you can confidently embrace the beauty, practicality, and eco-friendly charm of moss carpet, rug, or mat.
What Is the Best Rug to Not Show Dirt?
Non-greasy rugs can be pretty practical, depending on your lifestyle. Dark brown, multicolored, and neutral rugs are known to show dirt less, and moss rugs offer the same benefit! Both pom pom rugs and natural moss mats for showers are an exceptional choice for concealing dirt.
Their vibrant green texture naturally camouflages stains and dust, making them a practical and aesthetically pleasing addition to your home. Moss, with its densely layered and intricately patterned surface, can effectively mask everyday wear and tear.
What Is the Best Rug That Doesn’t Flatten?
Since the best rugs that don’t flatten are typically made from resilient materials like wool, pom pom rugs are a perfect choice. Wool can withstand wear and tear and resist crushing and matting. It also has an excellent bounce-back ability and can retain its shape and texture over time. Natural moss mats also exhibit good resilience, but you have to keep the moss moist and away from direct light to prevent flattening over time.

Image credits: mayonaka295959.
Why Are Hand-Knotted Rugs So Expensive?
Hand-knotted rugs are renowned for their high cost because skilled artisans spend extensive time and effort tying individual knots on a wooden loom, resulting in rugs of exceptional quality and durability.
These knots, intricately made by hand, determine the rug’s density, complexity, uniqueness, and a higher price tag. If you’re feeling creative, you can take a DIY approach and make a pom-pom style moss rug or natural moss mat yourself!
2Kviews
Share on Facebook


13
2