Get Premium
Dark mode theme is available exclusively for premium users. Learn more about the benefits of subscribing.
No fees, cancel anytime.

 Dark Mode Ad-Free Browsing Unlimited Content
 Ad-Free Browsing Unlimited Content Dark Mode
Join 1.2 million Panda readers who get the best art, memes, and fun stories every week!
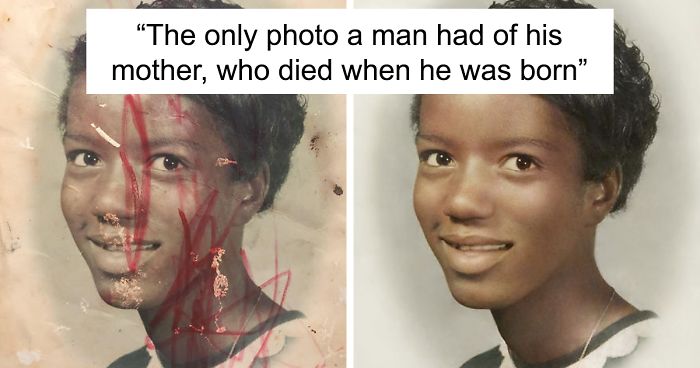
I occasionally take on requests to restore old photos in Photoshop. Some of these photos have suffered heavy damage, and I enjoy that particular challenge. Most are precious in one way or another to the client, and many times it’s the only photo someone has of a beloved or lost relative. I think it’s important to take one’s time when restoring such beautiful pictures. It’s easy to use shortcuts, but the best results come from meticulous care.
The original vintage photo is on the left. On the right is the image after reducing the contrast adjacent to the tears and cracks, then filling the cracks using sampling of adjacent pixels. This can be done using tools in Photoshop like “content-aware” fill or the healing brush. However, in areas where accurate detail is critical (such as faces), I prefer to do this step manually by eye, as it keeps the highest number of undamaged pixels intact.
The image on the left shows the layer of sampled greys used to fill the cracks and tears. On the right, the green indicates the areas of missing emulsion (data). As you can see, it’s not as much damage as you might suspect. When photo editing the cracks, I work in a separate layer and fill only the areas of missing emulsion. I do not paint over undamaged or intact areas of the photo, and I do not blend the fill into the surrounding areas.
Much of the loss is in areas that are what I call “non-critical”, meaning there’s not much in the way of identifiable features. Carefully dodged/burned transitions in these areas will flesh out the face. The yellow areas are where critical detail has been lost. These areas contribute significantly to a person’s appearance. Loss in these areas can be difficult in photo restoration. But again, the areas are fairly small in relation to the size of the head.
Another thing worth paying attention to is the “big picture” areas of damage. Scanning a damaged black and white photo will often leave highlights and shadows that can be misleading. The dotted lines indicate where the large tears were, and where I need to pay attention to shading, distinguishing what’s in the photo vs. shadows caused by the scanner lamp. Knowledge of anatomy becomes critical at this point, so you can balance shading in a way that’s consistent with the shape of the skull and flesh. I usually squint or blur (then undo), so I can see the shape better.
The image on the left is what I believe to be a pretty accurate reconstruction of the gentleman in this cool photo. I arrived at using these sampling techniques (manual and digital), and blending using the smallest dodge/burn brushes. From there, I created details in the features that were both generic and suitable within the context of other features (right). This is where knowledge of anatomy and illustration skills help in restoration. You may not always be able to achieve “historical” accuracy with old photo restorations, but the end result will be much closer to the actual appearance than using other repair techniques. Save your shortcuts and tricks for areas of an image that are not as critical as eyes, mouths, noses. Working pixel by pixel is tedious, but the results can be rewarding.
703Kviews
Share on Facebook
These are the best photo restorations I've ever seen. The first one with the grandparents blew my mind! And they're not only restoring photos, but memories as well. Incredible work!
The photo of the mother is especially touching! Oh I am so thankful for mine.
Load More Replies...I'm not bad with Photoshop and I've restored some photos but this is on another level. I wouldn't have even tried the majority of these, you explain it well and it make it sound easy but you are very talented. I can appreciate the hours you must have put in, great work.
Very good jobs. Here's one I did of my mother and sister. Image1-2-5...db8c7f.jpg 
These are the best photo restorations I've ever seen. The first one with the grandparents blew my mind! And they're not only restoring photos, but memories as well. Incredible work!
The photo of the mother is especially touching! Oh I am so thankful for mine.
Load More Replies...I'm not bad with Photoshop and I've restored some photos but this is on another level. I wouldn't have even tried the majority of these, you explain it well and it make it sound easy but you are very talented. I can appreciate the hours you must have put in, great work.
Very good jobs. Here's one I did of my mother and sister. Image1-2-5...db8c7f.jpg


 No fees, cancel anytime

")
")
")
")
")
")
")
")
")
")
")
")
")
")
")
")
")
")
")
")
")
")
")
")
")
")
")

1042
199