Does your house sound like a tap-dancing competition every time your dog walks across a hard floor? Overgrown nails are more than just an annoyance. Did you know that in severe cases, they can even lead to painful changes in the way your dog walks? As a vet, I see the negative impacts of untrimmed nails all too often – from scratched-up owners to posture problems for our canine pals.
- Overgrown dog nails can lead to painful walking changes.
- Desensitization is key before clipping a dog's nails.
- Choose the right tools for your dog's nail type and size.
- Trim nails so they don't touch the ground when the dog is still.
Learning how to cut your dog’s nails at home is a fantastic skill for any dog owner. It saves you time, and money and keeps your pup comfortable and healthy. It may seem daunting at first, but I promise, with some patience and practice, you’ll be a nail-trimming pro.
Let’s dive in!
The information provided herein is for informational purposes only. Please refer to our disclaimer for more details..
Preparing Your Dog
 Image credits: Hayffield L
Before you pick up the clippers, the most important step for making nail trimming a success is getting your furry friend used to have their paws handled. Let’s talk about how to get your dog comfortable with having their paws and claws in your hands.
- Desensitization: Start slow – this isn’t about the clippers yet, just about their paws. Over a few days or even a week, start by gently touching your dog’s paws when they’re relaxed. Give them a treat and offer lots of praise. Gradually work your way up to holding a paw and then each individual toe. When they seem comfortable with this, introduce the nail clippers. Let them sniff them and get used to the way they look and smell, rewarding them with treats throughout.
- Choosing a Time: Don’t try to clip your dog’s nails when they’re full of energy. Instead, find a time when they’re naturally calm – maybe after a nice walk or playtime. This will make everything less stressful for both of you.
- Finding a Good Position: How you hold your dog depends on their size and temperament. You might want them sitting in your lap, lying beside you on the floor, or standing next to you on a table (use a non-slip surface!). Experiment to see what feels secure for you both. If possible, have someone help hold your dog in place, especially if they’re a bit wiggly.
Pro Tip: Sometimes with fluffy pups, a little trim around the toes is necessary – it makes seeing the nails so much easier!”
Tools and Supplies
 Image credits: master1305
Choosing the right tools makes a world of difference when tackling those doggy nails. Choose the type that best suits your dog’s nails and your own comfort level. Always ensure your grooming tools are sharp, as this will help make clean nail cuts. Here’s what I tend to recommend:
Types of Clippers:
There are a lot of options for dog nail clippers, scissors, and grinders available in the market.
- Guillotine clippers are a classic choice, but they can be a bit tricky to use correctly. I like them for small dogs with thin nails.
- Scissor-style clippers are often easier to handle and a good all-arounder, especially for puppies or smaller breeds.
- Use pliers-style clippers, if your dog has thick, tough nails, a pliers-style clipper gives you extra leverage.
Nail Grinders
Grinders are a great alternative if your dog is noise-sensitive or has very thick nails. Just be aware, it takes a bit of practice for both you and your pup to get used to the vibration and sound. Before using a grinder, it’s definitely a good idea to chat with a veterinarian to get some veterinary advice.
Styptic Powder
This is an absolute must-have! Even the most experienced groomer can accidentally catch the quick (the sensitive blood vessel in the nail). Having styptic powder on hand stops bleeding fast. If you don’t have any, cornstarch or flour can help in a pinch.
Understanding Dog Nail Anatomy
 Image credits: Kristine Tanne
Understanding how your dog’s nails are built is super important when it comes to trimming them safely. Let’s dive a little deeper into the parts that make up a toenail:
- The Quick: The quick is often described as a pink, triangular shape inside lighter-colored nails. While that’s helpful, it’s important to remember that it’s filled with blood vessels and nerves. Think of this as the most sensitive part, kind of like the underside of your own fingernail or cutting your nail too short. Cutting the quick is painful and can cause bleeding.
- The Outer Toenail: Made of a tough substance called keratin, the outer toenail acts like a protective shell for the quick. It also gives your pup a better grip when they run, dig, or hold tasty treats! This part is the same as the portion of your own nail that you can safely trim.
Identifying the Quick in Light vs. Dark Nails
- Light Nails: The pink quick is generally easy to see, giving you a better idea of where to avoid cutting.
- Dark Nails: This is where things get trickier! If you can, carefully flip the nail over and look at the underside. You might see a softer, almost crumbly part that visually contrasts with the hard outer shell. That’s the quick extending further into the nail.
What Is The Ideal Length Of A Dog Toenail?
 Image credits: Igor Bumba
Ideally, your dog’s nails shouldn’t touch the ground when they’re standing still. They might touch when they walk – that’s because the way a dog’s foot works means the toes shift a bit with each step.
Long nails are more than just an inconvenience. They can:
- Increase the risk of painful breakage.
- Make walking more difficult, especially for senior dogs who might already struggle with grip.
- Contribute to joint pain from the altered way they have to distribute their weight
If you notice a nail curling, or you hear that telltale clicking on the floor, it’s definitely time for a trim!
Step-by-Step Guide To Cut the Dog Nails
Now that you understand nail anatomy and have the right tools, let’s get trimming! Trimming those nails requires a bit of know-how, especially for a wriggly, nervous pup. Let’s tackle this step by step:
- Position yourself and your dog comfortably. Start when your pup is relaxed. A calm dog makes this way easier (and safer for both of you!). Remember, regular nail trims are easier on you and your dog.
- Gently handle your dog’s paws. Dogs can be funny about their feet, so take a moment to let your pup sniff the clippers and get used to having their paws held.
- Pick up one paw. Start with a back paw – they tend to be less sensitive.
- Position your fingers for a good view. Put your thumb on the pad of the toe and your forefinger on the skin just above the nail. Make sure no fur is getting in the way of your view.
- Extend the nail. I like to gently push my thumb backward and my forefinger forward. This gives me a clearer look at the nail.
- Trim carefully! Clip only the very tip, straight across. It’s better to take off too little than too much – cutting the quick hurts!
- Don’t forget the dewclaws. These tend to grow a bit longer, so make sure to give them a trim as well.
- Watch out for that quick! It’s the pink part inside the nail. On dark nails, you may see a chalky white ring just before the quick. For an extra layer of safety, I trim a tiny bit at a time until I see that white ring appear.
Having the right tools makes a big difference. Sharp clippers or a good grinder are your best bet for a clean trim. For really long nails, I like to nip the bulk of the length with clippers, then smooth the edges with a grinder.
How To Gently Restrain Your Dog
Here are some comfy positions suitable for dogs of different sizes:
- Small Dogs: Sometimes, holding your tiny dog on your lap makes things easier. You can cradle them and gently lift each paw for trimming.
- Medium to Large Dogs: I find positioning myself beside or behind bigger dogs helpful. This way, I can easily reach their paws and gently hold each one in position.
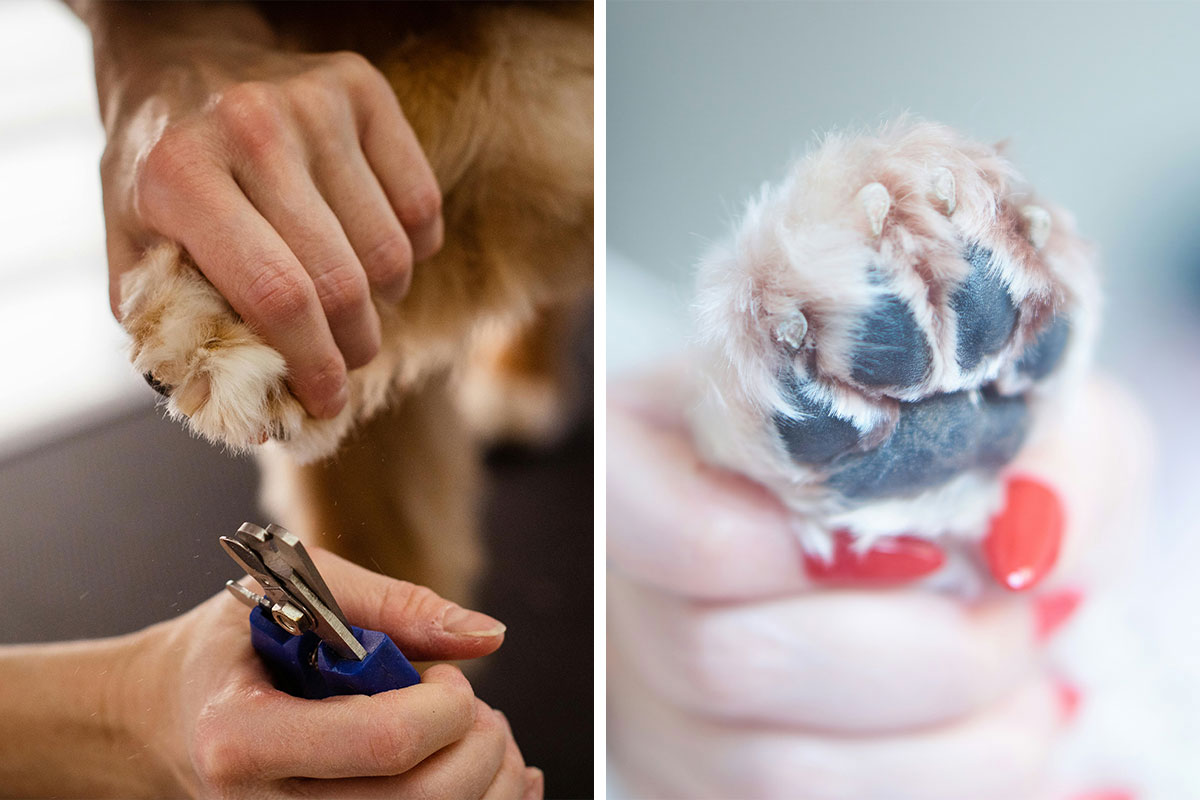
What If Bleeding Occurs?
 Image credits: alektas
Even the most seasoned groomer occasionally catches a nail a bit too short. Accidents happen, and although a cut quick can be startling and painful for your pup, it’s usually a minor situation. First things first, stay calm! Your dog picks up on your energy, so if you’re stressed, they’ll be too.
The key is to stop the bleeding quickly and minimize discomfort. Have some styptic powder, cornstarch, or flour on hand. Styptic powder is the best choice – it helps with the bleeding and contains a bit of numbing agent to ease the sting. If that’s not in your doggy first-aid kit, the cornstarch or flour will definitely help with clotting.
Just apply a pinch and hold for a few seconds – the pressure and the powder will do the trick. And remember, sometimes even a small cut can bleed a lot, so don’t panic if you see some red.
Got some blood in their fur?
A little hydrogen peroxide on a cotton ball is perfect for cleanup. It’s gentle and helps you see that the bleeding has indeed stopped. Of course, if the bleeding is significant despite your best efforts or your pup seems very uncomfortable, don’t hesitate to give your veterinarian a call. They’re there to help!
Healthy Paws, Happy Pups
Nail trims may seem daunting at first, but with practice and patience, you’ll be a pro in no time! Remember, short and frequent sessions are better than trying to tackle all the paws in one go – especially if your dog’s new to this. Treats, praise, and keeping your own cool are absolutely key. And if you’re ever unsure or things get a little tricky, your veterinarian and their team are happy to help you out with a demonstration or even the trim itself. Most importantly, with a little care, you can help keep your dog’s paws healthy, comfortable, and looking their best!
What do you think? Have you had any nail-trimming adventures with your own furry friend? Share your stories in the comments below, and if you found this guide helpful, don’t forget to pass it along to other dog parents!
2Kviews
Share on Facebook


0
0