Get Premium
Dark mode theme is available exclusively for premium users. Learn more about the benefits of subscribing.
No fees, cancel anytime.

 Dark Mode Ad-Free Browsing Unlimited Content
 Ad-Free Browsing Unlimited Content Dark Mode
Join 1.2 million Panda readers who get the best art, memes, and fun stories every week!
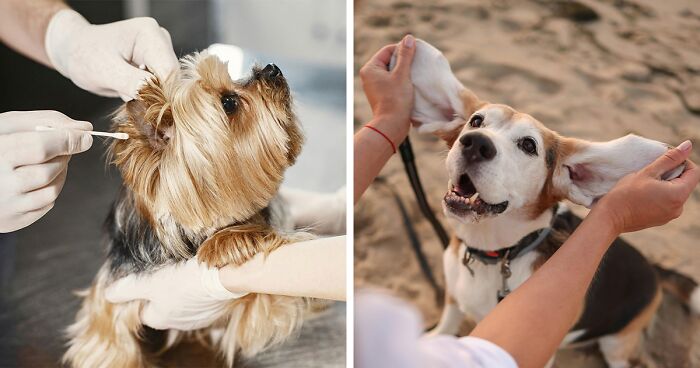
Grooming is not just a luxury; it’s a necessity for your dog’s health & happiness, and ear cleanings are a fundamental part of your dog’s routine. Imagine your pup, snuggled on the couch, head resting contentedly on your lap. Suddenly, their head shoots up, eyes wide, followed by a vigorous head shake and a frantic paw at their ear. That’s the ear trouble!
Do you know that ear problems are most common in dogs? And this is because their ears are shaped in a way that makes them get ear issues often. A study in the UK found that a surprising 7.3% of dogs get ear infections every year. Many things can cause these ear problems & some dogs keep having them all their life.
But don’t worry! While ear issues are common in our furry friends, with a little know-how, we can become masters of doggy ear care. No vet bills are necessary – although they’re always there for trickier situations!
So if you’re ready to learn the ins and outs of this vital grooming task, keep reading. This guide is your one-stop shop for understanding why dog ears get gunky, how to clean them safely and effectively, and when to call in the professionals. We’ll also sniff out the best cleaning solutions and answer all your burning questions.
The information provided herein is for informational purposes only. Please refer to our disclaimer for more details..
 Image credits: Valeria Boltneva
Understanding the root causes of dirt in your dog’s ears is crucial for effective entire ear care. Dog ears are shaped like an “L” and are longer than ours. This shape easily traps stuff like dirt, wax, water, and leaves. Because of their shape, dogs can’t clean their ears well – even if they shake their head or scratch.
Certain breeds, particularly those with floppy ears like Cocker Spaniels and Shih Tzus, are more susceptible to ear issues. Their floppy ears may trap more wax & dirt, and there’s less airflow, which means more infections. Additionally, dogs with hair in their ear canals have similar problems. The hair holds onto dirt and moisture.
Ear infections are also common in dogs with allergies. These allergies can be from things like pollen or certain foods like chicken eggs, wheat gluten soy, etc. Allergies make dogs itch, which weakens their skin and can lead to inflaming and infections, not just in the ears but in other body parts too. About half of the dogs with allergies are prone to ear infections. And for dogs with food allergies, over 80% of them have ear problems.
Other things that can cause ear issues in dogs include:
Older dogs often have ear problems too. This is because their skin gets thicker and they’re more likely to get infections. Diseases more common in older dogs, like Cushing’s disease & hypothyroidism, can also make ear problems more likely. As dog owners, knowing all this helps you keep your dog’s ears healthy. Regular ear cleaning is an important part, especially for dogs that get infections easily.
Determining how often to clean your dog’s ears depends on several factors including their breed, lifestyle & health conditions. Usually, cleaning your dog’s ears once a month is fine.
But dogs with floppy ears and those with long ears, like basset hounds, and dogs that love swimming or playing outside need frequent ear cleaning i.e., every other week, or maybe even every week.
Remember, cleaning their ears too much can cause irritation or infections. And always make sure to dry your dog’s ears well after they have a bath or go swimming. If you’re not sure how often to clean their ears – it’s a good idea to ask your veterinarian for advice.
 Image credits: Gustavo Fring
So before you start cleaning your dog’s ears, there are some important rules to follow and some mistakes you should avoid. This makes sure it’s a good experience for both you and your pet.
Following these tips will help you keep your dog’s ear cleaning safe, comfy & effective.
To clean your dog’s ears safely and well, you need a few key things:
Now that you understand the reasons behind dirty dog ears & have some cleaning tips – let’s go through the 11 easy steps to clean your dog’s ears. This will make the process easy and enjoyable for everyone.
Ensure the cotton ball isn’t too small to avoid it sliding deep into the ear canal.
By following these steps, you can clean your dog’s ears effectively at home. This keeps them healthy and comfortable. Remember, if you have any worries or questions about cleaning your dog’s ears, it’s always best to talk to your vet immediately.
Choosing the best ear cleanser for your dog is really important, especially if they often get ear infections. For such cases, a medicated ear-cleaning solution might be necessary. These special cleaners work by drying out and making the ear canal more acidic. This stops infections from happening as easily.
It’s really important to talk to your vet before you pick an ear cleaner. They can suggest one that’s just right for your dog, making sure it’s safe & works well. While you might see homemade ear cleaners online – it’s better not to use them. DIY mixtures often have things like vinegar, hydrogen peroxide, or alcohol. These can irritate or even damage your dog’s sensitive ears. Always go for products that your vet approves of. And remember, if your vet has given you ear medication for your dog, put it in clean ears so it works the best it can.
While most dogs require regular ear cleaning to maintain your dog’s ear health, however, if your dog appears to be in pain, it’s best to avoid at-home cleaning and seek professional veterinary care. Watch out for these signs that might mean your dog has an ear infection or other problems:
Remember, you can deal with mild dirt and wax at home, but these symptoms usually need a vet to check them out and treat them. And this way, your dog gets the right care they need to have their ears healthy.
As a responsible and caring dog owner, knowing how to clean your dog’s ear and implementing the right approach is vital for your pet’s health and comfort. Remember, picking the right ear cleanser is key. Also, knowing when to clean their ears and when it’s time to see the vet is important. So following the step-by-step guide we’ve given you will help you keep your dog’s ears clean & in good shape. And, taking part in this process of your dog’s care not only helps them stay well – but also makes your bond with them stronger. So, keep all these tips in mind and be confident and careful when cleaning your dog’s ears. A happy dog makes for a happy home, after all!
577views
Share on Facebook


 No fees, cancel anytime


-2
0