Get Premium
Dark mode theme is available exclusively for premium users. Learn more about the benefits of subscribing.
No fees, cancel anytime.

 Dark Mode Ad-Free Browsing Unlimited Content
 Ad-Free Browsing Unlimited Content Dark Mode
Join 1.2 million Panda readers who get the best art, memes, and fun stories every week!
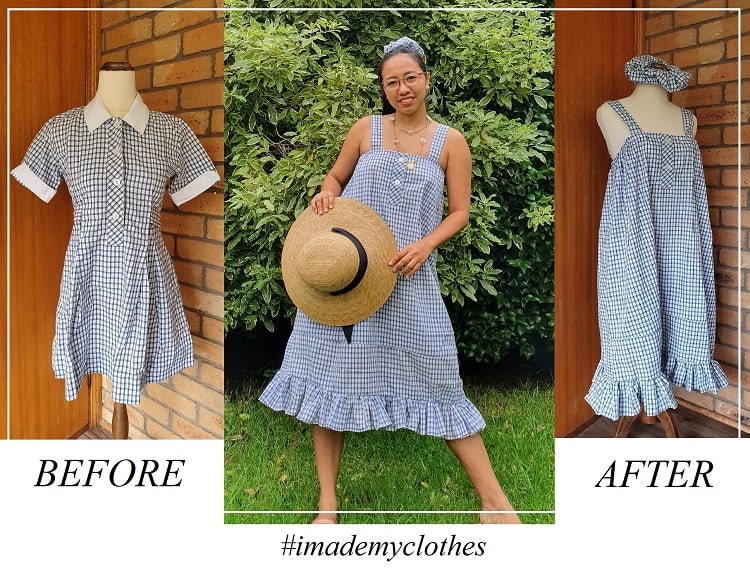
Hello everyone and welcome for another DIY or should I say thrifting session.
I know that some of you are now feeling weary of this isolation period but please hold on and just be patient. I was in that state a few days ago, so I thought about setting up my sewing machine back next to my workstation and look for something to (destroy) and bring back to new life!
A few months back, we had a huge back of outgrown school uniforms. Obviously, they are not mine but were outgrown by my boyfriend’s two daughters who studying in St Paul’s Anglican Grammar School – a private school which means expensive uniforms.
More info: forurbanwomen.com
Image credits: www.forurbanwomen.com
Image credits: www.forurbanwomen.com
Yeah, quite expensive as we just recently bought them new sets, about AUD$40 each dress.
I couldn’t have a heart of throwing them away. I tried to sell them second-hand via Facebook Market place at AUD$5.00, and only two pieces remain at hand. No one’s going to buy it coz summer is over, and a new set of uniforms are needed for the winter season.
Image credits: www.forurbanwomen.com
I checked the fabric, which is still in good condition, made of cotton, and would be easy to sew. I decided to keep them and grabbed my sewing kit and started unstitching them.
Image credits: www.forurbanwomen.com
Image credits: www.forurbanwomen.com
Image credits: www.forurbanwomen.com
Image credits: www.forurbanwomen.com
I cut the upper part of the dress and unstitched the folds to unveil the actual size of the fabric. Then I allocate a 1-inch on the upper part and stitched them. This is where I will insert the elastic (or garter) as support.
Image credits: www.forurbanwomen.com
Measure the elastic first based on my size surrounding my chest area. Then I insert it to the upper hem that I made.
Image credits: www.forurbanwomen.com
The school uniforms have this belt at the back which I unstitched and turn it as sleeves for the new dress.
Image credits: www.forurbanwomen.com
Then I grabbed the other dress, cut them in length and created ruffles to make my dress a bit longer below my knees.
Image credits: www.forurbanwomen.com
Image credits: www.forurbanwomen.com
Using the leftover fabrics, I created a huge scrunchy to paired with this newly thrifted dress.
Image credits: www.forurbanwomen.com
Image credits: www.forurbanwomen.com
I hope you guys enjoy my thrifting tutorial!
I still have other old school uniforms waiting to be thrifted so stay tuned!


 No fees, cancel anytime


2
0