ADVERTISEMENT

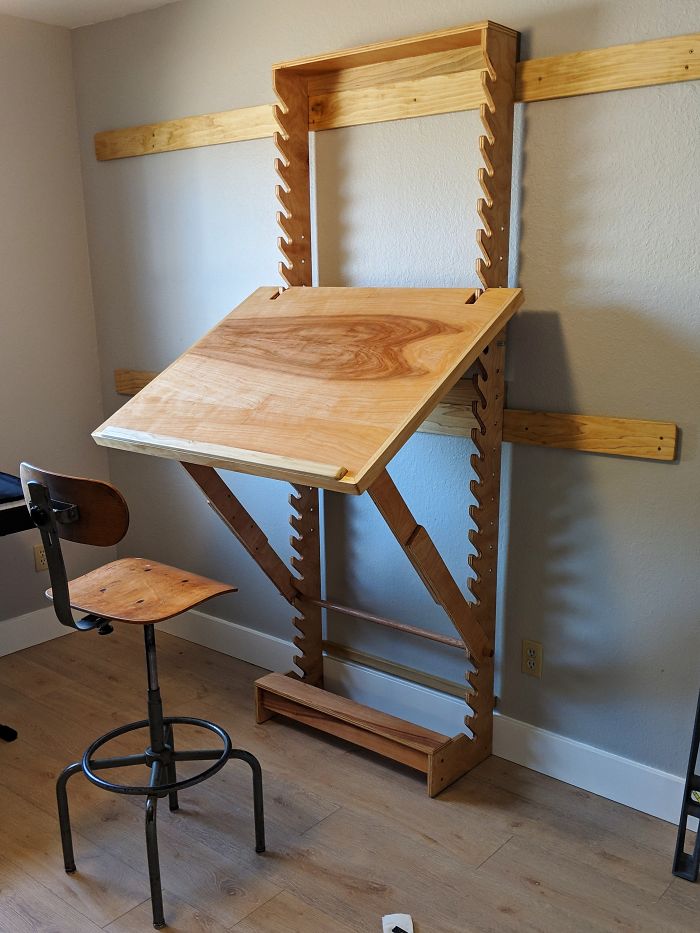
I built a desk for doing my artwork. It’s adjustable so I can use it as a standing or sitting desk and lay it flat or angled. I took design cues from a bunch of different desk images I found online, but I mainly copied Nathan Frey’s Frey Desk. The materials cost about $160-$180. I used a circular saw, jigsaw, corded and battery drills, orbital sander, Kreg pocket Jig, screwdrivers, carpenter square, ruler, and clamps.

More info: Instagram

First off, the finished product. Adjustable art desk with French cleat wall mount.

I modeled the desk in Blender so I could experiment with design variations and create a materials list.

I placed as many pieces as I could inside the dimensions of a 4x8ft plywood sheet (3/4in thick), then I had the sheet cut into three main pieces at Lowe’s so I could fit it in my car. I did all the smaller cuts at home with a jig saw and circular saw.

I drew the outline for the main rack spacing; they were one inch slots space three inches apart center to center and at a 45° angle. If I did this again I think an L shape or curve would have worked better than a 45° angle at keeping the rod locked in place (more on this later).

ADVERTISEMENT
ADVERTISEMENT

Since I don’t have a table saw, I cut the main two rack pieces with a circular saw and used a metal guide to keep it straight. Other rip cuts were made by clamping another piece of wood down to the plywood as a guide since the metal guide wasn’t long enough.

I clamping the two pieces together to insure the slots lined up and so I wouldn’t have to drill as many holes.

The first hole was a mess. I used a cheap drill bit that made the hole 1/8 bigger than it was supposed to be, and it made an ugly blue skid mark. I also wasted time making pilot holes, which was a bad decision because the new drill I bought didn’t need them and the holes made it impossible to keep the drill bit lined up.

The new drill bit was night and day better than the flimsy one. Faster and accurate. I drilled a hole in a scrap piece of plywood and used it as a jig to line up the drill bit. Also, my friend’s wired drill worked so much better than my battery powered one.

ADVERTISEMENT
ADVERTISEMENT

26 holes later, I unclamped the two pieces and finished the straight parts with a jigsaw.

The rough cut main pieces. I started to get really excited at this point.

Sanding this was a pain. My orbital sander was great for the flat areas, but I did the grooves by hand.

Lining up the pieces for the rack. I used screws and wood glue to attach the pieces.

It stands! So much joy at this point. I will probably only use it mounted to the wall, but I drilled some holes in the feet so I have the option to bolt a free standing base in the future.

ADVERTISEMENT
ADVERTISEMENT

Now for the desk top. I placed the rough cut boards to figure out how much I needed to trim. I spent many hours over the whole process staring at each stage making sure I didn’t make a mistake, and then staring more trying to figure out how to fix the mistakes I inevitably made.

After cutting some notches in the desk top and drilling pocket holes with a Kreg jig, I attached some 1×2 (.75×1.5inch) trim pieces around the edge to hide the plywood layers. I attached them with Kreg screw and a lot of glue.

Close up of the trim corner. I didn’t have long enough clamps to hold them in place but I think it turned out okay without them.

Attaching more support pieces on the underside. I wanted the desk to feel sturdy. I probably over did it. I don’t know what I’m doing so I just used a lot of screws and glue.

ADVERTISEMENT

I was able to clamp this part. I don’t enough clamps so I had to do them one at a time and wait for the glue to dry a bit.

Missing a few photos but here’s all the other pieces attached on the underside of the desk top.

I used a 1 inch dowel for the back attachment, and 1/2 inch bolts and washers to attach the arms. At this stage I just clamped the arm pieces so I could confirm the length was correct.

Woohoo! It looks like a desk! The step ladder is there to keep it from falling over. Also, I discovered that when the desk is set at shallow angles and you push down on the front, the back dowel pops out of the rack slots and the whole thing collapses with a bang. It’s not a problem at steep angles. I think if the slots were steeper angles than 45°, or L shaped, or curved, then the dowel would have something to push against rather than popping out.

ADVERTISEMENT

Had to go back and drill holes for a safety pegs. I clamped that hole riddled board underneath so the thin finish layer of plywood wouldn’t chip when the drill punched through the backside.

With the arm length confirmed I glued, clamped, and screwed the pieces together. By the way, my knees felt so much better after I bought those knee pads. A huge work table would have saved my weak abs and back from hunching over. Oh well.

All sanded and ready for staining.

I chopped the dowel up into smaller pieces because I like the way that looks more.

I used a natural stain and sealer. It turned out more yellow than I wanted, but I guess in matches the chair.

Stained and sealed! I spent quite a bit of time hugging it, petting it, and just staring at it. I also added a pencil catcher at the bottom before I added the sealer. I just glued and clamped it.

The groove for the dowel.

I even like the plywood layers. I guess I didn’t need those trim pieces.

But I sure do like how they look. The pencil catcher is a little short (I keep dropping pencils) but I didn’t want to rest my wrist on anything tall or sharp. I have plans to make a side attachment for holding pencils, brushes, and ink bottles.

Next step was to attach the french cleat wall mount. I wanted flexibility on where I positioned the desk, and I plan to make some mounted shelves in the future so I have a convenient place to put my art supplies.

All lined up with the studs. I clamped them to the desk so I wouldn’t have to hold it up while screwing it to the wall.

Here are the safety pegs to keep the desk from popping out when you push down on the front. I just slid some bolts through for pegs and looped some leftover copper electrical wire around the dowel and the bolt. Nice and secure, but a bit of a hassle when I want to adjust the desk angle.

I attached a power strip underneath for my lamps and phone charger.

Horizontal mode. I probably won’t use it like this very much but at least I have the option.

All clean and tidy. It will probably never be like this again

Standing mode. Sturdy enough to lean on.

Sitting mode, because my feet get tired.

The finished desk with all my art crap on it. I added a foot stool so I could bend my knees when standing.

Plenty of surface area for big sheets of paper and multiple books. Much better than spreading out on the living room coffee table.