For this recipe, we’ve chosen a delicious spring-inspired delight, that even your five-year-old cousin can breeze through and you won’t have any trouble with it, too. And though it looks truly impressive, it is super simple to make. So, here we go!
Prep time – 15 minutes
Total time – 15 minutes
Step 1
Making Cookie Dirt


We believe that before making this dessert you’ve already checked the list of ingredients, so we’re going straight to the ‘Making Of’ part. Round up your Oreo cookies – we’ve used 8 of them, but you can use as much as you like or as many as you need for the portions that you wish to make. Eight of these cookies make enough chocolate dirt for about four desserts.
The easiest way to make the dirt is to put the cookies in a food-safe baggie, seal it and then have a go at them with a rolling pin. The dirt looks best when the crumbs are different in sizes and not pulverized completely.
Step 2
Chocolate Melts

After you’ve crushed your Oreos, the next step is melting the chocolate. Note that for this recipe you’ll need chocolate melts and not the actual chocolate, since the melts, as the name suggests, melt better, creating even consistency for decorating. The easiest way to liquify them is to pop the melts into a microwave using a microwave-safe bowl and then heating them for about a minute at 40% power. Slow and steady is the best way to go, as if overheated the chocolate melts will harden. If after a minute they’re still not thoroughly melted, pop them back into the microwave and do short 10-second bursts until you get the desired consistency. Also, we recommend using the orange-colored ones, but if you want to make your carrots purple or pink – go for it. Whichever color you choose you’ll need about a cup of the tablets.
Step 3
Coating Strawberries

Step 4
Decorating Strawberries

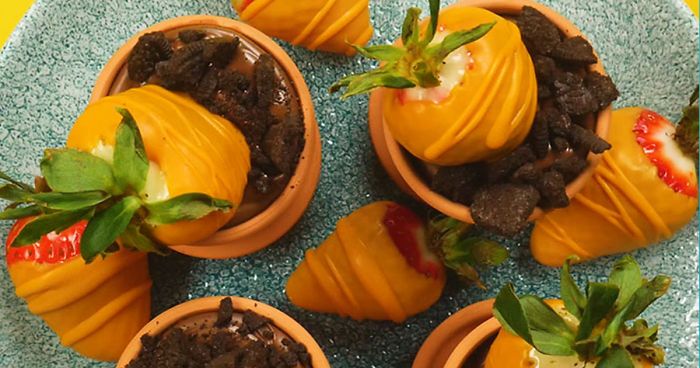
After bathing your strawberries in melted chocolate, place them on a metal rack to cool off and the coat to harden. To make them more carrot-looking, we’ve tried to recreate the peel effect by dripping leftover melts with a spoon. You can also use your fingers for dripping because we all know that licking your chocolatey digits is the best part of any cooking.
Step 5
Layering The Dirt


It’s dirt time! While the chocolate-coated strawberries are cooling, gather up your tiny flower pots. If you don’t have those at hand, you can also use small mason jars, teacups, glasses or even muffin forms. To make the dirt not only realistic but also tasty, we went by layering the Oreo dirt with peanut butter and some Nutella. So a layer of chocolate soil, then peanut butter, another layer of dirt and a layer of Nutella and then a finishing layer of cookie crumble dirt.
Step 6
Finishing Touches

List of ingredients for four portions:
Decoration:
Instructions:
Quick step-by-step video for making this dessert

Popular on Bored Panda


3
0