Everyone is eagerly anticipating the new Captain Marvel movie that comes out in March, 2019. So instead of waiting around impatiently, try out this brilliant Captain Marvel Cosplay Tutorial! You’ll stand out as the most dedicated fan if you put this together and wear it to the premier.
More info: costumesupercenter.com

What we know so far is that this movie is set in the 90’s which sounds perfectly nostalgic for a large slice of the Marvel Cinematic Universe fanbase. The creator of the movie Kevin Feige claims that much of this movie will take place in space among the battling Kree and the Skrull alien nations.

There are many different routes to take for a Captain Marvel cosplay, but this tutorial focuses on the bodysuit. Uncanny Megan is the artist behind this tutorial, and she did an amazing job with it!
Choosing the Bodysuit

She started off with the Simplicity 8286 bodysuit pattern and cut out the pieces for Bodysuit A in my size.

Then, taking the pieces she had cut out, she traced the front and back pieces onto newspaper and drew up new designs to feature Captain Marvel’s signature red and gold V. She repeated this step with the sleeve pattern as well.
She then took her fabric and cut out her newly drawn pattern pieces, as well the rest of the unaltered pieces.
When cutting out her self-drawn pattern pieces, she made sure to leave some seam allowance to make sure the full costume will still be the same dimensions in the end.

Next, she began making the base of the bodysuit, following the original pattern directions. This was done by pinning each piece together, right-side in, and sewing them in place with a zig-zag stitch.

Once the main part of her bodysuit was sewn together (ie: the torso), it was time to add the gold and red V. She did this the same way she attached the torso pieces together.
Next, she repeated the previous step and attached the gold and red designs to the sleeve bases.
She also decided to hem her sleeves with a line of red, to have a cute cuff and avoid any showing stitches.
To do this, She took two rectangles the same length as the end of her sleeves, folded them in half (right-side out) and attached them to the bottom.

For her next step, She added piping to the sleeve holes of the bodysuit. She did this first by using a sewing machine and a zipper foot, and then hand sewing to make sure it was attached as closely as possible. Once the piping was in place, She attached the sleeves.
Her next step was adding the zipper, which she did by pinning it in place and then sewing it twice. Once with a regular zipper foot and then another time, retracing her steps with an invisible zipper foot.

After the zipper was finished, it was time for the collar. Taking the regular collar pattern piece, she elaborated slightly by curving the edges. She then pinned and sewed it together following the pattern directions.
To make sure the collar would sit upright and stay closed, she also hand stitched some large clasps to the inside.
The finishing touch to the collar was sewing some small gold buttons into place!

After this, it was time to begin working on the bottom half of the suit. She started by closing the seam underneath my zipper and sewing the crotch pieces together.
Then, she took my leg fabric, sewed the pieces together, and began to attach the legs to the torso. This was done by placing each leg right-side out against the bodysuit, lining up the seam lines, and sewing it into place.
Once she had a full bodysuit sewn up, it was time for the star! She printed out a photo to use as a pattern, cut it out, and then cut out her fabric star in two halves.

To attach the star to the suit, she chose to use some Peel ‘n Stick sheets. The sheets weren’t quite big enough, so she had to cut them out in quarters instead of halves.
The last step was the belt. She made this using one very long rectangle of fabric, pinning it together right-side in, and sewing along the edge.
Once sewn, she flipped it back right-side out. Then, placing the seam in the center, she folded her edges inward, pinned them down, and sewed them shut.

For the medallion, she took a sheet of 4mm craft foam, cut out a circle, and then cut out a slightly larger circle in her gold material.
She hot glued the fabric down to the back of the foam circle and then also glued safety pins so it could be removable from the belt.
After she finished all her crafting, she ordered her last few pieces online. She got a few accessories from Costume SuperCenter.
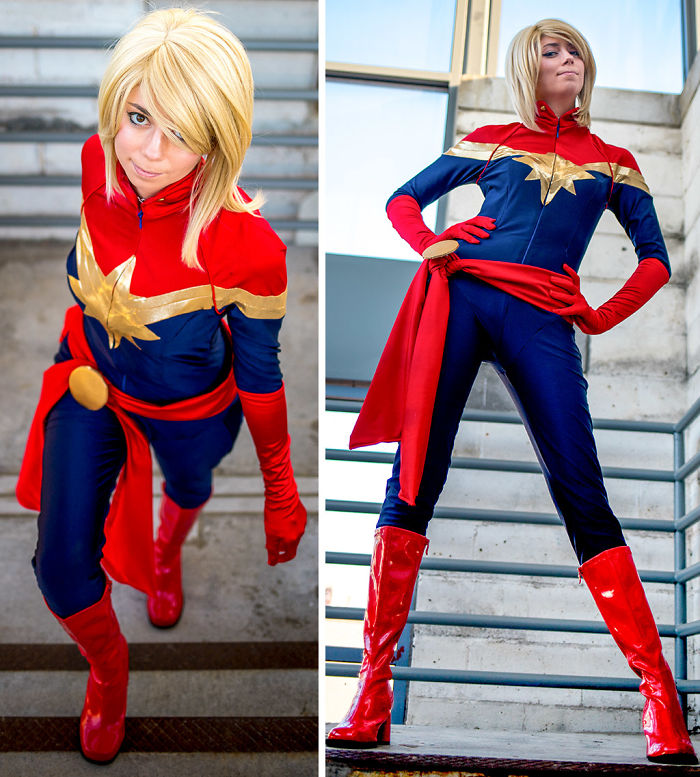
This is the result! Thank you so much for reading, and good luck! Share your results with the world!


3
0