Get Premium
Dark mode theme is available exclusively for premium users. Learn more about the benefits of subscribing.
No fees, cancel anytime.

 Dark Mode Ad-Free Browsing Unlimited Content
 Ad-Free Browsing Unlimited Content Dark Mode
Join 1.2 million Panda readers who get the best art, memes, and fun stories every week!
Here, I’ve detailed some pumpkin-carving hacks and tips that will allow anyone to carve a killer pumpkin, regardless of artistic ability.
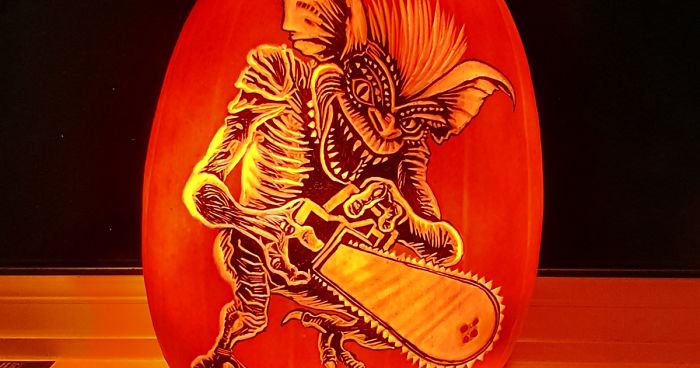
There are three types of pumpkin carving: cut-out, sculpting, and shading. Cut-out is what people are most familiar with. It involves cutting straight through the pumpkin to make a design. Sculpting is where you carve a 3D sculpture, much the same way you would carve wood or clay. Shading: this final method is what I specialize in, and what I will be detailing in this article.
This involves shaving the outside of the pumpkin to different depths allowing the varying amounts of light to make a design.
Check out my first Bored Panda article for more of my carvings.
More info: pumpkinfreak.co.uk | Instagram | Facebook
Image credits: yaketyyakyak
First of all, put down that kitchen knife or cheap 3-piece carving set instead of using wood-carving chisels or sharp clay loops. These will give much more control and allow for greater detail. Both are readily available on Amazon and fairly inexpensive.
If, like me, you like to draw, I’d advise sketching on paper first and using the transfer method below to put the design on the pumpkin, but if you haven’t got the artistic flair for that, you can head to a good pattern site like www.stoneykins.com and download a ready-made pattern or find an image you like and work off that (I do all three of these things). However, working directly from an image on a pumpkin can be tricky. If you select a simple image with good contrast between light and dark areas, you’ll make life much easier for yourself.
You can, of course, draw directly on the pumpkin with a marker pen, but if you have a drawing or image you want to carve, here are two methods to transfer the design:
Print off your design in the size you want, then stick it to the transfer paper with sticky tape, then to your pumpkin. Draw over the design, picking out the light and dark areas, and all the details you want, peel off the design and transfer paper, and like magic, it’s on your pumpkin.
Again, print off your design in the right size, place tissue paper over the design, and trace—I like to do this with a soft pencil, then tape the tissue to your pumpkin and trace over the design with a permanent marker. The ink will seep through the tissue and onto the pumpkin. Remove the paper and you have the design.
Get out as much flesh as you can and make the pumpkin wall where your design is thinner than everywhere else. 2 to 4 cm thick should do it—the thinner you hollow out, the brighter your design and pumpkin will glow, but be warned, the thinner you go, the quicker your pumpkin will rot.
If you want to give a better glow and make the design stand out, stop using candles; instead, use LED lights. Again, these are inexpensive and readily available! Put the light inside the pumpkin directed at where your design is.
Now you have your design on the pumpkin. It’s time to carve; you won’t be cutting through the pumpkin at all. Instead, use the chisels or loops to scrape away small amounts of the waxy skin layer and carve deeper on the lighter areas of the design. For darker areas, only scrape a very thin layer, or leave the waxy skin on—I like to add a black marker on the skin I’ve left intact to give more contrast.
Getting the light and dark tones can be time-consuming, I can spend 20+ hrs on this part, but with some time and patience, I’m sure you’ll end up with something you’re very pleased with.
Getting the light and dark areas or “values” is where my sketching hobby was useful. Having a basic understanding of how light and shadow behaves is really helpful. Here’s a video that explains the basics of “shading values.”
Using this “values” approach along with having the right tools and ability to get an accurate pattern on your pumpkin (plus, of course, the main ingredient: time and patience!) should result in some impressive results.
If you try this and found this article useful, I’d love to see what you’ve come up with. Please tag or message me your pumpkin carvings on social media @PumpkinFreakArt.
9Kviews
Share on FacebookThere is no such word as irregardless. This drives me to distraction to see and hear people who use this. The word is REGARDLESS. That is all nothing more to add. never never irregardless
Thank you I actually came into the comments so I could say this.
Load More Replies...Love the Anglra fish at the end! Are you a carpenter? This skill is amazing btw!
Thanks. No I'm not a carpenter, I draw a little but just really love carving Pumpkins!
Load More Replies...Dude this is sick! Plus I love the instructions since I kinda had an idea how people did these super cool pumpkins (like thin layers shaved off for value) but never really gotten specific instructions. Super cool!
Give it a go! I'd love to see what you carve if you do... tag my on social media @PumpkinFreakArt
Load More Replies...well this is an amazing work, there is a guy doing shirts about scary scenes like gremlins that are also amazing. but i love the scariest ones here, like the one of the bad gremlin https://www.etsy.com/es/listing/944869451/billy-gizmo-gremlins-cita-camiseta?ref=shop_home_active_11&cns=1
There is no such word as irregardless. This drives me to distraction to see and hear people who use this. The word is REGARDLESS. That is all nothing more to add. never never irregardless
Thank you I actually came into the comments so I could say this.
Load More Replies...Love the Anglra fish at the end! Are you a carpenter? This skill is amazing btw!
Thanks. No I'm not a carpenter, I draw a little but just really love carving Pumpkins!
Load More Replies...Dude this is sick! Plus I love the instructions since I kinda had an idea how people did these super cool pumpkins (like thin layers shaved off for value) but never really gotten specific instructions. Super cool!
Give it a go! I'd love to see what you carve if you do... tag my on social media @PumpkinFreakArt
Load More Replies...well this is an amazing work, there is a guy doing shirts about scary scenes like gremlins that are also amazing. but i love the scariest ones here, like the one of the bad gremlin https://www.etsy.com/es/listing/944869451/billy-gizmo-gremlins-cita-camiseta?ref=shop_home_active_11&cns=1


 No fees, cancel anytime


90
29