Fabric Stencil Project with Christmas Stencils
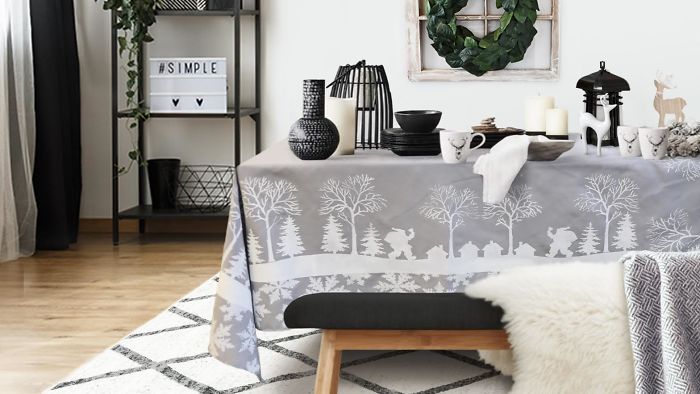
Happy Holidays to all Cutting Edge Stencils fans! It is the greatest time of year and the perfect chance to get crafty with stencil projects! You will be astounded to find out that our adorable Christmas stencils will be your life saver this season. Today we will show you the easiest and most festive Holiday Tablecloth project using our craft stencils for fabric stenciling! This DIY fabric stencil project will literally be the center of attention at your holiday dinner party! Let’s get stenciling!
More info: cuttingedgestencils.com

Let’s Begin!
You’ll start by laying out your tablecloth on an open and flat surface. This is because you have to iron out all folds and creases as best as possible! It will be easier to stencil with a smooth surface. After you decide which Christmas stencils you will use, you can measure out its placement. We have chosen to use the Merry Christmas Craft Stencil with a Snowflake Stencil border. Decide how you want each snowflake stencil to be laid out around the border and evenly apply blue painters tape so that the border remains consistent and straight.

Once you apply blue painters tape fully on one side, continue along the other sides of the tablecloth. Measure out the border so that it matches the previous placement exactly.

Apply the blue painters tape along the entire side!

After the border is placed along the entire tablecloth, you can begin stenciling! (For more tips to make your stencil project perfect, take a look at our Video Tutorials) Take your Merry Christmas Craft Stencil and spray a generous amount of Fabric Spray Adhesive to the back of the stencil and place it down flat on the tablecloth! Take blue painters tape and cover the “Merry Christmas” quote to create your desired look.

Take a 2″ dense foam roller and paint over your stencil with the fabric paint of your choice. For this project we used two of these stencils so we can flip the design without getting paint all over the fabric! Align the snow together to create an on-going landscape!

Continue stenciling your Christmas Stencil along the side.

When you get to the corner of your tablecloth, you will use the blue painters tape to cover any extra stencil openings that may overlap while stenciling on the perpendicular side.


As you turn the corner, cover the tree design with blue painter’s tape so the paint does not get over the previous stenciled parts!

Continue the fabric stenciling along the remaining sides and follow the same directions when going around each corner of the tablecloth with the Christmas Stencils to create your holiday tablecloth! Our Christmas stencil patterns are perfect for this project! What do you think so far?

Once complete, peal back the blue painters tape that created the border. You will see how amazing your fabric project is coming along!

Take your Snowflake stencils and begin filling in your border. Mix and match the different sizes and patterns to create your own unique design! You can play around with the stencils to make it as simple or as busy as you’d like!


After the spaces are all filled in, let the the tablecloth dry completely. Now you can finally decorate it for your holiday party and you can take pride in knowing that you have designed this yourself!


1
0