Get Premium
Dark mode theme is available exclusively for premium users. Learn more about the benefits of subscribing.
No fees, cancel anytime.

 Dark Mode Ad-Free Browsing Unlimited Content
 Ad-Free Browsing Unlimited Content Dark Mode
Join 1.2 million Panda readers who get the best art, memes, and fun stories every week!
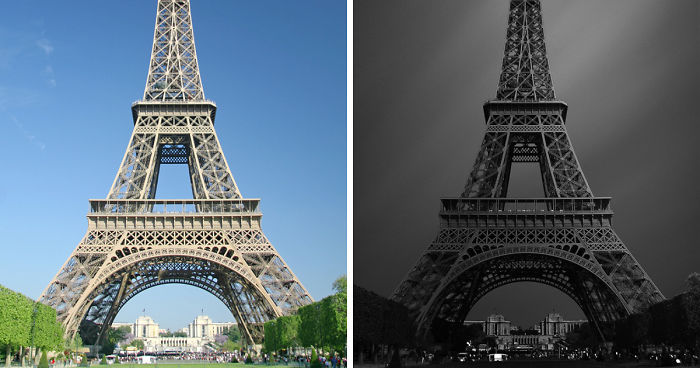
This architecture photography tutorial explains step by step how to obtain this dark black and white result in post-processing, since photography art isn’t only about composition and light, but also about editing.
More info: flickr.com
You don’t need to spend lots of time on clipping here at this stage of photo editing, it is undoubtedly the most challenging phase, and other tricks afterward will allow you to hide most imperfections from a quick selection.
A beautiful sky made with long exposure filter (i use the Lee big stopper for example), but if you are familiar with photoshopped images, it is quite possible to create one easily.
It’s essential to play with the different colors of the layers during photo manipulation to begin to give contrast to your image. For example, reds and yellows in this image lighten the Eiffel tower, and the blue darkens the background. (A little trick here is to duplicate your basic image – the one before the sky was removed – place this layer behind the mask of the Eiffel tower, and in « product » mode. This action will retrieve all the details of the edges, which can be lost during clipping. You can also delete a few dark areas of the Eiffel tower to bring up only the layer in product mode placed in the background).
Black layer in dim light mode to darken the background, without bringing out the grain – Adjustment layers: color balance or contrast light in a mask (to appear on the Eiffel tower only), or a white brush stroke in « soft light » or « inlay » make it possible to bring out the areas of the Eiffel tower in order to give the illusion in the edited pic of a more enlightened part than others. (Another tip here is to apply a black inner glow, in product mode, on the Eiffel tower, to erase the white smoothness that can appear when trimming, and become very visible with this dark background).
2Kviews
Share on Facebook
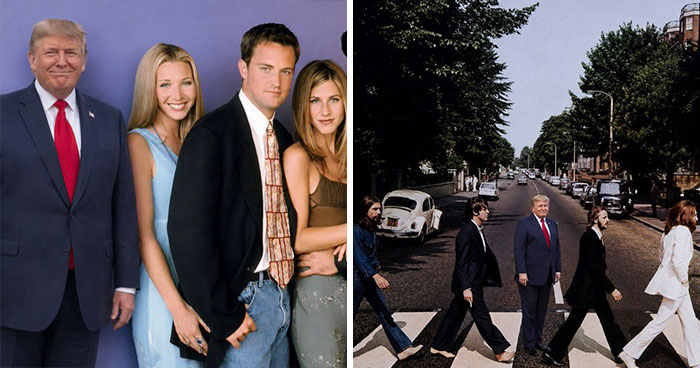
i feel like will smith looking at it during night in i am legend universe. calm and serene but also lonely.
i feel like will smith looking at it during night in i am legend universe. calm and serene but also lonely.


 No fees, cancel anytime


20
1