Get Premium
Dark mode theme is available exclusively for premium users. Learn more about the benefits of subscribing.
No fees, cancel anytime.

 Dark Mode Ad-Free Browsing Unlimited Content
 Ad-Free Browsing Unlimited Content Dark Mode
Join 1.2 million Panda readers who get the best art, memes, and fun stories every week!
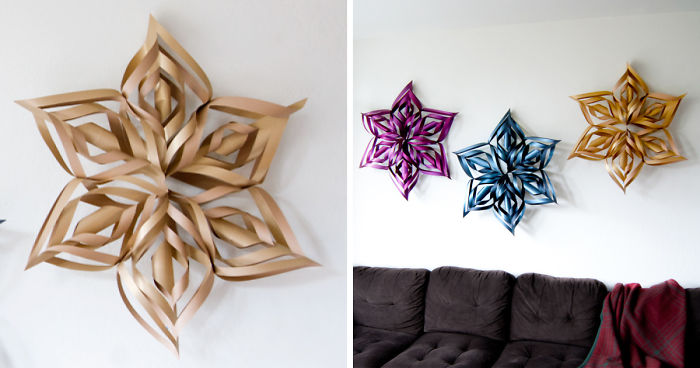
We spent Thanksgiving with family in Idaho, and my super awesome sister-in-law showed me how to make these ginormous paper snowflakes in just a few easy steps. I could barely contain my excitement when I learned how to make these snowflake decorations, and I couldn’t wait to get back home and share this with all of you! I have a small apartment, so I only made three of these DIY Christmas decorations, but if you have a house, these paper-crafted snowflakes will make for amazing porch decorations! Talk about Holiday curb envy!
So the first thing I did after getting back was hit my local Michael’s for my DIY project supplies (they had a sale, so I was in heaven, and each paper was only 25 cents)! You will need six 12 x 12 sheets of paper to make one snowflake so stock up. I would also suggest looking for a paper that is double-sided or has a nice contrasting color. I found that a lot of scrapbook paper is not dual-sided, and that will just not do for this craft (unless you like to mix patterns and solids, in which case go for it). Personally, I need a little Holiday glitz in my life, so I went with sparkly paper for my Christmas decorations. The back-sides of the paper are the same color, but in matte, so it all looks on point!
What you will need for these DIY Christmas decorations:
6 – 12 x 12 sheets of paper for 1 snowflake
1 – stapler
1 – bone paper folder (optional)
Scissors
More info: acharmingproject.com
You will need to make four diagonal cuts, 1 inch apart starting from the bottom of the right-hand side. The only thing that is absolutely IMPERATIVE is that you must cut upward from the side that is folded over. Imagine, if this were a book, then you would be making your cuts on the side of the binding, not the pages. Also, make sure to cut up to 1/2 inch from the edge on the left.
I would suggest connecting the sides that have three strips with the sides that have two strips. I also found that it’s best to connect three pieces together, then connect those to another set of three. But do whatever works for you – don’t stress over it, it’s just an easy DIY snowflake :)
18Kviews
Share on Facebook
What a lovely idea. I am sure that one could also use this design to make a light shade as well.
I have to make this!!!! Michael's here I come! Would be an awesome idea in a smaller size for a gift instead of a bow, too!
What a lovely idea. I am sure that one could also use this design to make a light shade as well.
I have to make this!!!! Michael's here I come! Would be an awesome idea in a smaller size for a gift instead of a bow, too!


 No fees, cancel anytime


153
4