80k Instagram Followers Later, Here’s My #1 Advice For Better Photos (with Befores & Afters)
Off the bat you should know that this is not an article about how to game Instagram followers. I possess no secret intel there. The main reason I have the numbers I do is because my personal account (instagram.com/kellyalack) has twice been featured on Instagram’s suggested-user list. That, plus a couple articles about it and regrams by big brands including Design*Sponge, Steven Alan, and Coastal Living mag, have accelerated my follower count. BUT…none of this would’ve happened had I not been posting halfway decent photos. And that’s what this article is about.
5 quick, relevant facts you should know:
1. I wasn’t an early Instagram adopter. I put up my first shot (more on it below) in mid-2013ish.
2. I have no inside contact at Instagram, nor do I have insight into their selection process. I wish I did, then maybe my company’s account (instagram.com/spot) would have more followers.
3. I am no “photographer,” and have received no proper training outside the one film-photography class I took years ago in college.
4. I’ve shot 99% of the photos on both my account and Spot’s account with my iPhone, NOT a camera.
5. I work pretty much nonstop during the week, so I take most of my shots on weekends, making what I can out of limited shooting time.
While there are overarching tips I could share—shoot during the day, pay attention to your background, avoid overly cluttered compositions—my #1 secret (or crutch as true photographers might call it) is mastering photo-editing tools.
Personally, I use Snapseed and VSCO. But there are others: For example, my good pal Rosie D’Argenzio, who heads up social for One Kings Lane, uses Afterlight. I’m going to talk general photo-editing tips here, not review apps, because the photo-manipulation levers they offer are relatively similar.
More info: blog.spot.com
You want your images to look like this:
")
A well-lit, visually balanced snap of Poot’s Cactus Nursery, near Manteca.
Not like this…
")
Say hello to my first-ever Instagram photo. Note the border and hardcore filter. I’ve learned a trick or two since then.
Now for the good stuff. My BEFORES and AFTERS:
")
Before: Dull, dreary, and lifeless. After: Colors are more saturated and textures are visible.
")
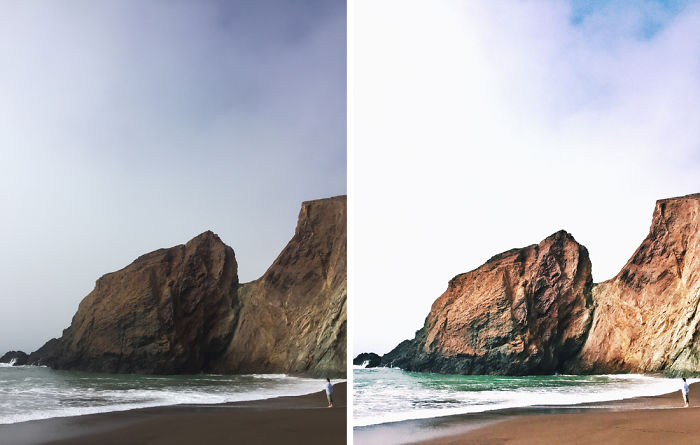
Before: Though the shot obviously has good bones—those copper cliffs are pretty stunning—it winds up being dark and difficult to visually “read.” After: The multi-tones of the cliff-face come to life and make the picture.
")
Before: The yellow-y tones of interior lighting are like the visual equivalent of nails on a chalkboard to me. I cringe. They make rooms appear blah at best, dirty at worst. After: If you up the contrast and cool down the light spectrum, the photo ends up being much crisper and cleaner.
")
Before: The blues in the sky are fine and the field is pretty enough, but we can do better. After: Now, the sky pops and the hayfield appears to glow.
")
Before: The tablescape looks washed out, shadow-y, and less than inviting. After: Exaggerating the contrasts and brightening the photo makes the silverware glisten and the food take on a wish-I-was-at-that-table glow. (Pro tip: Overhead food shots are tried-and-true Instagram gold, but you’ll notice that I personally don’t post very many because I’m rarely in restaurants during daylight and night shots are nearly impossible to nail with a phone.)
But what am I actually doing??
")
Above left you have a look at Snapseed’s main editing tool. As mentioned, I primarily use Snapseed and VSCO, and while I have no go-to, one-size-fits-all editing sequence, there are a few steps I do almost always (found within “Tune Image” and “Details” in Snapseed):
-Up the brightness.
-Up the contrast.
-Up the ambiance.
-Lower the shadows.
-Up the highlights.
-Lower the warmth (a tad).
-Up the structure.
-Up the sharpening.
Lastly, I occasionally overlay a VSCO filter (above right) scaled way down for a final bit of intensity. Depending on the image, C1 Vibrant, F2 Mellow, and G3 Portraits are my favorite VSCO filters. And there you have it, folks.
A caveat:
What works for me might not for you. I’ve absolutely developed a style that tends towards brighter images living within a color palette of blues, pinks, greens, and browns. That said, these tools will improve, say, moodier shots streaked with shadow just as well.
And, finally, a conclusion:
Even if your end goal is not to amass hordes of Instagram followers (it was an unsolicited surprise when it started happening to me), it’s nice to be able to create content that is, simply, more elegant. Doesn’t matter if you’re posting pictures on your blog (truth, I edit a lot of the photos for my company’s blog—blog.spot.com—on my phone), to Pinterest (um, same goes for our Pinterest images where we’re @welcometospot). Learning some simple tricks that successful Instagram users prefer to keep close to the vest can help accelerate your ability to make your work more beautiful.
529views
Share on Facebook


8
0