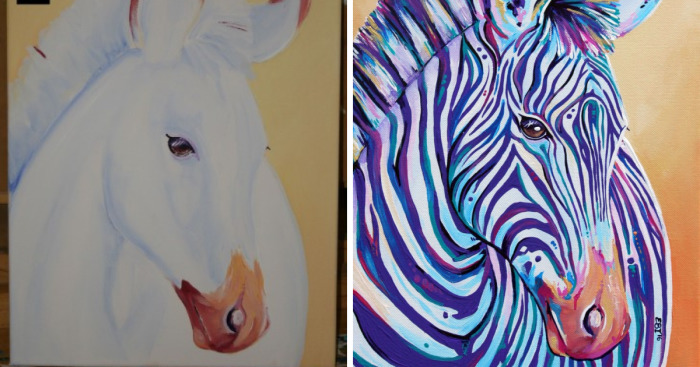
1. Having sketched the image lightly onto the canvas I used a coat of Napples Yellow for the background. For the base coat of the zebra I used titanium white tinted with cobalt blue in the shadows. This gives a formwork from which to build up the image.
2. Here I’ve used a skin tone, burgundy and dioxazine purple along with a small amount more titanium white. I’ve put the basic colours down for the muzzle (use the purple sparingly and only in the deepest shadows after all of the other paint). At this stage I’ve also done the eye useing the same colours as the muzzle and added a small amount of burgundy to the ears.
3. Once the first two layers are completely dry I started adding the stripes. Let the undercoat dry properly is important for a couple of reasons. Firstly we want the stripes to be distinctive against the white, secondly, and this is something a lot of people don’t seem to realise about acrylic paint – if I make a mistake I can wipe it off. A damp microfibre cloth will completely remove wet acrylic paint leaving behind the dry layer underneath, so as long as you let your paint dry well between layers you can erase mistakes in the current layer you are working on. The stripes here are done in brilliant violet with a liner brush.
4. More stripes, still just in the brilliant violet, make sure that the stripes follow the lines of the body, wrapping around the neck etc, also matching up in the mane.
5. Now I started adding more colour, going back to the Cobolt Blue but this time using it direct from the tube and layering it over the purple stripes to add more interest – I’m not putting it onto every stripe, but where I am using it I use it on three or four stripes in a group. This makes it stand out more and look more cohesive than doing unrelated smaller patches. I’ve also deepend some of the white areas of the coat with another mix of cobalt blue and titanium white.
6. Repeat step 5 but this time with colbalt green. The choice and order of colours I’m using is not random, I’ve started with the purple and am working through related colours in order purple – blue – green to build up more depth and interest than you can achieve with a single colour.
7. I am now jumping to the other end of the colour spectrum, but again not randomly. I’ve picked out the skin tone that I’ve already used in the muzzle and adding a small amount of that in the mane and ears, as well as mixing it with titanium white and adding to some of the white parts of the coat. I’ve then added magenta to both the muzzle and the stripes. The magenta connects the skin tone to the purple and adds more warmth to the stripes that were previously in colder colours. Again I’ve mixed it with white to add to the stripes, particularly on the body behind the face to make a clearer distinction between the two.
8. Shadows and highlights. More dioxazine purple to build up the shadows, and titanium white in the highlights, particularly on the face and mane. Try not to over do this stage, we are just trying to add a bit more definition, not overwhelm the existing colours.
Completing the painting. This bit is a little harder to pin down and comes down to looking for any small things that might still need tweaking. The shadows I’d put in were a bit too heavy so I went back with violet to tone them down. There was also a lack of connection between the zebra and background so I added some of the skin tone used in the muzzle to the bottom right of the background, and put some small amounts of the original Napples Yellow into the highlights on the zebra. I redid some of the magenta that got lost in the shadow layer. I also softened the eye with a small amount of skin tone to lighten the colour and a white highlight. Finally I photographed the finished piece outdoors in natural light, you can see from the colour clarity in this final photograph how important that is if you are wanting to get good digital images of your work.
*Please note I retain the copyright on these images. They maybe be copied and used for educational purposes only – no copy may be sold or used commercially – E.Izzett 2016.
More info: Facebook
Tutorial Images – See step by step instructions above

Final Painting

190views
Share on Facebook


17
0