Get Premium
Dark mode theme is available exclusively for premium users. Learn more about the benefits of subscribing.
No fees, cancel anytime.

 Dark Mode Ad-Free Browsing Unlimited Content
 Ad-Free Browsing Unlimited Content Dark Mode
Join 1.2 million Panda readers who get the best art, memes, and fun stories every week!
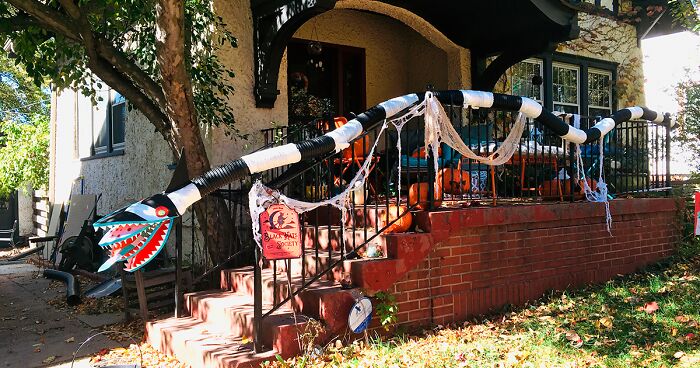
My wife Michelle is awesome. She made her point clear that she was not going to let the current pandemic ruin her favorite holiday ever. Therefore, she decided to create a monster to safely deliver candy to trick-or-treaters! She used her favorite Tim Burton movie as inspiration for the project.
Here’s what she said:
“It’s going to take nothing short of the apocalypse to make me cancel Halloween, but I don’t want to touch any grubby hands either. Meet my new candy delivery system straight outta Beetlejuice (The Sandworm)! A secret compartment in his neck allows the candy to slide down, drop out of the mouth, and into your bucket or bag—a trick and a treat!”
More info: Instagram | Etsy | Facebook
Follow the pictures below for full details!
Full list of the items required for this DIY:
1. 2 drain spouts ($4.30 from Lowes)
2. 2 sheets of 2 mm white foam 12″ x 18″
3. 2 sheets of 2 mm black foam 12″ x 18″
4. 3 sheets of 1.5 mm white foam 12″ x 18″
5. 1 sheet of 1.5 mm red sparkle foam 4″ x 6″
6. 1 sheet of 1.5 mm green sparkle foam 4″ x 6″ (foam ranges from $1.99 a sheet to .99¢)
7. 2 pieces of red poster board (87¢)
8. 1 roll 1/4″ turquoise trim ($1.99)
9. 2 rolls white duct tape 1.88 in x 20 yd ($3.88)
10. 1 roll black duct tape or electrical tape for installation
11. White marker
12. Glue (E6000 or 9001 work great with foam)
Measure and use a white marker to mark out where you will make the stripes. Use white duct tape to fill in the area.
Using the thin 1.5 mm white foam, cut four strips the length of the sheet (18″) for teeth and a fifth for the tongue. For the large outer head, I cut two strips (one for each side of the head) with a triangular cut and for the smaller head inside, made a thinner jagged tooth. Don’t forget the squiggly tongue, it will help guide the candy out of the mouth!
Gently fold the thick 2mm black foam in half lengthwise and cut an arch shape the full length, two times as shown. Trace the shapes onto the red poster board, cut, and glue to the foam, this will support the shape of the head and protect it from the wind.
Glue the two strips of teeth to each edge of the top and bottom head sheets. Let dry for at least an hour.
Glue 1/4″ sparkle trim around the entire edge of both top and bottom outer head pieces. Again, let dry for 30 minutes to an hour.
Using white duct tape, add a thick white stripe in the middle of the top outer head portion. I used two strips’ width. Then glue the eyes in place.
Using a single piece of white duct tape on each of the top and bottom portions of the outer head, adding 2″-3″ length of extra tape on each side, place the head so that the opening is wide enough for the second head. Continue to adjust the duct tape until you are satisfied with the angles.
Using the thin 1.5 mm foam, cut out two smaller versions of the large head. Adorn with sparkly eyes and spots all over. Line the inside of both pieces with red poster board.
After lining the smaller head with poster board, glue the teeth and the lips in place. Allow both heads to dry at least an hour. Again, using a single piece of white duct tape that laps over the edge 2″-3″ inches, place the smaller head inside so that its mouth opening allows the candy to easily slide out. Once both heads are in perfect placement, secure with more duct tape.
Using a turquoise marker, color stripes on the tongue. Place a long strip (8″-10″) of duct tape at the end and stick completely down, well inside the drain spout, making a little slide for the candy to shoot down!
Using a long, single piece of duct tape, begin to place your sandworm on the railing. Don’t use copious tape at first—you want to make sure it is at the correct angle for candy to completely slide down first.
Using a sharp blade, carefully cut away a flap that candy can fit through. Do not cut away the additional plastic—keep it as a lid to prevent rain from getting into your sandworm before Halloween!
There should be a perfect corner piece from cutting the shape from the large head to use as a fin! Trim it up and duct tape both sides of the base to make it stand in place.
12Kviews
Share on FacebookI have a family in my neighborhood who always does something similar. They have a balcony and set up a hot wheels track with loop de loops and everything. Then they send the candy down. Favorite spot for little kids every Halloween.
We were the ones the children ask,"Are you going to do something again this year?" I don't know who loved it the most. them or us!
I mean I don't Celebrate Halloween But It's Genius UwU!! Also yall, Be Safe uwu👍
I have a family in my neighborhood who always does something similar. They have a balcony and set up a hot wheels track with loop de loops and everything. Then they send the candy down. Favorite spot for little kids every Halloween.
We were the ones the children ask,"Are you going to do something again this year?" I don't know who loved it the most. them or us!
I mean I don't Celebrate Halloween But It's Genius UwU!! Also yall, Be Safe uwu👍


 No fees, cancel anytime


130
11