ADVERTISEMENT

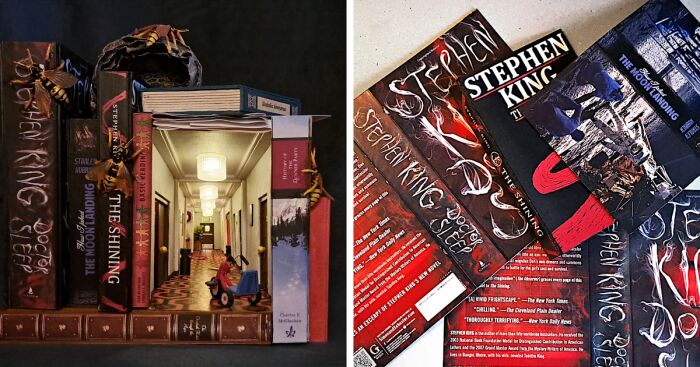
After my usual miniatures typically turn out too large, I wanted to try something smaller this time. The result is a detailed recreation of the famous Shining corridor, small enough for a deep bookshelf!

More info: kassiopeya.online

Here’s a little overview of how the miniature scenery came to life…

In order to be able to build the entire corridor, it has to be distorted in perspective (otherwise it would simply become too long). So I first print out a grid that shrinks in perspective towards the end – and also a corresponding carpet pattern at the same time

According to this grid, the floor and side walls of the corridor are built later on.

I now cut the corridor doors into the side walls and then glue cardboard behind them again

ADVERTISEMENT

Next, the ceiling is built from cardboard and wooden skewers – also distorted in perspective, of course, and with small plastic caps as lamps. Under each lamp I drill a small holes so that I can illuminate them later with LEDs

ADVERTISEMENT

Now the walls are covered with a “wallpaper” made of scoop paper and I paint the doors before…

….everything is attached to the base plate. As you can see here, in addition to the main corridor, a branching corridor and room 217 are also built, into which you will later be able to look at least partially

Now it’s time for the interior decoration! First, room 217 (237 in the movie) gets some furniture and a few houseplants…

ADVERTISEMENT

…and also in the hallway itself some details are added

After everything is in place here, I start installing the LED lights, which I glue one by one…

…before finally assembling and closing the corridor. The last thing to do is plug the LED’s into the ceiling lights from above and fix them in place. Thus, my little corridor shines as it should – is missing only the exterior cladding, because everything still looks a little bald

ADVERTISEMENT

To make the corridor look nice and atmospheric, it’s going to be framed in a framework of faux books…. Which means that I have to build a lot of books. So first I print out lots of book covers and glue them onto thin cardboard

Next, the book pages must be built. For this I carve the book pages one by one and 1cm thick strips of styrodur and paint them…

ADVERTISEMENT

… before inserting them into the book covers. This way I build a lot of book covers behind which I can now hide the corridor itself as well as the shapes of the branching rooms. Looks much nicer already!

The last detail to be mentioned is one that especially book lovers will recognize and that I felt particularly uneasy about when I first read the novel: The infamous wasp’s nest. For this I cover my artificial pile of books with foil (so that I don’t ruin anything) and build the nest of papier-mâché directly on top. The honeycombs inside are formed from modeling clay and a honeycomb baking pan.

ADVERTISEMENT

And of course the inhabitants of the nest may not be missing: However, I do not build theall of these wasps myself but use ready-made wasp figures, which I then only re-paint…

… and fix them on my books.

And with that, my first Book Nook project is finally finished. And what can I say – it was so much fun that probably some more will follow!

ADVERTISEMENT