Get Premium
Dark mode theme is available exclusively for premium users. Learn more about the benefits of subscribing.
No fees, cancel anytime.

 Dark Mode Ad-Free Browsing Unlimited Content
 Ad-Free Browsing Unlimited Content Dark Mode
Join 1.2 million Panda readers who get the best art, memes, and fun stories every week!
How to Make an Embroidered Badge: A Complete DIY Guide
In this guide, we’ll you explore everything you need to know—from the initial design and digitization of the actual embroidery process, finishing techniques, and tips for a professional look. Let’s dive in and learn how to create an embroidered badge that truly stands out.
Custom embroidered badges have a timeless charm. They not only add a unique touch to your clothing and accessories but also serve as powerful tools for branding, team identity, and personal expression. Whether you’re a creative DIY enthusiast or a business looking to showcase your logo with elegance, learning how to make an embroidered badge can transform your ideas into wearable art.
For premium custom patches and badges, remember that Custom Patches Hub at custompatcheshub.com is here to help bring your vision to life with expert craftsmanship and top-quality materials.
More info: custompatcheshub.com
There’s something uniquely special about embroidered badges. Whether seen on a sports team’s uniform, a company’s promotional apparel, or as part of a personal collection, these badges carry a sense of pride, authenticity, and artistry.
Imagine a badge that reflects your personality, a team emblem that bonds members, or a logo that captures your brand’s essence—all stitched into fabric with care and precision. This guide is designed to take you on that journey. We’ll start from the very basics of design, move through the detailed steps of the embroidery process, and finish with tips on care and maintenance.
Embroidery isn’t just about sewing; it’s about storytelling. Each badge you create tells a story of who you are and what you stand for. And with the right techniques, your embroidered badge can be a true work of art.
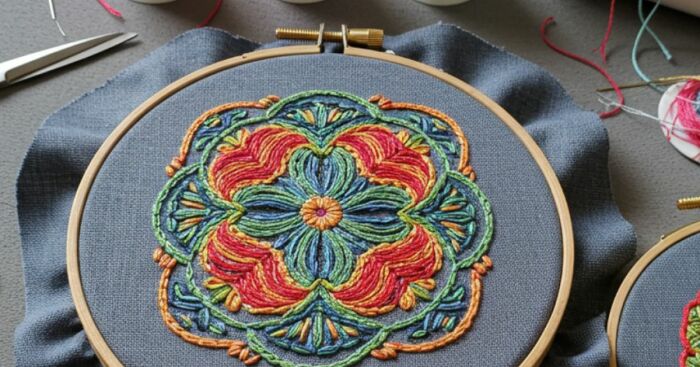
An embroidered badge is a small fabric patch that has been decorated with a design using embroidery techniques. Unlike printed badges, embroidered badges feature textured, raised stitching that adds depth and visual interest. These badges are often used as identification marks, logos, or decorative elements on clothing and accessories.
Key Characteristics:
Tactile Quality: The raised stitches provide a unique, three-dimensional feel.
Durability: High-quality threads and fabrics ensure that the badge stands up to wear and washing.
Versatility: Suitable for a wide range of applications—from uniforms to personal accessories.
Customization: Each badge can be tailored in shape, size, and design to suit your needs.
Custom embroidered badges offer several compelling benefits:
Enhanced Aesthetics: The texture and detail of embroidery give badges a premium look.
Branding Power: They serve as a powerful visual element for branding, helping businesses and organizations establish a memorable identity.
Durability: Well-made embroidered badges are designed to last, resisting fading and wear over time.
Versatility: Whether used for personal expression or corporate identity, these badges can be customized in countless ways.
Cost-Effective: With options for DIY or professional services, you can choose a method that fits your budget.
Before you start crafting your embroidered badge, you’ll need to assemble the necessary materials and tools. Having the right supplies on hand is critical for achieving professional results.
Materials:
Fabric Base: Choose a durable fabric such as cotton, twill, or felt. The fabric should be smooth and sturdy enough to hold the embroidery.
Embroidery Thread: High-quality, colorfast threads (polyester or rayon) are essential for vibrant and lasting embroidery.
Stabilizer: A tear-away or cut-away stabilizer will support your fabric during the embroidery process.
Adhesive or Iron-On Backing (Optional): If you plan to attach your badge without sewing, you might use a heat-activated adhesive.
Dyes or Paints (Optional): For adding color to the fabric before embroidery.
Tools:
Embroidery Hoop: Keeps the fabric taut, ensuring even stitching.
Embroidery Machine: A machine like the Babylock Valiant can deliver precise, high-quality embroidery. Alternatively, you can hand-stitch the design if you prefer a personal touch.
Cutting Tools: Sharp scissors or a rotary cutter, along with a cutting mat, are essential for precision cutting.
Design Software: Programs such as Adobe Illustrator or Inkscape help you create and digitize your design.
Laser Engraver or Stamping Tools (Optional): For additional texture or detail.
Iron or Heat Press: Necessary for applying heat if using adhesive backing.
Parchment Paper: Protects your design during the heat application process.
Edge Sealer: Fray check or heat-sealing tape to ensure clean, durable edges.
Assembling these materials and tools will set you up for success in your patch-making journey.
A great badge begins with a compelling design. This phase is crucial, as it sets the direction for the entire project.
Brainstorming Your Concept
Define the Purpose: Decide whether the badge is for personal use, team identification, branding, or commemorative purposes.
Sketch Your Ideas: Start with rough sketches. Don’t worry about perfection at this stage; focus on capturing your ideas.
Gather Inspiration: Look at examples of embroidered badges and DIY embroidery patches online to spark creativity.
Digital Design
Use Design Software: Programs like Adobe Illustrator or free alternatives like Inkscape allow you to create a vector version of your design.
Simplify Your Design: Bold lines and minimal details are ideal for embroidery. Intricate designs may lose clarity during stitching.
Color Selection: Choose a high-contrast color palette to ensure your badge is visually striking.
Size and Proportion: Consider where the badge will be used. A badge for a hat might need to be smaller than one intended for a jacket.
Spend time refining your design until you’re confident it reflects your vision. A well-designed badge sets the stage for a successful embroidery project.
Digitizing is the process of converting your design into a format that your embroidery machine can understand. This step is critical for ensuring accuracy and precision.
How to Digitize:
Choose Your Software: Use embroidery digitizing software like Wilcom, PE-Design, or Ink/Stitch.
Import Your Design: Open your vector file in the software.
Set Stitch Parameters: Assign different stitch types (satin, fill, running) to various elements of your design.
Adjust Density: Ensure that the stitch density is balanced so that the design is neither too heavy nor too sparse.
Test the File: Run a test embroidery on a scrap piece of fabric to check for any adjustments needed.
Finalize the File: Once satisfied, save the digitized file in the format required by your embroidery machine (e.g., .DST or .PES).
Proper digitization is both an art and a science—it can make the difference between a mediocre badge and a stunning, detailed piece.
Before you begin embroidering, you must properly prepare your fabric to ensure crisp and even stitching.
Steps to Prepare:
Clean the Fabric: Wipe down the fabric with a damp cloth to remove any dirt or oils.
Condition the Fabric: If necessary, apply a fabric conditioner to make the material more pliable.
Cut to Size: Cut the fabric to a size slightly larger than your intended badge. This extra margin will allow for adjustments during the embroidery process.
Attach the Stabilizer: Place the appropriate stabilizer on the back of the fabric to support it during embroidery. Choose between tear-away for delicate materials or cut-away for more durable fabrics.
Hoop the Fabric: Secure the fabric and stabilizer in your embroidery hoop, ensuring it’s tight and free of wrinkles.
These steps ensure that your fabric remains stable, leading to a professional-looking embroidered badge.
Now that your design is digitized and your fabric is ready, it’s time to start the embroidery process.
Machine Embroidery
Load Your Design: Transfer the digitized file to your embroidery machine.
Thread Setup: Insert the correct thread colors according to your design. High-quality threads will produce vibrant and durable results.
Hoop the Fabric: Ensure that your fabric remains secure in the hoop throughout the process.
Start the Machine: Begin the embroidery and monitor closely for any issues such as thread breaks or misalignment.
Test and Adjust: If possible, run a test embroidery on scrap fabric to verify that everything is set correctly.
Hand Embroidery (DIY Embroidery Patch)
Transfer the Design: Use transfer paper or a lightbox to trace your design onto the fabric.
Select Stitches: Choose from satin, back, or running stitches depending on your design’s requirements.
Embroidery: Carefully stitch the design, ensuring consistency in stitch length and density.
Review Your Work: Once complete, inspect the embroidery for any inconsistencies or areas that need reinforcement.
Both methods require patience and attention to detail. Machine embroidery is faster and typically more consistent, while hand embroidery offers a personal touch and can be incredibly rewarding.
The final steps in making an embroidered badge involve refining your work to ensure a clean, professional finish.
Trimming the Patch
Cut the Excess: Use sharp scissors or a rotary cutter to trim away any extra fabric around the embroidered design.
Shape the Badge: Ensure the final shape is neat and consistent. You might choose a traditional round or rectangular shape, or opt for a custom design.
Sealing the Edges
Apply Edge Sealer: Use fray check or heat-sealing tape along the edges of the patch to prevent fraying.
Optional Border Stitching: For added durability and a finished look, consider stitching a border around the patch.
Adding Backing (Optional for Iron-On Badges)
Adhesive Backing: If you want your badge to be iron-on, apply a heat-activated adhesive such as fusible webbing to the back.
Heat Application: Cover the badge with parchment paper and use an iron or heat press at the recommended temperature to bond the adhesive.
Cool and Set: Allow the badge to cool completely before handling.
These finishing touches transform your embroidered badge into a professional product that can be applied with confidence.
To take your badge-making skills to the next level, consider experimenting with these advanced techniques:
3D Puff Embroidery
What It Is:
A technique that uses foam backing to create a raised, three-dimensional effect.
How It Enhances Your Badge:
Adds texture and depth, making the badge more tactile and visually striking.
Applique Methods
What It Is:
Combining multiple layers of fabric or materials, then stitching them together.
How It Enhances Your Badge:
Creates a multi-dimensional look that can incorporate different colors and textures.
Metallic and Glow Threads
What It Is:
Using specialized threads that shimmer or glow under low light.
How It Enhances Your Badge:
Offers a modern twist on traditional embroidery, making your badge stand out.
Detailed Digitizing Techniques
What It Is:
Fine-tuning your digitized design to capture intricate details.
How It Enhances Your Badge:
Ensures that every element of your design is rendered accurately, resulting in a high-quality finished product.
Combining Techniques
What It Is:
Integrating multiple techniques (e.g., embroidery with appliqué) into one design.
How It Enhances Your Badge:
Produces a unique, artistic badge that blends texture, depth, and intricate detail.
352views
Share on Facebook


 No fees, cancel anytime


14
2