Get Premium
Dark mode theme is available exclusively for premium users. Learn more about the benefits of subscribing.
No fees, cancel anytime.

 Dark Mode Ad-Free Browsing Unlimited Content
 Ad-Free Browsing Unlimited Content Dark Mode
Join 1.2 million Panda readers who get the best art, memes, and fun stories every week!
Happy November!
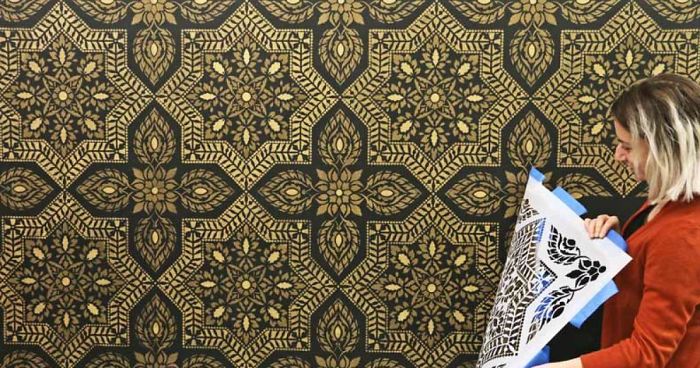
With cement tile accent wall trends on the rise, we’ve come up with the perfect stencil alternative for a fraction of the cost! Using our DIY tile stencil patterns you can easily create your very own cement tile design on ANY wall in your home! Let’s see how!
More info: cuttingedgestencils.com
Before we begin stenciling, let’s talk. Getting your wall ready for stenciling is important but don’t be intimidated! Make sure your wall is smooth and that you spackle, sand and prime any visible cracks. Stenciling always works best on smooth surfaces so we recommend sanding the wall with some 120 grit sandpaper. Next, wipe any dust off and then paint your wall with your color of choice. The base coat we chose for this stencil project is Benjamin Moore Black with a flat finish.
Once you allow your base coat to fully dry, you can attach our clip-on stencil level to the bottom edge of your tile stencil! This tool is super helpful in ensuring the perfect positioning for your stencil project every time! No need for large cumbersome levels. Now you’re ready to begin stenciling!
Place your tile stencil where you want to start. You can use blue painter’s tape to help secure your stencil to the wall. For extra adhesion, you can apply spray adhesive to the back of the stencil before placing it on the wall. Spray adhesive can also help to reduce paint seepage from underneath the stencil!
Evenly coat your 4” stencil roller with Blackened Bronze Metallic Paint and offload any excess paint onto a paper towel. This is one of the most important steps when it comes to stenciling! The number one mistake is having too much paint on your stencil roller or brush. The goal is to have your stencil roller evenly covered with paint but to be almost dry to the touch
Apply light pressure to your stencil roller when stenciling. You can always go back over sections that need more coverage! A 4” stencil roller will get the job done quickly and effectively!
To get the two-tone detailed look, you will go back over desired areas on the stencil with Pale Gold paint using our 2″ dense foam roller. We recommend a 3/4″ professional brush for even smaller openings for extra detail!
Align the tile stencil using the built-in registration marks and the previously stenciled parts of the design. This system makes stenciling easier and quicker than ever before!
Repeat this simple stenciling process for an eye-catching DIY metallic accent wall
Stenciling the wall where it meets the baseboard may look intimidating but it’s not hard at all! The biggest tip to remember is that our stencils are flexible and can bend into the crease at the baseboard. Use your fingers to press the stencil into the crease of the baseboard and stencil downwards with your stencil roller
A professional stencil brush can be useful in tighter areas of the tile stencil. Pounce the metallic paint towards the baseboard for crisp edges. Look how simple!
Repeat the stenciling process until your accent wall is complete. This stenciled accent wall screams trendy! Who knew a tile stencil was for more than just floors?
Thanks for reading and happy stenciling!
5Kviews
Share on Facebook


 No fees, cancel anytime


44
0