Get Premium
Dark mode theme is available exclusively for premium users. Learn more about the benefits of subscribing.
No fees, cancel anytime.

 Dark Mode Ad-Free Browsing Unlimited Content
 Ad-Free Browsing Unlimited Content Dark Mode
Join 1.2 million Panda readers who get the best art, memes, and fun stories every week!
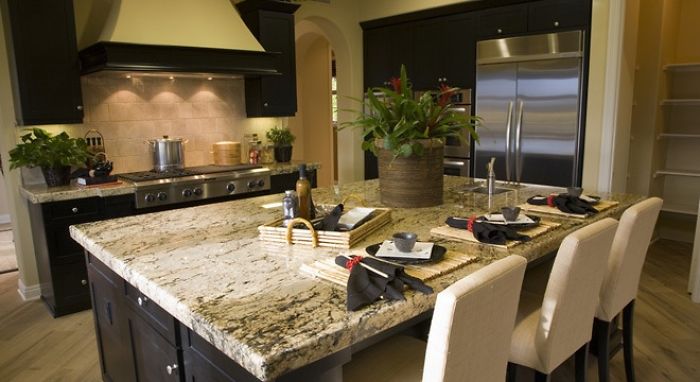
Like most natural stone surfaces available in the market, Granite worktops can be a bit pricey, especially when you go for the high-quality slabs. However, you can save around 20% up to 30% off a professional installation by doing this task by yourself.
More info: themarblestore.co.uk
Here are the tools and materials that you will need for this project:
level
shims
caulk gun
seam setter
acrylic caulk
painter’s tape
angle grinder with diamond blade
two-part epoxy for non-porous application
Working with your local stone fabrication shop when planning your installation is really important. Granite is particularly heavy so it’s rather difficult to transport and must be properly cut with specialty tools. Though it’s known for being a sturdy material, if it’s not handled accordingly or installed with proper support, it may crack or, worse, break off.
The first step in this process is to determine what type of granite you want. Go to your local stone fabrication shop and look for as many samples and slabs as you can. This allows you to see all the varied grain patterns and colours up close and personal.
You’ll also need to determine the length of the worktop overhang, as well as the size and type of backsplash that you want to install.
Once you’ve decided your granite surface and removed your old worktops, it’s now time to accurately measure your base cabinets to give to the fabricator. Begin with the top portion of the base cabinets, and include the distance from the front of the face frame, up until the walls along the entire length of the cabinets.
The most accurate way to get measurements for your fabricator is to make a template from a simple cardboard or even Mylar plastic. Scribe the template so that it fits securely against the wall before tracing the front edge onto the template.
In your template, you must measure the exact locations of cut-outs for your cooktops and sinks, as well as the holes for soap dispensers and faucets. If you plan to integrate an undermount sink, take note of that on the template so the fabricator would be able to cut a channel along the underside portion of the sink hole. This allows the sink clips to be secured.
After you’ve specified your requirements to the fabricator and submitted all the necessary measurements, set a date for delivery or pick-up of your finished worktops.
Make sure your base cabinets are even and level across their entire length. If they’re not level, then unfasten the base units and level them with shims underneath the baseboard. It’s not a wide idea to use shims directly under the granite worktop as this will create tiny spaces that could cause the worktop to crack under pressure.
It’s now time to get the worktops home safely, which can be a little tricky. Unless they’re being delivered to your home, you’ll have to pick up the worktops from the fabricator when they’re ready. Remember though, granite is heavy so you’ll need help to transport the worktops safely into your home.
It’s crucial to always carry the worktops in a vertical position and never horizontally flat, so as to avoid breaking or cracking the stone surface. Protect the edges by covering them with wide painter’s tape. When the granite slabs arrive, be sure to have a cleared space ready to store them upright until you’re ready to install them in your kitchen.
To start off, dry-fit the worktop to assure an accurate fit. When lifting the worktop, take extra care to support the granite along cut-outs as those areas can be thin. Lay the slabs directly on the frames of the lower cabinets. Then, cautiously shave the edges to the desired level by using a dry-cut diamond blade attached on an electric grinder. Be sure to wear protective eye-wear to guard against grit and dust. After that, fit the granite slabs back in place making sure all the edges fit securely, including the seams between each slabs if you have more than one.
First, tape the edges of the worktop to protect them. Then, join the butt seams using two-part epoxy, which you can get from the fabricator shop.
Next, tighten the screws until you feel some resistance. Then turn on the auto pump (the pressure created guarantees that the seams remain even as the epoxy dries). A seam setter is also used to ensure that the top edges remain attached with each other. When the epoxy is dry (for about an hour or so), you can then remove the setter. After that, cautiously shave away any excess epoxy by using a razor held vertically.
Now that the seams are joined, it’s time to secure the granite stone to the cabinets. The weight of the worktops themselves is almost enough to hold the stone in place, but you’ll still need to run a bead of caulk along the bottom edge of the counter, where the granite stone meets the cabinet top.
Be sure not to use silicone caulk as these could wick into the stone over time and cause staining. Stick with acrylic instead..
After installing the granite slab(s), finish it off by applying some granite sealer to your worktops. This step is crucial as it will prevent any deep staining and it will also protect the stone. Simply wipe it evenly on the surface with a clean cloth, making sure to cover the entire surface. Let it dry for about 24 hours before using the worktop.
Clean your worktops by using a granite cleaner. You can get this one at most fabrication shops. A granite cleaner is especially made to keep your worktops looking shiny and new.
Installing granite worktops can really be challenging, but the improvement in your kitchen is well worth the effort. Not to mention the money you can save by doing the project yourself!


 No fees, cancel anytime


0
0