Get Premium
Dark mode theme is available exclusively for premium users. Learn more about the benefits of subscribing.
No fees, cancel anytime.

 Dark Mode Ad-Free Browsing Unlimited Content
 Ad-Free Browsing Unlimited Content Dark Mode
Join 1.2 million Panda readers who get the best art, memes, and fun stories every week!
Shutter errors are always a horror for camera users. Some err99’s, overexposed/shady photos, and an expensive repair.
I have purchased a faulty 1000D for second camera, the error was “does not power on”. I hoped that this might be a fuse replacement, which is an easy job. The camera didn’t power up first, as many cables were disconnected in it. After connecting, it turned out that it does overexpose either with 1/4000, and the mirror is stuck in upper position.
I searched and found a lot of information on Camera repair blog, and on IR conversion pages for astrophotographers. Found that in the 1000D the sensor can be fit back in the right position, without focus recalibration. The repair itself is not a hard task if you are extra careful, and take a photo of every step, as there are many cables and screws.
More info: kilatas.great-site.net
The backside is easy to take off; take off every screws, and peel out the back side. Be careful, as there is a flex cable for the LCD. Pull off the front cover also. Be careful to not touch the flash condenser cables on the front panel : cover it with insulating tape!
The mirror lockup was solved easily – the spring was not attached. Clamped it back, and the mirror was able to return to the original position. Luckily no mirror shaft was broken.
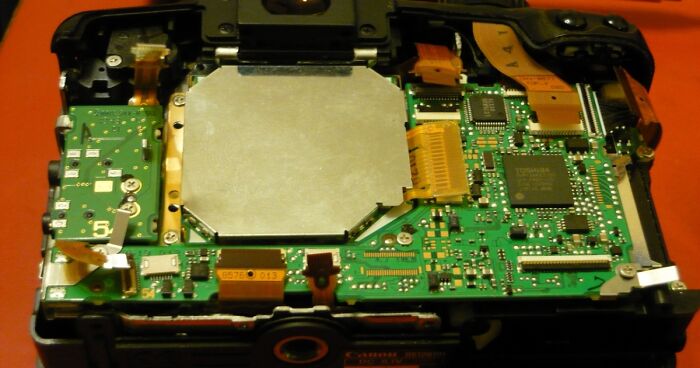
To replace the shutter, one needs to remove the mainboard, sensor, and metal frame of the camera. All flex cables (and the light meter’s black receptical) need to be disconnected, and a few more screws needs to be unscrewed, and there we’ll see the sensor.
To remove the sensor, you only need to unscrew some of the screws which are holding the sensor itself; no need to disassemble the sensor. The shield can remain on the backside. There are 3 washers under the sensor screws, mark these, because you need to put them back on their location when assembling the camera. These can affect the sensor plane. Luckily the 1000D has a washer-positioned sensor, not with Torx screws and springs as the newer ones; those are hard to justify. Put the sensor in a dust-free box.
Pull up the top of the camera, remove all screws (even the diopter’s), disconnect the flex cables. Remove the 4 screws of the tripod connector. Remove the battery holder and the attached PCB. Disconnect the shutter cable, remove the screws holding the shutter. One can remove the shutter,a nd if replacing, put the new one on the camera. (Important, that a new shutter needs to be calibrated in order to achieve accurate shutter times, e.g. the 1/2000, 1/4000 times needs to be adjusted.
The shutter is kept together by one screw. After unscrewing, one can remove the back cover of the shutter unit, to see the two curtains… but this only had one of them. It seemed OK, but the other was missing.
WTF?
Maybe this was used to repair a 450D, or other 1000D. Or simply had a broken curtain.
The curtain set was very inexpensive, so I ordered one. (Also a complete shutter, which was not needed.) It was easy to put the new curtains on, and the shutter seemed to be working, with moving the shafts by hand.
Putting it together
Putting it together is the reversal of the dismantling :D In theory, and if you are remembering what you have done weeks ago, because the shipping time for the shutter blade is 3-4 weeks from China :D
In fact, re-building the camera was not a horror, even if it lasted for half a day. Screw the shutter,put the washers, put back the sensor and mainboard, LCD, and try it. Easy to write, but no other way to be sure it works.
And it worked! I had some mistakes with cable connections, but in fact it finally began to work.
When I began, did not thought that it will work, but in the end, the 1000D worked correctly, all functions were OK, and since then it serves at my girfriend’s father, since years. And there wre no magic, just screws and FPC’s, nothing what cannot be done. And I found good tutorials, which meant I haven’t spend much time figuring out what to do.
This can be also found at http://kilatas.great-site.net/gallery or in this Boredpanda post : https://www.boredpanda.com/i-keep-photographing-the-starry-sky-since-years/


 No fees, cancel anytime


1
0