Get Premium
Dark mode theme is available exclusively for premium users. Learn more about the benefits of subscribing.
No fees, cancel anytime.

 Dark Mode Ad-Free Browsing Unlimited Content
 Ad-Free Browsing Unlimited Content Dark Mode
Join 1.2 million Panda readers who get the best art, memes, and fun stories every week!
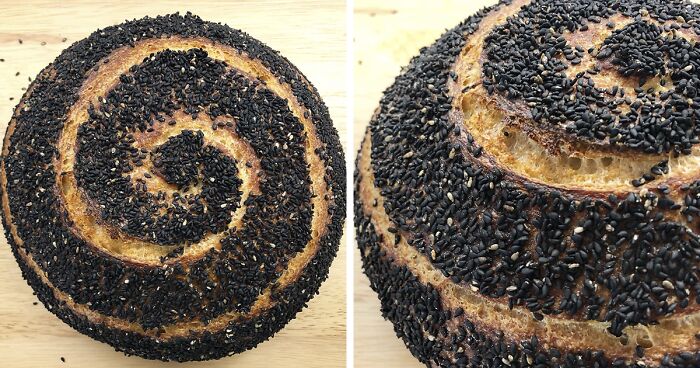
I’m a home baker in Adelaide, Australia and have been thoroughly enjoying my journey with making sourdough breads since March 2020. I specifically like it because the flavor possibilities are endless, along with the techniques used to get to the final product. Not only has the taste ruined me and my family for store-bought breads, but I am able to create bread art and I just love giving a fresh loaf to family and friends.
This is a hobby I’ll never get bored with!
Down below you can find a full recipe for my sourdough bread and pictures of various loaves of bread I’ve made so far.
More info: Facebook | Instagram
Phase 1 – Sourdough Starter
In order to make sourdough bread, you need a healthy and active sourdough starter that will act as your rising agent/yeast.
Day 1:
– 20 ml filtered/bottled water
– 20 g organic wholegrain flour
– Let sit, loosely covered, in a dark place.
Day 2:
– Discard half of Day 1 starter and add:
– 40 ml filtered water
– 40 g organic wholegrain flour
– Let sit, loosely covered, in a dark place.
Day 3:
– Discard half of Day 2 starter and add:
– 80 ml filtered water
– 40 g organic wholegrain flour
– 40 g unbleached plain flour
– Let sit, loosely covered, in a dark place.
Phase 2 – Stabilizing & Maintaining Sourdough Starter
Every morning for the next 7 days:
1. Discard everything but 2 tablespoons starter
2. Add:
– 2 tablespoons water and
– 1 tablespoon wholemeal flour
– 1 tablespoon plain flour
3. Stir till combined and keep loosely covered in a dark place.
To maintain your sourdough starter:
– After 7 days, continue feeding it daily with 1 tablespoon water and 1 tablespoon flour. If the amount in the jar becomes too much, just discard some, always leaving a few tablespoons.
Stage 3
Day 1 – Leaven:
In a container, mix together:
– 20 g peaked starter
– 40 ml water, room temperature
– 20 g bread flour
– 20 g whole wheat flour
– Let sit, loosely covered, till it doubles in size. It’s ready when it’s bubbly/foamy and passes the floating on the water test.
Day 2 – Bread Recipe:
1. In a large bowl, mix together till dissolved:
– 350 ml water
– 75 g leaven (prepared the day before – Day 1 in Stage 3)
2. Add:
– 500 g bread flour
3. With hands, mix everything together by squeezing the dough through fingers till well-combined, getting rid of any dry lumps/flour pockets, getting the flour fully hydrated (3 – 4 minutes).
4. Let it rest in the bowl, covered with cling wrap, for 30 minutes so the dough doesn’t dry out, allowing it to relax and fully hydrate.
5. Add 10 g salt to the dough, along with a splash of water, and mix through dough till salt is completely dissolved and you’re not feeling any salty bits between your fingers (wet fingers/hands to more easily work with the dough).
6. Remove dough from bowl and knead on a clean flourless surface for approx. 10 – 12 minutes till smooth, elastic, and tacky, but not sticky (test if the dough is ready for bulk fermentation by doing the windowpane test).
7. Covered in a bowl, let the dough bulk ferment for 3 – 4.5 hours (depending on room temperature). The dough will be ready for shaping if it has doubled in size, is wobbly, has gas bubbles on the surface, and springs back slightly when poked with your finger, but still leaving a finger dent.
8. Pre-shaping: On a lightly floured counter top, assist dough out of the bowl with a dough/bench scraper in order not to deflate the dough.
9. Quickly fold the top edge to the middle, then bottom edge to the middle, then both sides to the middle (like an envelope – use dough/bench scraper to assist). Then take corners of envelope and also fold into the center.
10. With the assistance of your dough/bench scraper, flip the dough over and rest for 30 minutes on a countertop covered with cling wrap. The ball will slightly flatten during this time.
11. In the meantime, cover a bowl/proofing basket with a kitchen towel and dust liberally with rice flour.
12. After 30 minutes of dough resting, dust the surface lightly with flour again and flip the dough onto the floured surface with the assistance of your dough/bench scraper. Brush off excess flour on the dough.
13. Final shaping: Stretch the top part of the dough and tuck in, then while stretching each fold, stitch sides of dough towards the middle, overlapping in the center – looking like a mummy.
When you get to the bottom, roll the dough up and tuck in with fingers until you get all the way over. Use cupped hands to gently tuck sides of dough underneath. Then, use a bench scraper to form a nice, round ball by slowly and firmly pushing/sliding underneath the dough while keeping the scraper on the counter (in all directions). This will build surface tension.
14. With dough/bench scraper assistance, flip the dough over into hands and cradle into prepared proofing bowl/basket, seam facing up.
15. Cover dough completely with kitchen towel corners, place the bowl into a plastic bag, and into the fridge to retard overnight. Let retard in fridge overnight, up to 24 hrs (minimum 8 hrs – the longer in the fridge, the better the flavor and more digestible the bread).
Day 3 – Baking your bread:
1. Preheat oven WITH a dutch oven or a cast iron pot to 250°C for 1 hour.
2. 10 minutes before 1 hour is complete, remove dough from the fridge, flip it out of proofing bowl onto baking paper, and gently remove kitchen towel.
3. Brush off excess flour, quickly and confidently score dough from top to bottom with a very sharp blade/razor.
4. Work quickly, but carefully: Remove preheated dutch oven or cast iron pot from oven, remove the lid and lower dough with baking paper into the pot (be very careful not to burn yourself – use kitchen gloves).
5. Cover with the lid and place the pot on the middle shelf in the oven and bake for 20 minutes at 250°C.
6. After 20 minutes, remove the lid and lower temperature to 220°C and bake further, uncovered, for 25 minutes or go off of color of bread (dark brown).
7. Remove the bread from the oven and the pot, and let cool completely on a cooling rack before slicing into the bread. Slicing the bread whilst still hot lets the steam escape, which is needed for the chewy center, and will cause it to dry out sooner.
8. A properly baked bread sounds hollow when you finger-tap it on the bottom.
Enjoy!
6Kviews
Share on Facebook


 No fees, cancel anytime


61
7