Get Premium
Dark mode theme is available exclusively for premium users. Learn more about the benefits of subscribing.
No fees, cancel anytime.

 Dark Mode Ad-Free Browsing Unlimited Content
 Ad-Free Browsing Unlimited Content Dark Mode
Join 1.2 million Panda readers who get the best art, memes, and fun stories every week!
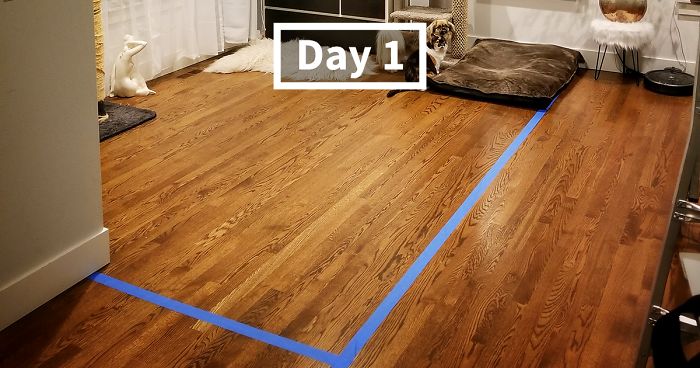
When we purchased our home last year, we started out using one of our three bedrooms as a home office. Our plans were to eventually convert the unused formal living space in the front of the house to an office space since we’re both working from home, as we have a bigger family room in the back of the house that we use as our primary living space. When we found out that we were going to have a baby, I figured this would be a good time to tackle this DIY project.
The space I ended up framing is a few inches over 8 feet wide and almost 12 feet deep. This ended up being the ideal size for us to fit two large 8 feet by 30-inch custom desks and still leave plenty of room for the dining area next to it. We already had an air conditioning/heating vent in the space, so I thankfully did not have to do any ductwork during this home remodeling.
The full project took me a little over four months to complete, mostly doing work on weekends and evenings. In between, I tackled other building and remodeling ideas like making a patio dining set and a greenhouse, so I definitely took my time with it.
Follow my full journey in the images below. Feel free to leave a comment or reach out if you have any questions, and I will do my best to answer them. I’ve also answered a lot of questions about this DIY idea already on Reddit, so be sure to check that out as well.
179Kviews
Share on Facebook
I'm sorry, I keep looking for the animals - there is a cat and dog on the first picture and another cat on a later picture. And, yeah, congratulations, good work on the renovation!
LOL. I was about to say the same thing. The pets were displaced. Forgotten casualties.
Load More Replies...I love seeing how you did this. I would enjoy this kind of project but certain parts would be intimidating. Especially love the skate wheels on the chairs. Ingenious.
I love the roller blade wheels too, and I'm totally going to steal that idea!!
Load More Replies...wow! You're super handy. I really like how you've included so many windows--keeps both spaces light and bright.
Now that you've learned some valuable lessons, I bet you kind of have the urge to build something else with your newfound confidence. Not gonna lie, some of those lessons could've been easily avoided by looking at a couple basic blogs or videos but that's the way it goes (I did renovations for years so I'm sure I've made every mistake in the book at some point). Looks great in the end though and that's what matters. Great touch on the rollerblade wheels.
Curiosity question. What's the point of the door since all the window openings are, well, opened? To me the door won't stop the cat, won't block any noises etc. Don't get me wrong, you did a great job. I'm just curious.
New baby. Once he/she gets moving they won't want him/her to get into the room where there are cords and expensive equipment. He also closed off the windows so the cats can't get in.
Load More Replies...Amazed that ppl can just do woodwork like that. I can't even nail something without the wood splitting in two.
Have you tried..? Often what's stopping you is only in your head. And you can surprise yourself at what you are capable of, if you set your mind to it and do it.
Load More Replies...I think I want to know if he has brothers that are handy also! What a great job! I’m a woman, and even I understood what you did as your directions were very simple and not fussy with the extra words! I have to say, I am extremely impressed, and make sure to tell your wife, she’s one lucky wife and mama! Congratulations on the new baby !
Yes- covering floor before starting the drywall work would've saved a lot of cleaning up. My ex and I bought a 2 story home in Queens years ago, and the rug was so thin and cheap, NO PADDING! we ripped it up, only to find these gorgeous wide plank white pine hardwood floors, that they used as a drop cloth. Tons of paint splatters everywhere. We sanded and refinished them to look fantastic. One of the most rewarding home improvement projects I've been part of. He did a beautiful job! That ceiling certainly presented a challenge! Bravo! And congrats on the little one!
What a difference having lots of tools and space to move makes to a diy project. Looks fantastic!
Wow!! Looks great! You are really talented. And congrats on the new baby!
That yellow and black desk chair looks like it was taken from a rollercoaster.
Impressive work! Quick question… when you put up the frame for drywall - I am sure nails are applied to studs of ceiling and adjacent walls - what about the floor? Did you have to put nail to the hardwood floor? Thanks!
Hi we are trying to do the same thing. can you tell me the dimensions of the door and windows? also the dimensions of your office space? Where did you purchase the doors? and glass? thank you!
We are actually looking to do something like this in our living room. The previous owner knocked out a Wal to make it one giant room but it’s not very useful. We’re going to use it as a raft room/guest room... maybe with a Murphy bed so we can’t do the window effect like you have. You did a great job though. It looks like it was always there. One question though... if you replace your flooring, how are you going to cut around the walls? It looks like the wall frames are sitting on top of the hardwood instead of the subfloor. I think we’re going to have to take a circular saw and cut out a notch for the walls because we plan on redoing the floors sometime in the future. Thanks for the step by step. We have a vaulted ceiling as well so yea, angles will be a challenge. Lol ok high school math teachers... this may be one practical use for algebra.
Omg... wall not wal and craft room not raft room lol. Damn autocorrect.
Load More Replies...Loved the project. HATED that ugly racing car chair. It makes everything else pointless. Like a beautiful boy with a HIDEOUS purple tinted wannabeard
Hello, great work. I'd suggest something like this ( https://www.amazon.com/Hardwood-Anti-Slip-Protective-Transparent-Delivery/dp/B07BTRQQGX/ref=sr_1_4?ie=UTF8&qid=1535709790&sr=8-4&keywords=protective+transparent+carpet+wheel+chair ) a transparent plastic curtain, under the 2 chairs, otherway in a couple of months you'll get a weird circular-shaped part of ruined wood parquet. Bye
I feel like the rubber roller blade wheels are a lot more attractive than a plastic mat, especially if they don't dig into the hardwood.
Load More Replies...What about ventilation? There are the French doors, but in bad weather or during the winter those need to stay closed. Once you put in the windows, I found myself feeling stifled and unable to breathe just looking at it. Perhaps that's not an issue, but it was the first thing I thought of. Love the animals, particularly your cat who just owns the place, evidently! Nicely done. I love the way it turned out.
We have airconditioning throughout the house, there's a vent in the new home office as well. Ventilation is not an issue. There's also the huge window that opens up, and the doors can always open if needed.
Load More Replies...Hello. I have a question the answer is probably obvious but yet, I am wondering: how did you maintain the walls ? With nails in the roof and the pre existing walls ? What about on the floor ? Thank you (sorry for my english :))
I nailed the bottom plates into the floor and the top plate into the joist in the ceiling. The sides are also nailed into the existing studs in th wall, so it's not going anywhere :)
Load More Replies...Can you delete comments?? How do you do that? I've always missed that on BP. Can you edit too..? Thanks in advance, I would appreciate it so much :)
Load More Replies...Obviously this the work of a talented carpenter. But I have a question is a relatively straight forward general contracting job the kind of thing you want to show on BoredPanda? What's next how to put siding on a house or how to shingle a roof?
The point of this is that it's a DIY job. I never did anything like this before and purchased a bunch of the power tools as part of the project. It's meant to serve as inspiration for folks to get an idea of how to change up a space.
Load More Replies...But you like pointing out that You Did Better. Charming.
Load More Replies...The space is kind of hard to photograph with a non-wide angle lens, so it's just to show the space better. There's also 1/4 inch thick glass in all the window openings, per one of the later picture descriptions.
Load More Replies...I'm sorry, I keep looking for the animals - there is a cat and dog on the first picture and another cat on a later picture. And, yeah, congratulations, good work on the renovation!
LOL. I was about to say the same thing. The pets were displaced. Forgotten casualties.
Load More Replies...I love seeing how you did this. I would enjoy this kind of project but certain parts would be intimidating. Especially love the skate wheels on the chairs. Ingenious.
I love the roller blade wheels too, and I'm totally going to steal that idea!!
Load More Replies...wow! You're super handy. I really like how you've included so many windows--keeps both spaces light and bright.
Now that you've learned some valuable lessons, I bet you kind of have the urge to build something else with your newfound confidence. Not gonna lie, some of those lessons could've been easily avoided by looking at a couple basic blogs or videos but that's the way it goes (I did renovations for years so I'm sure I've made every mistake in the book at some point). Looks great in the end though and that's what matters. Great touch on the rollerblade wheels.
Curiosity question. What's the point of the door since all the window openings are, well, opened? To me the door won't stop the cat, won't block any noises etc. Don't get me wrong, you did a great job. I'm just curious.
New baby. Once he/she gets moving they won't want him/her to get into the room where there are cords and expensive equipment. He also closed off the windows so the cats can't get in.
Load More Replies...Amazed that ppl can just do woodwork like that. I can't even nail something without the wood splitting in two.
Have you tried..? Often what's stopping you is only in your head. And you can surprise yourself at what you are capable of, if you set your mind to it and do it.
Load More Replies...I think I want to know if he has brothers that are handy also! What a great job! I’m a woman, and even I understood what you did as your directions were very simple and not fussy with the extra words! I have to say, I am extremely impressed, and make sure to tell your wife, she’s one lucky wife and mama! Congratulations on the new baby !
Yes- covering floor before starting the drywall work would've saved a lot of cleaning up. My ex and I bought a 2 story home in Queens years ago, and the rug was so thin and cheap, NO PADDING! we ripped it up, only to find these gorgeous wide plank white pine hardwood floors, that they used as a drop cloth. Tons of paint splatters everywhere. We sanded and refinished them to look fantastic. One of the most rewarding home improvement projects I've been part of. He did a beautiful job! That ceiling certainly presented a challenge! Bravo! And congrats on the little one!
What a difference having lots of tools and space to move makes to a diy project. Looks fantastic!
Wow!! Looks great! You are really talented. And congrats on the new baby!
That yellow and black desk chair looks like it was taken from a rollercoaster.
Impressive work! Quick question… when you put up the frame for drywall - I am sure nails are applied to studs of ceiling and adjacent walls - what about the floor? Did you have to put nail to the hardwood floor? Thanks!
Hi we are trying to do the same thing. can you tell me the dimensions of the door and windows? also the dimensions of your office space? Where did you purchase the doors? and glass? thank you!
We are actually looking to do something like this in our living room. The previous owner knocked out a Wal to make it one giant room but it’s not very useful. We’re going to use it as a raft room/guest room... maybe with a Murphy bed so we can’t do the window effect like you have. You did a great job though. It looks like it was always there. One question though... if you replace your flooring, how are you going to cut around the walls? It looks like the wall frames are sitting on top of the hardwood instead of the subfloor. I think we’re going to have to take a circular saw and cut out a notch for the walls because we plan on redoing the floors sometime in the future. Thanks for the step by step. We have a vaulted ceiling as well so yea, angles will be a challenge. Lol ok high school math teachers... this may be one practical use for algebra.
Omg... wall not wal and craft room not raft room lol. Damn autocorrect.
Load More Replies...Loved the project. HATED that ugly racing car chair. It makes everything else pointless. Like a beautiful boy with a HIDEOUS purple tinted wannabeard
Hello, great work. I'd suggest something like this ( https://www.amazon.com/Hardwood-Anti-Slip-Protective-Transparent-Delivery/dp/B07BTRQQGX/ref=sr_1_4?ie=UTF8&qid=1535709790&sr=8-4&keywords=protective+transparent+carpet+wheel+chair ) a transparent plastic curtain, under the 2 chairs, otherway in a couple of months you'll get a weird circular-shaped part of ruined wood parquet. Bye
I feel like the rubber roller blade wheels are a lot more attractive than a plastic mat, especially if they don't dig into the hardwood.
Load More Replies...What about ventilation? There are the French doors, but in bad weather or during the winter those need to stay closed. Once you put in the windows, I found myself feeling stifled and unable to breathe just looking at it. Perhaps that's not an issue, but it was the first thing I thought of. Love the animals, particularly your cat who just owns the place, evidently! Nicely done. I love the way it turned out.
We have airconditioning throughout the house, there's a vent in the new home office as well. Ventilation is not an issue. There's also the huge window that opens up, and the doors can always open if needed.
Load More Replies...Hello. I have a question the answer is probably obvious but yet, I am wondering: how did you maintain the walls ? With nails in the roof and the pre existing walls ? What about on the floor ? Thank you (sorry for my english :))
I nailed the bottom plates into the floor and the top plate into the joist in the ceiling. The sides are also nailed into the existing studs in th wall, so it's not going anywhere :)
Load More Replies...Can you delete comments?? How do you do that? I've always missed that on BP. Can you edit too..? Thanks in advance, I would appreciate it so much :)
Load More Replies...Obviously this the work of a talented carpenter. But I have a question is a relatively straight forward general contracting job the kind of thing you want to show on BoredPanda? What's next how to put siding on a house or how to shingle a roof?
The point of this is that it's a DIY job. I never did anything like this before and purchased a bunch of the power tools as part of the project. It's meant to serve as inspiration for folks to get an idea of how to change up a space.
Load More Replies...But you like pointing out that You Did Better. Charming.
Load More Replies...The space is kind of hard to photograph with a non-wide angle lens, so it's just to show the space better. There's also 1/4 inch thick glass in all the window openings, per one of the later picture descriptions.
Load More Replies...


 No fees, cancel anytime


477
79