I found this old Kindle 3 in our E-Waste box at Maker’s Asylum, Delhi. It was not working so I decided to open it up. The back is kept in place by a dozen tabs around the sides. I used my finger nails since part of the back had already popped open. There are 24 screws holding everything in place. I used a Phillips head screwdriver to remove them.
Upon opening it I found: Screen was broken; Electronic parts were corroded;Tried to charge its battery with universal charger, It didn’t get charged;So everything was useless but wait !! The body is still perfect!
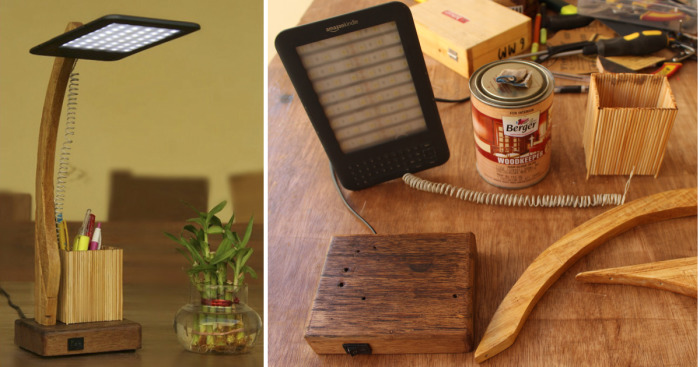
So I converted this old broken Amazon Kindle to a study lamp so I can still use it to read REAL books.

Broken Kindle Story

Fixing LEDs

I fixed 5050 LEDs in place of Kindle’s display area. LED strips are self adhesive so its easy to fix them on a surface. To ease the connection I cut positives from one side and negative terminals of LED strips from another end. Then striped a copper wire and connected all positives of one side and all negatives of another. For diffusing the light I used a translucent plastic sheet and sandwiched it with clear sheet which was on Kindle display already.
Making Stand

The stand is made using two parts attached to each other using self taping screws and one small part to attach it with Kindle. I used lumber and cut out curved shape with jigsaw. The Kindle is attached to the small triangular piece by a nail and super glue so its fixed permanently. The triangular part connected to stand by a screw. So it can be tilted also. After cutting it I sanded it using hand grinder with sanding pad attachment.
Making Base

The base was made out of an old plank which was part of a bench. Using circular saw I cut it to the required length. I also trimmed thin wood from all sides using circular saw to expose cleaner wood. On top and bottom surface I used hand planer to get rid of the paint and get cleaner wood. I then ran the final block on table router to route the edge profile.
Electronics Housing

To house the power supply I marked the area on the bottom surface of the Base block and switch then I chopped out the wood. For internal wiring I drilled a hole through the cavity made for switch to the cavity made for power supply. The side on which switch is mounted is the front side. For Input AC wire I drilled another hole in the back side to the power supply chamber. Again another hole was drilled from top surface to the power supply chamber to connect wires from power supply to the LEDs.
Pen Stand

Pen Stand was made using 3mm wood sticks joined together to form four walls using super glue. After making four sides, I used Dremel to cut it out to length and sanded it to give smooth edge using sanding attachment. In corners I left an extended stick and drilled 3mm holes on the top surface of the Base Block to fix the pen stand on it.
Wiring

From domestic AC to power supply I used normal 2 core wire connecting neutral directly to power supply and phase via switch. I soldered all connections and used heat shrink sleeves to prevent short circuits.

I found an old 4 core CCTV Cable, stripped it using cutter, took two white wires from it and coiled it around a pen. I used this coiled wire to connect the power supply output to the LEDs inside Kindle.
Finishing

Now that all the parts were made I used Berger Wood Keeper polyurethane and applied it using linen cloth. Note: Avoid cotton for polishing as it may leave small fibres on the surface of the wood. Once the polish is dried I assembled all the parts together using wood screws. I also covered the power supply in the bottom using a small piece of plywood. Finishing wood does the real magic, the texture came out real nice.
5Kviews
Share on Facebook

It's great idea! If you can cover that kindle with wood, it would look better I think.
It's great idea! If you can cover that kindle with wood, it would look better I think.

44
2