Get Premium
Dark mode theme is available exclusively for premium users. Learn more about the benefits of subscribing.
No fees, cancel anytime.

 Dark Mode Ad-Free Browsing Unlimited Content
 Ad-Free Browsing Unlimited Content Dark Mode
Join 1.2 million Panda readers who get the best art, memes, and fun stories every week!
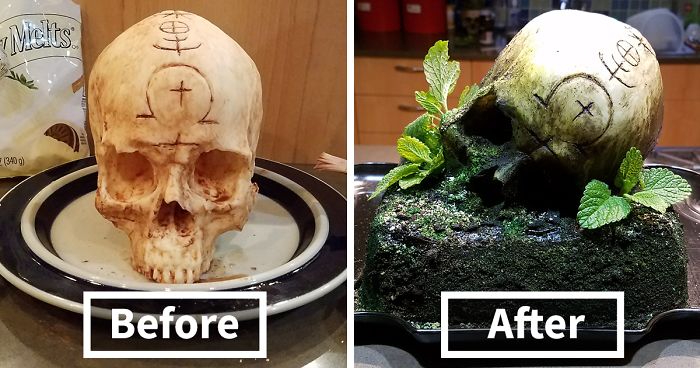
For me, Halloween is 365 days a year, so when I found a 1:1 silicone skull mold, I knew I had to make a skull cake out of it.
And since I can’t eat the whole thing by myself, I took it to work…
More info: eatthedead.com | Instagram
I made it to see if the new skull mold I bought was worth what I paid for it. I’d say yes. And then I got carried away…
I do the same thing to the top half of the mold as well. Once the first layer in both the top and bottom of the mold has solidified, I pour in more chocolate. I assemble both halves of the mold and strap it together. Time to start rotating it. In order to get a consistent layer of chocolate on all parts of the mold and to seal the two sides together, I spend the next two hours rotating the mold around and around 360 degrees, flipping it every 2 minutes. It’s tedious, but the results are worth it. By the way, I found this mold on Ebay. It’s 100% food safe silicone and is life sized.
I used a skewer to carve in some symbols and a mixture of vodka and cocoa powder to give it a dirty, worn, realistic look.
This lets me know where I need to carve it down so the skull sits the way I want it to.
I smooth on the frosting and grind up some chocolate cookies to make my “dirt.”
Using it as a reference, I start assembling my final cake. I sprinkle crumbled chocolate cookies on top of the frosting to simulate dirt.
I also tucked a few green silk leaves onto the cake to see how it looked. I’m pretty happy with it so far, but it needs more color. Then I go over the skull with my airbrush, adding darker green, yellow and black food coloring to add depth and make it look more aged and worn.
36Kviews
Share on FacebookWow! It looks so realistic! I'm seriously impressed by this cake. When you look at it for the first time, you would never think that it's completely edible. Super well done!!!
Wow! It looks so realistic! I'm seriously impressed by this cake. When you look at it for the first time, you would never think that it's completely edible. Super well done!!!
it's unique but it would be great if there are candies inside of the hollow skull (m&m or gummy worms).


 No fees, cancel anytime


359
39