Get Premium
Dark mode theme is available exclusively for premium users. Learn more about the benefits of subscribing.
No fees, cancel anytime.

 Dark Mode Ad-Free Browsing Unlimited Content
 Ad-Free Browsing Unlimited Content Dark Mode
Join 1.2 million Panda readers who get the best art, memes, and fun stories every week!
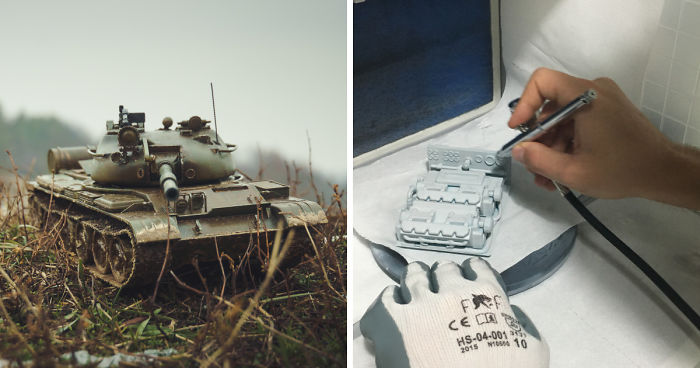
Ever since I got into 3D printing I’ve always dreamed of building a detailed scale model replica. I knew it would not be an easy way to accomplish this but I was determined to at least try. After in-depth studies of air brush painting, modulation and weathering techniques I decided to go with a tank replica. That meant I was going headfirst into one of the most complex areas of scale modelling: trying to replicate scratches of various depths, streaks of rust, dirty, oily, grimy, muddy parts … I was exalted with the possibilities and rushed to work.
Sadly, my 3d modelling skills weren’t as good as I’ve hoped for this kind of task, so designing all the intricate parts and details were out of the question. I then turned my focus to a model market place which had the blueprints of such a replica and I continued from there.
I’ve spent somewhere near 15 hours adjusting the files to my wishes and 3D printer that I own, splitting parts, enlarging details, fixing the newly modified files. The 3D printing alone lasted for a whooping 300 hours, some of which included some retries of parts I wasn’t completely happy with. During post-processing work is where I’ve spent around 30 hours sanding, priming and filling out with putty the different imperfections of the printed model. It was slow progress but the scale replica was beginning to shape beautifully.
The last step was to paint the model and I began by choosing 3 similar colors on which the current modulation is based. That gave me a good base on which to further enrich the looks from a chromatic point of view. There were 8 steps in total during which I’ve applied different effects raging from simulation of chipping, streaking, mud splatter to dust effects, applying color filters, washes, different stains (oil, engine grime etc) and the most fun of them all, mud. The latter one was achieved by combining a plaster compound with pigments, water and some fluid retarder for easy application and the result was pretty nice.
In the end, all the paint work was sealed with a satin varnish for protection.
More info: Facebook
1Kviews
Share on Facebook
I'm not a fan of scale models but this looks just amazing! Really impressive
I'm not a fan of scale models but this looks just amazing! Really impressive


 No fees, cancel anytime


38
3