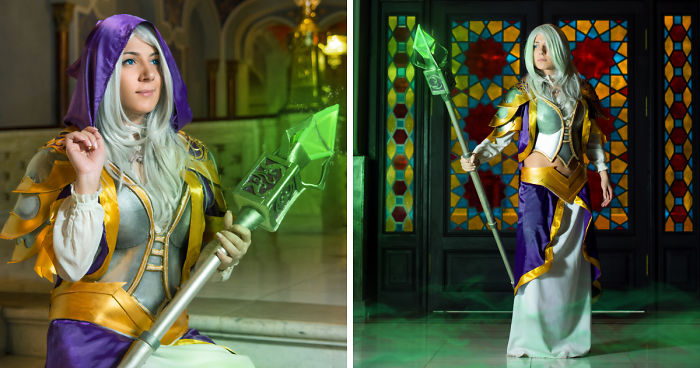
Almost all characters from games have some accessories and weapons. Let’s speak about how to create Wand/Staff out of food super easy and cheap materials, even using the EASY trick to add some lightning into wands. This tutorial is based on my Jaina Proudmoore Cosplay from World of Warcraft, but you can use this tips to make any other wands or staffs, changing the design.
INTRODUCING THE LIST OF MATERIALS:
Water pipe
PVC sheet
Thin EVA foam (yoga mat)
Transparent food container or a bucket (I have used transparent green one for my Jaina Proudmoore -Staff, feel free to choose any other color)
Small flashlight
Super strong glue (I have used the hot glue gun)
Metallic acrylic paint – silver, purple and black, or dark silver (if you don’t want to mix the colors)
Tiny door hinges
PVA Glue (white glue)
TOOLS:
Hot glue gun, Scissors, Rotary tool or extremely sharp scissors (you need this to carefully cut out the shape of your crystal out of the bucket, or the food container)
More info: novartem.com | Facebook

First of all, let’s cut out the crystal pieces out of the paper and move the template to the food container or the bucket. In order to form a crystal, you will have to cut out small triangles and glue them together, from the inside. I have pre-taped the plastic triangles from the outside to fix them in the position I needed.

Happy with your template? Time to cut your food container or plastic!

As you can see in the scheme, the lower pieces are different than the upper ones. We have to put the flashlight into the crystal, so make sure to leave a space for it. After our crystal is ready, let’s start to craft the box that will hold the crystal and hide the flashlight. Cut out the square pieces out of the PVC sheet and glue them together. Our box will have a door, so we could reach the flashlight in order to switch it on, or of, or even change the battery. For the door, connect the “door” and the box, by drilling the tiny door hinges in the corner of our box. Trace the flashlight shape in the middle of the upper PVC sheet and cut out the hole. Trace the pipe end on the lower PVC part and cut the hole out (that’s why you need a rotary tool)


I have also glued the EVA foam inside of the box, in order to hold the flashlight.

Let’s get back to our crystal. We are going to do the crystal frame or crystal holder. Cut out the stripes out of Eva foam and glue them on the sides of the crystal connection, this will help you to hide the glue marks. This step is individual, you can leave your crystal like it is, it’s all up to you, but however, you will still have to fix the crystal on the box. Wrap the bottom of the crystal into EVA foam and carefully glue the construction right to the edges of the hole (don’t glue it on the flashlight)

Before you attach the pole to the box, make sure you have decorated the box and the pole itself, using the EVA foam!

After you are done decorating your staff, wrap the pole end which connects the box, leaving the top untouched. Stick the tip of the pipe into the box and go crazy with the hot glue, open the box and apply the hot glue from the inside as well, wait patiently before the glue hardens.

Prime the staff before painting it, I have used the multiple layers of the white glue (PVA). Let each layer of PVA dry completely before you apply another one. I usually use 4-5 layers. Be careful with the crystal, you can cover it in paper tape, in order to get rid of unnecessary glue, or paint marks on it.


4Kviews
Share on Facebook


26
2