Get Premium
Dark mode theme is available exclusively for premium users. Learn more about the benefits of subscribing.
No fees, cancel anytime.

 Dark Mode Ad-Free Browsing Unlimited Content
 Ad-Free Browsing Unlimited Content Dark Mode
Join 1.2 million Panda readers who get the best art, memes, and fun stories every week!
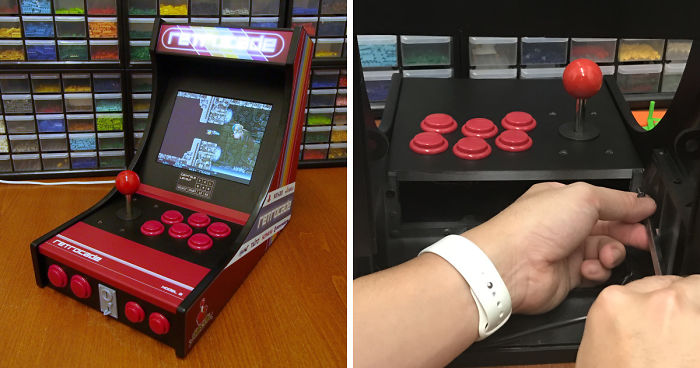
I grew up in the 80s, probably the glory days of arcade gaming, so I have always wished I had an arcade machine of my own with real arcade joystick and buttons.
Fairly recently, I built a 3D printer from kit, so I thought I should put it to good use and make myself a desktop arcade machine.
Over a few weeks, I ordered all the electronic parts I needed, like the controller, LCD display, Raspberry Pi 3, etc. I then did all the 3D modelling and spent over 100 hours printing the parts. Also, I wanted my arcade machine to have a lot of detail, so I also created things like a faux coin slot, etc. To give it the professional finish, I also designed the artwork which I sent to a commercial printer to have it printed on vinyl sticker.
Do take a look at the video and photos below to see how much effort I put into making a small dream of mine come true!
More info: hackaday.io
13Kviews
Share on Facebook
If I had a 3D printer, I would print a 3D printer. Random thought of the day =D
i miss mitch hedberg. he would have liked this post.
Load More Replies...nicely done...but if I may it would have been far easier (and with less plastic) to use wood and laser cutter ;)
Indeed, that would have been easier =) ... and I actually considered that option first, but unfortunately, I don't have access to a laser cutter. Also, doing it with 3D printing does have certain advantages in terms of how some of the parts are designed. Ideally, I would have the main parts done in wood and the detailings 3D printed ;)
Load More Replies...Are you using Retropie with Emulationstation? If so, which theme are you using? Looks way better than the default one.. I use attractmode on a Windows NUC to achieve the same (even better) but I'd like to get the same on my retropie.
Amazing! You are a genius. The work this took! Congratulations, it looks so professional and perfect
Good job my man....please produce more so I can relive my childhood at bars!


 No fees, cancel anytime


126
15