Of course, you can throw away your celery butts. But you can also use them to grow a new batch. Fresh and healthy food isn't reserved for those whose wallets can withstand a trip to the grocery store's organic section — anyone with a container and a few sun rays can grow something they can eat or admire later on. Even replacing as little as one or two items on your plate with those you've nurtured yourself can add so much more fun and flavor to your world. Below are some of the ways you can start. Bon appétit!
This post may include affiliate links.
Green Onions

"Pop your cut scallions in a glass of water and, clearly, they regrow. I had to try it for myself.
I chopped off some scallions and stuck them root-down in a Mason jar above my sink. I topped off the water once or twice when I saw that it had mostly evaporated, but other than that I did nothing. To my surprise, these grew fast. Within a day or two there was fresh growth, and within a week they had 3 to 4 inches of fresh green onion on top."

To learn more about regrowing foods, Bored Panda got in touch with Catherine Hughes, the creator of home & garden blog Growing Family.
Hughes pointed out that different veggies regrow in different ways; some can return to life from seeds that the original plant produced, while others can recover from a piece of the original plant. You should always try to do your research!
"The easiest way to have a go at regrowing food is indoors, ideally in a saucer or container on a bright window sill," Hughes explained. "Remember to water regularly."
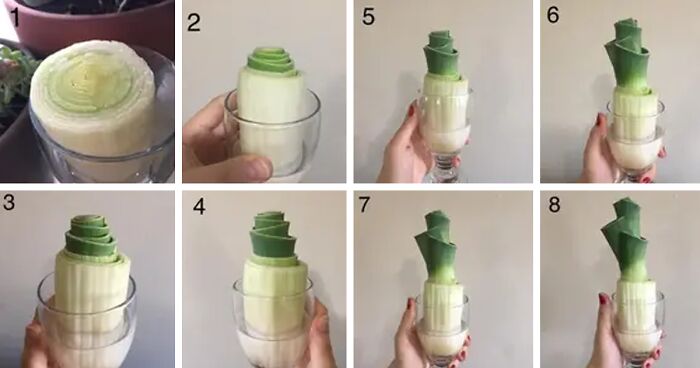
Soaking The Root End Of Leeks In Warm Water Allows A Whole New Set Of Tender Leaves To Grow

So you take the edible bit, pop it in some water and grow more inedible bits? Great
Those who are new to the game might want to start with something more forgiving. "If you grow salad from seed, lots of varieties will keep producing new leaves after you harvest them. Go for varieties labeled as ‘cut and come again’, and aim to pick the leaves little and often. If you harvest them all at once, the plant will struggle to recover," Hughes explained.
According to her, garlic is another good option. "All you need to do is plant a single clove in a pot, about an inch below the surface, with the pointy end sticking up. Water it whenever the soil feels dry. When the leaves start to turn yellow you can harvest your garlic bulb."
"Celery is also easy to regrow; just pop the base in a shallow dish with some water, and new leaves will soon start to emerge," Hughes added. "Change the water every couple of days, and transfer it to a container filled with soil once the roots have formed."
Grow New Potatoes From Old Ones

Instead of throwing away old potatoes that have grown eyes, simply cut it into several pieces and plant it in the ground to grow new ones. Each eye can turn into a whole new potato
Yup. Growing potatoes is super easy. I grow them in a 5 gallon bucket. It's just really important to keep the roots/tubers fully covered with soil as the plant grows. If they get too much chlorophyll, the potatoes can turn toxic for humans. (They turn green. You'd have to eat a lot, be very small, or have a compromised immune system to actually get sick.)
As you become more comfortable with looking after your greens, you can try something more ambitious. Like avocados. "They're tricky [because] you need to suspend the pit over a glass of water so that it’s semi-submerged and keep an eye on the water level," Hughes said. "Plus, avocado plants can take up to ten years to bear fruit!"
If you don't want to wait for that long, consider ginger. "It's another challenging vegetable to regrow. It’s not hard to plant, but it needs a humid, warm environment to grow, and can take almost a year to produce a harvest."
Gardening is a fantastic hobby not only for the foods it produces. It can build self-esteem, reduce stress, and help you combat loneliness. Try it, even if you fail, you don't.
Mint

Simply place a stem of around 10cm/ 4 inches long into a glass of water, making sure that the leaves are well above the water level. Roots will soon begin to grow and as soon as the roots are growing well, these cuttings can be transplanted into containers, or directly into your garden
Carrot

Soak carrot tops in a shallow pool of water for one week and transfer to soil when roots form. The tops will grow beautiful greens that are great in salads and pestos, as a replacement for parsley, or simply as a beautiful house plant
Regrown Mushrooms From Their Stems

"Plant mushroom stalks in soil with some compost or used coffee grounds and keep them in a moist environment, preferably where it will be cool at night. They can be tricky to grow, and within a few days the stems will either start to sprout new heads or rot."
No way. You can take spores from ageing caps and innoculate sterilised coffee grounds with oyster mushrooms or champignon varieties, but stalks? No way.
Sweet Potatoes

When we talked about growing regular potatoes, we mentioned that you need to cut the potato into small pieces and places it in a pot of soil watering it regularly. There’s also another method to grow regular potatoes or sweet potatoes. Instead of placing them in the soil, you’ll have much greater success if you cut them in half and use toothpicks to suspend them over a glass of water. The great thing about sweet potatoes is that they are an excellent staple food and lost a lot longer than normal ones. This is one of the healthiest vegetables you can grow and just a few will produce hundreds. Once they start to grow roots, you can put them in soil.
Sprout An Avocado Tree From The Pit

STEP 1 – REMOVE & CLEAN PIT
You’ll need to start by removing the pit from the avocado carefully (without cutting it), and then washing it clean of all the avocado fruit (often it helps to soak the pit in some water for a few minutes and then scrub all the remaining fruit off). Be careful not to remove the brown skin on the pit – that is the seed cover.
STEP 2 – LOCATE WHICH END IS ‘UP’ AND WHICH IS ‘DOWN’
Some avocado pits are slightly oblong, whereas others are shaped almost like perfect spheres – but all avocado pits have a ‘bottom’ (from where the roots will grow), and a ‘top’ (from which the sprout will grow). The slightly pointier end is the top, and the flat end is the bottom. In order to get your pit to sprout, you will need to place the bottom root end in water, so it’s very important to figure out which end is the ‘top’ and which is the ‘bottom’ before you go piercing it with toothpicks.
STEP 3 – PIERCE WITH FOUR TOOTHPICKS
Take four toothpicks and stick them at a slight downward angle into the avocado seed, spaced evenly around the circumference of the avocado. These toothpicks are your avocado scaffolding, which will allow you to rest the bottom half of the avocado in water, so therefore the toothpicks need to be wedged in there firmly. I recommend sticking them in at a slight angle (pointing down), so that more of your avocado base rests in the water when you set this over a glass.
STEP 4 – PLACE AVOCADO SEED HALF SUBMERGED IN A GLASS OF WATER
And set on a quiet windowsill with sunlight. It’s helpful to use a clear glass so you can easily see when roots start to grow, and also when the water needs to be changed. Many guides recommend to change the water every day, but I found, through trial and error, that it is better to change the water every five days to a week or so. You do want to make sure you change the water regularly, to prevent mold, bacteria and fungus growth, which can doom your little avocado sprout.
STEP 5 – WAIT FOR YOUR AVOCADO SEED TO SPROUT!
Many online guides I have read say that sprouting can take anywhere from 2-4 weeks, but in my experience, it usually takes at least 8 weeks to get a sprout, so be patient. Here is the process you will witness:
1. The top of the avocado pit will dry out and form a crack, and the outer brown seed skin will slough off.
2. The crack will extend all the way to the bottom of the avocado pit, and through the crack at the bottom, a tiny taproot will begin to emerge.
3. The taproot will grow longer and longer (and may branch), and eventually a small sprout will peek through the top of the avocado pit.
4. Do not allow your taproot to dry out unsubmerged EVER – doing so will be the death of your plant
STEP 6 – POT IN SOIL WHEN TREE IS ABOUT 6” TALL
When the stem is 6-7 inches long, cut it back to about 3 inches, this will encourage new growth. When it hits 6-7 inches again, pot it up in a rich humus soil in an 8-10″ diameter pot, leaving the top half of the seed exposed. Place on a sunny windowsill. Avocados love sun – the more sun the better.
STEP 7 – WATER & WATCH IT GROW
Give it frequent waterings with an occasional deep soak. The soil should always be moist, but not saturated. Yellowing leaves are a sign ofover-watering; let the plant dry out for a few days.
STEP 8 – PINCH OUT TOP LEAVES TO ENCOURAGE BUSHINESS
When the stem reaches 12 inches tall, pinch out the top two sets of leaves. This will encourage the plant to grow side shoots and more leaves, making it bushy. Each time the plant grows another 6 inches pinch out the 2 newest sets of leaves on top.
STEP 9 – TROUBLESHOOTING BUGS
My avocado trees seem to collect aphids – the nasty critters can’t get enough of the delicious avocado leaves. If you get them, here’s how to get rid of them: Wash all of the aphids off the plant by spraying your plant down with a hose outside or in the sink/shower. Once the little pests are off, spray your plant with a mixture of water with a small squirt of dishwashing liquid and a teaspoon of neem oil. This will keep aphids from returning. Check your plant every 4-5 days and re-clean and spray when necessary.
STEP 10 – WINTERING
Baby avocado trees can kick it outdoors in summer, but if you live anywhere where it gets cooler than 45 degrees F, you’ll need to bring them back indoors in the fall/winter, before the temperatures fall.
You need to splice avo to get decent new avos and it can take years.
Strawberries

Carefully cut the outer skin (containing the seeds) off the berry, or extract seeds using tweezers. Place the skin or seeds in a container with soil, cover with soil, place in a sunny spot and water regularly until sprouts emerge. Transplant the sprouts to a strawberry pot or outside garden in springtime
Basil And Cilantro

Most cut herb bundles (the kind you get from the grocery store) can be grown into whole new plants. Remove the bottom leaves from the stems (but keep the top ones) and soak them, cut side down, in warm water. Once roots have sprouted, transfer to dirt and watch it grow
Sprout The Tops Of Pineapples Into Beautiful Houseplants

Once you bring your pineapple home, cut off the leafy top about half an inch (1.5 cm.) below the leaves. Then remove some of the lowest leaves. Trim off the outer portion of the pineapple top at the bottom of the crown, or stem, until you see root buds. These should resemble small, brown-colored bumps around the stem’s perimeter. Allow the pineapple top to dry for several days to one week prior to planting. This helps the top to heal, discouraging problems with rotting.
Although it’s possible to sprout a pineapple in water, most people have better luck rooting them in soil. Use a light soil mix with perlite and sand. Place the pineapple top in the soil up to the base of its leaves. Water thoroughly and place it in bright, indirect light. Keep it moist until roots develop. It should take about two months (6-8 weeks) for roots to establish. You can check for rooting by gently pulling the top to see the roots. Once significant root growth has occurred, you can start giving the plant additional light.
PSA: in order to get a mature pineapple plant to produce fruit, place a couple of pieces of a cut apple on the heart of the plant. The gas (undetectable to us) that comes out as the apple turns brown and slowly disintegrates, triggers the plant to flower. Commercial pineapple growers spray the gas directly on the plants to trigger this.
Lemons

Lemon trees can be grown from seeds and if you live in an area that gets really cold winters, you can simply grow dwarf trees indoors. Meyer lemons tend to have smaller plants so choose these if you want an indoor lemon tree. You will begin to get lemons from your tree in just a couple of years so remember that you won’t actually get lemons the same year that you plant them. Just be sure to clean and dry your seeds before planting and choose a soil that is rich in nutrients for the best results.
Peppers

You can grow a number of hot peppers from the seeds that are leftover. Just collect the seeds from your habaneros, jalapenos or any other peppers that you have on hand. Plant them in potting soil and keep in direct sunlight unless it is warm outside and then you can just plant them in your garden area. Peppers grow relatively fast and don’t require a lot of care. Once you get a new crop, just save some of the seeds for replanting again.
Napa Cabbage Butts Can Be Regrown

Garlic

All you need:
A small, clear container (I used tiny plastic shot glasses so that my glass shot glasses wouldn’t smell like garlic… coconut rum + garlic = gross)
Unpeeled garlic cloves (make sure the garlic is from your local farmer’s market)
Water
Add a bit of water at the bottom of your shot glass or small container – just enough to cover the bottom of your clove (don’t submerge the clove or it’ll rot). Keep this on your windowsill and after a few days, you’ll have scapes! Let them grow until they’re several inches tall, then cut from the top.
Bok Choy

•Chop off the base of the bok choy, much like you would slice the base of a bunch of celery.
•Place the bok choy in a bowl or saucer of warm water, with the cut side facing up. Set the bowl on a windowsill or another sunny location.
•Change the water every day or two. It’s also a good idea to occasionally mist the center of the plant to keep it well-hydrated.
Rosemary

Rosemary can easily be regrown by using cuttings. You’ll most likely need a pot of soil for this one. Cut off a leaf or stem from a big plant and place it in a cup of water and let it grow for a few weeks. After that, transplant it to soil, keeping the soil moist but not drenched. Wait a few months and you’ll have a fully-grown rosemary plant. This one doesn’t do too well in the winter, so try and save it as a summer project.
Keep in mind though, rosemary is a very fast growing bush. It will rapidly outgrow most pots.
Lemongrass Stalks

Soak lemongrass stalks, root end down, in warm water. After several weeks, transfer the rooted stalks into soil and grow your own fresh lemongrass!
Tomatoes

Tomatoes can be grown just by saving those seeds that you probably throw out anyway. You just have to rinse the seeds and allow them to dry. Plant in a good, rich potting soil until you notice growth coming in. Allow the seeds to get a few inches high before transplanting them outdoors. During cold weather you can grow your tomatoes indoors. Just remember to keep them in an area that gets plenty of sunlight and water a few times each week.
Tomato plants don't grow true from saved seed, so you're unlikely to get a particularly good cultivar of tomato this way. You're far better off buying good quality seeds of a tasty tomato that's suitable for your needs and growing conditions.
Celery

The butt of celery can regrown a few extra stalks with just a little love. Simply place the end of the celery, root side down, onto a plate of water in a sunny window. After one week, roots will appear and it's ready to transfer to soil.
your whole house will smell of celery, literally, your WHOLE HOUSE! put then outside when you can.
Fennel

Simply place a stem of around 10cm/ 4 inches long into a glass of water, making sure that the leaves are well above the water level. Roots will soon begin to grow and as soon as the roots are growing well, these cuttings can be transplanted into containers, or directly into your garden


Ginger

How to Grow your Own Ginger
1. Select a Healthy Root. The best roots (rhizomes) for growing are firm, fleshy and already have green points forming at the end of the 'fingers.' If you prefer, cut the ginger into separate pieces with at least one green tip per segment and allow to dry for a few days.
2. Soak the Roots Overnight in warm water. This will stimulate growth and rinse off any chemicals that might be present. A few of my friends have also had a lot of success soaking their various root crops in compost tea, believe it or not!
3. Set the Roots in Sphagnum Moss (or coconut fiber) so that the top of the root is visible, with the green growing tips pointing up. I used a propagating tray, but you can use any container wide enough to accommodate the root. Keep the sphagnum moss lightly moist, but allow it to dry out between waterings.
4. Transplant to a Pot once the first leaves have formed. At this point you should notice a mass of fleshy white roots, which can be gently teased loose from the moss. Hold the root just beneath the edge of the pot, and fill the pot with fresh potting mix so that the fine roots are surrounded and the top of the rhizome is barely visible.
5. Caring for Your Ginger is easy, as long as you provide warmth, humidity, moisture and drainage. Summer is the best time to grow ginger because it's already hot and humid, but if you're growing it indoors you can place it in a bright windowsill and occasionally mist it with water. Drainage is provided by simply using a pot with drainage holes.
Ginger is awesome. I did not follow these steps, just took piece of ginger, put it in ground and it grew. But it takes a while. However for winter upper part dies, In country in Europe where in winter there's not enough light. I wanted to get rid of it thinking it's done but when I took it out of ground it had bunch of good big healthy roots, so instead I repotted it and it grew again after some months. I never used root from my ginger,only love having it growing. However it's just a grass, not very interesting for most people.
Bean Sprouts

This one doesn’t take much work, but there a few steps involved. You can either chop off the bean part of the sprout or buy just the beans at your local grocery store. Soak them in a cup of water completely, mixing them around with your hand. Leave them soaked for 24 hours and the seed should start to germinate. After that, cover them in 2 paper towels, one on the bottom and one on top. Wait a few weeks and they should grow tall like grass!
I'm going to use this one. My son absolutely loves bean sprouts but they are a bit hard to find most of the year around here.
Cherries

You can actually grow your own cherry tree from the pit of the cherry, although it does take some time to grow an entire tree. You will need to keep the pit in cold storage for a few weeks so that they will germinate. To do this, simply clean the pit, pack it in nutrient rich soil and store it in a lidded container in your refrigerator. Leave for about twelve weeks and then transplant outdoors
Radishes

All you need for this is a glass of water, toothpicks, potting soil and some radishes. Take a radish, cut it in half, and cut off some of the green leaves on the top, but make sure to leave at least a small portion. Place the top half dangling over water by using toothpicks to suspend it in air over the glass. Just make sure that it’s not completely submerged. In a few weeks you’ll notice that roots are starting to grow out from the bottom. From there you can transplant it to a pot of soil if desired. It’s a really easy process. If it doesn’t work, try using the bottom half instead.
They say to cut in half in a lot of these but in the pic they are not cut in half?
Turnips

We placed this plant near beets and rutabagas because the way they grow is very similar. All 3 plants start out growing roots along with green leaves sprouting out from the top. Cut off the end with the stem and wait for roots to grow. Once this happens after a couple of weeks, transplant the turnip to a pot of soil and wait about 3 months for the plant to fully mature. Just like beets and rutabagas, turnips do a lot better in harsher weather conditions than most other vegetables.


I swear all of the instructions begin with: simply... Get the golden fleece, kill the minotaur, and your parents while ur at it, commit suicide, persuade hades to bring you back to life, then look at your rotten stalks, and ta da!! Youve failed! Or maybe im just jealous if everyone who actually managed this🤣
So? You can grow plants from seeds? Are there people who don't know what seeds are? That's a big portion of these.
