I’m a student with no experience in woodworking or computers. But since I prefer desktops over laptops I decided to start a project last summer.
If I were to spend this much money (for a student at least) on the computer components, I might as well spent a lot of time on building a case. This could have been done way faster but given my little experience I only had basic tools like a chisel and files at my disposal.
Nonetheless I’m happy the final result and I recommend anyone who is in doubt about starting a similar project to just commit to it. It is easier than it looks.
This is how it looks and you can make one yourself

I’m a student with no experience in woodworking or computers. But since I prefer desktops over laptops I decided to start a project and build a wooden computer

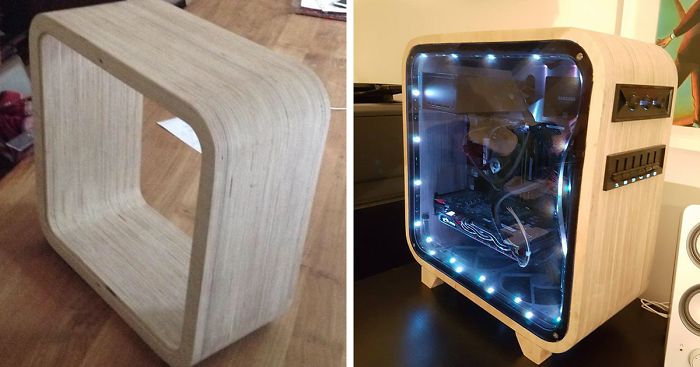
The beginning of the project. I worked for a few weeks in a local carpentry. I asked if they could make me a custom frame (420mmx420mm). A few weeks later this got dropped off at my home

I removed the edge for the side panels. I used a chisel and hammer to remove 5mm deep and 15mm high pieces of unneeded wood and smoothed the edges with a dremel

I installed the fans. These fans are held in place by friction only. I used a metalfile to file off a fraction of wood everytime until the fans fitted snugly. Same method was used for fans on the bottom

I went with 2x140mm fans on the top and 2x140mm fans on the bottom this way the hot air can follow it’s natural pathway: straight up. I used a cheap jigsaw to roughly cut out the holes for the fans and shaped some more with a wood file.
Installing the controllers wasn’t easy. The bays were too big so I cut them off with my dremel and sanded the cuts with 200 grit sandpaper. RGB LED controller and fancontroller were fitted into the body

I bought the aluminium sheets at a local metalshop. I used a metal file to file the edges until they fitted perfectly into the frame. The outer wall was also filed to shape

Next step was to install the power-supply. The PSU I used was a small form factor power-supply

So it came with a metal adapter to make it fit into cases with a normal PSU hole. I trimmed it down and drilled some extra holes so I could use this to attach the PSU to the back of the case
I ordered this 390x390x5mm black plexiglas online and again, as I did with the aluminium outerwall, I filed the edges to fit the case

Then I attached the fake wall to the case. The L irons I used were a bit too large so I used a simple metalsaw to shorten them. Then I attached the fake wall to the case using small bolts, screws and washers

I had to installing the ON/OFF switch. I bought this online from a german shop, called a “Vandal switch”. I drilled a hole in the wall and used the metalfile to make it the right size

I installed the i/o panel. The i/o panel is held in place just by fitting snugly

I initially intended to make the stands out of aluminium but decided to go with wood scarps anyways because it gives the case a better coherence

The final assembly

Illustration of the fake wall that hides all the cables from view and makes sure the pc is tidy on the inside

I have also installed LEDs but I never turn these on because I don’t like the look of it. Only use of them is to show the inside of the case

First time turning the wooden pc on

40Kviews
Share on Facebook

You didn't make a wooden computer, you made a wooden computer tower. ;) Nice job, though.
I wouldn't have put the fans on the top myself, dust will fall in through them so will build up a lot more inside than usual.
Load More Replies...''Nonetheless I’m happy the final result and I recommend anyone who is in doubt about starting a similar project to just commit to it. It is easier than it looks'' and then "I worked for a few weeks in a local carpentry. I asked if they could make me a custom frame (420mmx420mm). A few weeks later this got dropped off at my home" Are you f kidding me? It's not easier than it looks, you asked a carpentry to do it!! WTF???
Hi, just for personal interest where did you get the wooden frame from and how much did it cost? Thanks!
And you wasted so much wood in every center of panel.. Anyway, good try, just add some oil/laquer to make wood stand out.
it's not that easy to catch fire, more likely to deform first for the really bad cooling system design and low conductivity of heat...
Load More Replies...Cool design but computers generate a lot of heat. I suspect some intense warping before too long.
The wood actually feels very cool when the computer is running. Also the grain in the sheets of wood are in different directions so it's pretty resistant to warp. It has been running for 8 months and nothing moved a bit :] Thanks for the compliment though.
Load More Replies...great job!! looks very nice! you should put some wooden cover for monitor too :)
Very nice job!! Now, there is a reason why tower PCs come in metal cabinets: to shield the user from electromagnetic radiation. I would prefer a metal plate between me and the internals.. but of course many cabinets come like that with lights to show the components.
Yeah i know. I'm planning on buying some paint or some sheets to put on the inside to protect from EMF.
Load More Replies...Well done! You have a towering talent! Now, have you solved the Rubik's cube? :D
One piece broke off and i tried glueing but it didn't work :p haven't played with it since and i forgot some algorithms :[
Load More Replies...Sorry to say this, This is a really bad decision, unreasonable idea from an completely outsider in my opinion. Because he/she might thought the case is just a container, but actually why most cases are made of metal board is for isolate the radiation, even better cases' coating provide extra protection from radiation. Wood? HAHAHA. Besides this, the fan cooler is not ok just exsiting there without any airflow path designed. Hot air raises, cool air descends. If the fans blow downward, they just pump out the only cooler air in the case. If they blow the air in the case, the hot air is kind of compressed in it and will be pushed out from all other small gaps. additionally, most most wood and plastic is not good conductor of heat...and many more wrong things. Hope he/she don't have high performance parts in it, and hope he/she won't paint it some day, cause the heat inside will made harmful gas vaporized...that's a smell...
The link does not work for me
Load More Replies...You didn't make a wooden computer, you made a wooden computer tower. ;) Nice job, though.
I wouldn't have put the fans on the top myself, dust will fall in through them so will build up a lot more inside than usual.
Load More Replies...''Nonetheless I’m happy the final result and I recommend anyone who is in doubt about starting a similar project to just commit to it. It is easier than it looks'' and then "I worked for a few weeks in a local carpentry. I asked if they could make me a custom frame (420mmx420mm). A few weeks later this got dropped off at my home" Are you f kidding me? It's not easier than it looks, you asked a carpentry to do it!! WTF???
Hi, just for personal interest where did you get the wooden frame from and how much did it cost? Thanks!
And you wasted so much wood in every center of panel.. Anyway, good try, just add some oil/laquer to make wood stand out.
it's not that easy to catch fire, more likely to deform first for the really bad cooling system design and low conductivity of heat...
Load More Replies...Cool design but computers generate a lot of heat. I suspect some intense warping before too long.
The wood actually feels very cool when the computer is running. Also the grain in the sheets of wood are in different directions so it's pretty resistant to warp. It has been running for 8 months and nothing moved a bit :] Thanks for the compliment though.
Load More Replies...great job!! looks very nice! you should put some wooden cover for monitor too :)
Very nice job!! Now, there is a reason why tower PCs come in metal cabinets: to shield the user from electromagnetic radiation. I would prefer a metal plate between me and the internals.. but of course many cabinets come like that with lights to show the components.
Yeah i know. I'm planning on buying some paint or some sheets to put on the inside to protect from EMF.
Load More Replies...Well done! You have a towering talent! Now, have you solved the Rubik's cube? :D
One piece broke off and i tried glueing but it didn't work :p haven't played with it since and i forgot some algorithms :[
Load More Replies...Sorry to say this, This is a really bad decision, unreasonable idea from an completely outsider in my opinion. Because he/she might thought the case is just a container, but actually why most cases are made of metal board is for isolate the radiation, even better cases' coating provide extra protection from radiation. Wood? HAHAHA. Besides this, the fan cooler is not ok just exsiting there without any airflow path designed. Hot air raises, cool air descends. If the fans blow downward, they just pump out the only cooler air in the case. If they blow the air in the case, the hot air is kind of compressed in it and will be pushed out from all other small gaps. additionally, most most wood and plastic is not good conductor of heat...and many more wrong things. Hope he/she don't have high performance parts in it, and hope he/she won't paint it some day, cause the heat inside will made harmful gas vaporized...that's a smell...
The link does not work for me
Load More Replies...
429
64