We Turned A Boring Wall Into An Instagrammable Cactus Paradise Using A Stencil
Cactus walls are all the rage on Instagram and Pinterest! We created our own using a wall stencil and the finished product is absolutely gorgeous.
This DIY project is super easy, inexpensive, and most of all fun! Who needs a filter when you can have a cactus wall mural?
More info: cuttingedgestencils.com | Instagram
Instagrammable cactus wall

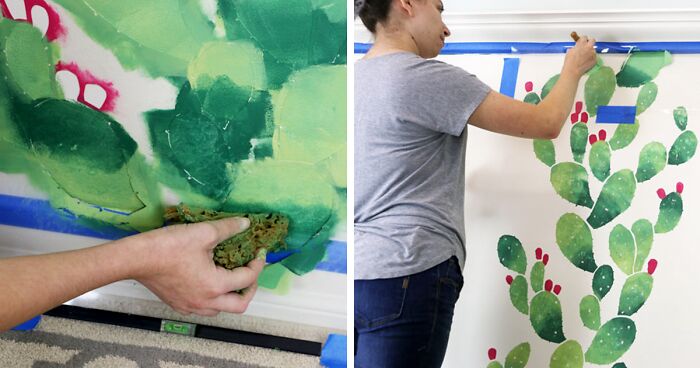
Simply load and offload the dense foam stencil roller and be sure to coat the roller evenly

We chose to use spray adhesive to help achieve crisp edges in addition to blue painter’s tape. The beauty of this stencil art project is that you can vary the colors any way you want! You can easily transition from the lightest to darkest color or simply randomize your color selection for a more organic stenciled look!
Dampen your blending sponge with water and wring it out very well before you begin stenciling. Roll the body of the cactus with your 3 chosen stencil colors

While that paint is still wet, place your damp sponge on the body of the Prickly Pear stencil and pounce the sponge up and down, while slightly rotating your wrist for a natural blending of these colors. This will help blend your cool stencil colors together while also giving the cactus some texture! This stenciling technique may sound difficult but it’s so easy! Keep pouncing until you’ve achieved your desired look!
Once you’ve finished blending, take a polyfoam brush and dab the pink color onto the fruit portion of the stencil

This will mimic the needles that Prickly Pears naturally grow!

Once you reach the bottom of the wall, use a stencil brush to pounce the paint down towards the baseboard

You can even bend the stencil to make sure the stencil fits into the crease of the baseboard. Simply repeat the blending process with your damp sponge and finish the stenciled cactus with the white dots.
With the stenciling brush, pounce the paint upwards towards the crown molding

Once each section is complete, peel back your stencil design and align it with the previously stenciled parts

Peel the stencil

Here’s the final result!

See the full process in the video below:
8Kviews
Share on Facebook

Nice! But...does anyone know since when is instagrammable a word? Google gives me 2.040.000 results but this is the first time I heard it. Weird.
probably since "instagram-model" is an accepted job description (at least in some circles)...
Load More Replies...Seems so simple I want to try it myself but I bet I wouldn't get such a good result
It is so easy!! You can absolutely do it on a wall and get an amazing result. Have some faith in yourself! :)
Load More Replies...I like the pattern and colours. It gives freshness to the room. Nice work!
Yes it is definitely different! It was used in a nursery and everybody loved it!!
Load More Replies...Thanks so much!! Finally some positive feedback! haha
Load More Replies...Instagrammable? Have you seen Instagram? Pictures don't have to be great to be posted there. They don't even have to be all that pinteresting.
Very true! haha just another word for "trendy" but i think its safe to say this might be more interesting than most of the crazy photos on instagram!!
Load More Replies...Don't listen to the haters :) carry on as you are! I can't believe the amount of people hating on this post!! Ignore them as best you can and don't give up!! ^ ^
That sounds awesome!! You must really be quite the painter :) We love marbling and woodgraining in our studio. Unfortunately for those who do not know how, we are here to make projects much easier for them! These stencils are made so that ANYONE including a 6 year old can do it with not much time involved! We would love to see some of your marbling work!
Load More Replies...Nice! But...does anyone know since when is instagrammable a word? Google gives me 2.040.000 results but this is the first time I heard it. Weird.
probably since "instagram-model" is an accepted job description (at least in some circles)...
Load More Replies...Seems so simple I want to try it myself but I bet I wouldn't get such a good result
It is so easy!! You can absolutely do it on a wall and get an amazing result. Have some faith in yourself! :)
Load More Replies...I like the pattern and colours. It gives freshness to the room. Nice work!
Yes it is definitely different! It was used in a nursery and everybody loved it!!
Load More Replies...Thanks so much!! Finally some positive feedback! haha
Load More Replies...Instagrammable? Have you seen Instagram? Pictures don't have to be great to be posted there. They don't even have to be all that pinteresting.
Very true! haha just another word for "trendy" but i think its safe to say this might be more interesting than most of the crazy photos on instagram!!
Load More Replies...Don't listen to the haters :) carry on as you are! I can't believe the amount of people hating on this post!! Ignore them as best you can and don't give up!! ^ ^
That sounds awesome!! You must really be quite the painter :) We love marbling and woodgraining in our studio. Unfortunately for those who do not know how, we are here to make projects much easier for them! These stencils are made so that ANYONE including a 6 year old can do it with not much time involved! We would love to see some of your marbling work!
Load More Replies...
78
30