My Little Pony is loved by many, especially young girls, and this DIY wings and ears project is fun for everyone. Put on your artsy cap, and give this project a try. Share your experience too!
More info: costumesupercenter.com

Materials you will need:
Craft foam
Paper clay
Metal headband
Masking tape
Scissors
Large sheet of paper
Marker and pen or chalk
Foam head (Optional)
Water (Preferably in a spray bottle)
Paint
Sand paper
Hot glue
Wire cutters and pliers
Blank
Materials you will need for the wig tutorial portion:
Heat resistant wig
Curling iron
Bobby pins
Foam head (Optional)
Wig stand (Optional)
Brush
Start with the clay

You’ll want to work the clay into a pointy hill shape. The front of the ear should be somewhat flat while the back is more rounded out.
Shaping the Ears

Once you have a rough shape of the ear, you need to carve out the inner part of the ear. Take your finger to where you want the top of the inner portion to start, push into the clay, and push the excess down and remove.
If you have any other excess clay, you can take your finger, start at the top of the ear and lightly push down the excess clay off your base. Similar to how to carved out the inner part of the ear.
Moisturize

Now that you have the rough shape of your base, the rest is just shaping it out to your liking. When working with the clay, you remove the moisture from it. You will need to restore the moisture, otherwise your base will continue to crack and you’ll want to smooth out those cracks.

using the base for a wig might help you get a better idea of what kind of shape your ears should have and how big they should be.

When you finally have the final shape to your liking, repeat to make the second ear. I used my first ear as a reference to match the size for the second ear as best as I could.
After this, you must leave them to dry.
Making the Wings

Draw out a rough shape of how big you want your wings to be. Pony wings have four large outer features and three smaller inner features. There is no correct size, so test your pattern in the mirror. You can ask a friend to hold the wing for you so it’s sitting in the correct spot. Cut out pattern once you’re happy with your size and shape.
Trace your pattern onto your craft foam. You will need four of the bigger sections, two for the left wing and two for the right wing as you will be sandwiching the two together.
Once you’ve cut out your larger pieces, cut out the smaller part of the wing from your pattern to use to trace onto the foam. You will only need two of the smaller wing portion.
Apply the Wire

Take one of your larger wing pieces and using your wire, make a loop shape. Twist the excess wire together. Repeat for other wing. Wire gauge is up to your preference but it should be on the thinish side so it’s relatively easy to bend only needing the wire pliers for minor assistance.
Tape the wire down to the wing using masking tape.
Next you want to make the rest of the harness by shaping the wire into a U-shaped structure. You want to attach your U-shape piece to the rest of the wings and twisting the other wires. Apply some masking tape to where your wires are twisted together.
Connect the Wings

After that you’re ready to make a sandwich and hot glue your other large wing piece down to the other. Then glue your smaller wing pieces onto the larger wing pieces.
Curl the Wig

NOTE: You want to make sure your wig is heat resistant or the fibers will melt.
This part is optional if you’re not doing Pinkie Pie. I did not have a wig stand, but this step would be easier with a wig stand and you could also curl the wig higher instead of more towards the bottom like I did.
Take a section of the wig and curl like normal hair. Hold the curling iron to the wig for a little more than a minute and a half.
Let the curl out slowly so it’s still in the loop shape and pin in place to let it cool down.
Repeat this process throughout the entire wig.
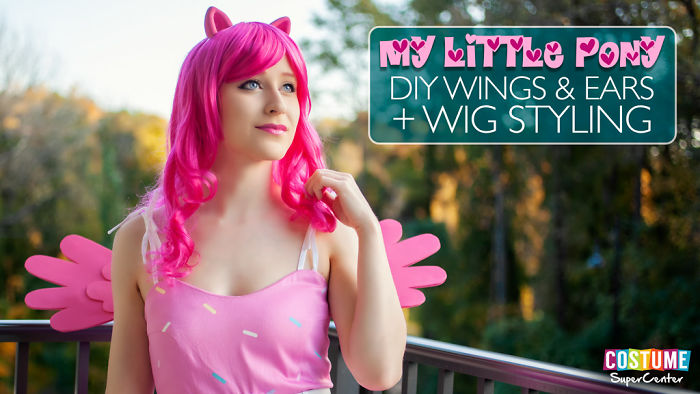
Admire the Final Product!


I like how you've crafted it yourself, but you don't mention how you keep the creepy bronies at bay.
I like how you've crafted it yourself, but you don't mention how you keep the creepy bronies at bay.

-2
3