My name is Bram Berkien, I’m an active lifestyle photographer from the Netherlands. In my work I focus on shooting athletes from many different sports, one of them being climbing.
I’d like to share with you my top five tips for shooting better photos of your climbing friends. No expensive camera, heavy lenses or special software like Photoshop is needed to use any of these tips. Even using a phone you can get started straight away! To view my full portfolio just drop by www.bramberkien.com.
1 – Choose the best moment and the right pose
Climbing is a sport where the peak of the action often occurs in a very specific part of the route or boulder. Having been present while your buddy was climbing the route it’s easy to remember the intensity of the section and specific moves. However, if you want to make someone who’s just seeing the photo and wasn’t present during the actual climb feel the action it’s imperative to shoot the exact right moment and move of the climb. To make this a bit easier it’s best to just shoot a series of photos when the action reaches its peak and then select the best one afterwards. Never just shoot one photo, the human body and climbing are too dynamic to trust on just the one frame to capture the best moment.
Some moments work better than others. When the holds are getting worse and the moves are getting harder then the climber’s body position is a very good indication of the difficulty of the climb. Therefore, harder routes generally yield better poses than easy climbs. Climbers staring at the next hold with a focussed face usually work better than climbers clipping their quickdraws. Also, try to always have the next hold in frame. This way, viewers can understand the difficulty the climber has ahead of them. Concentrated faces and eyes work better than the back of a head, although an anonymous climber in an interesting body position can be really interesting. Please note that these are all just guidelines and a wide range of exceptions exist where doing the exact opposite could work perfectly well. Moreover, I implore you to experiment and just shoot a large amount of photos, and then choose the best frames afterwards. Do cull down your selection, nobody wants to see 400 photos of your last trip. It’s so much better to just show 10 very good shots.
2 – The right crop and framing
Barring some remarkable exceptions, most climbers use both their hands and feet. These limbs are essential to climbing. Wouldn’t it make sense therefore to get these in frame? Try not to chop off any hands or feet with the way you frame your shots. If you’re just shooting the climber’s upper body, make sure not to cut him off at a weird place. In general you want to stay away from having any joints of the body on the edge of the frame and cut off. These include ankles, knees, elbows and shoulders. Cropping in the middle of these joints can make it appear as though the climbers is missing some limbs. Also, be sure to give the climber some space. For example, don’t bring the bottom of the frame too close to the climber’s feet. Otherwise, you’d run the risk of having the climber sort of stand on the bottom of the frame. The photo displayed below is only just acceptable in that respect, in hindsight I probably should have stood a little further away from the action and give Elko a bit more space. In addition: consider that climbing is all about height. It would make sense to give viewers a feeling for the height the climber is at, which is especially true in sports climbing and to a lesser degree in bouldering.
3 – Follow the light
This one may have the biggest potential to pimp your climbing photos. Before taking a photo, take a good look at how the light from the sun is hitting the scene. Be aware of the position of the sun in the sky, and whether or not there are a lot of clouds present. In a nutshell, shooting with the sun in your back is easier but oftentimes a bit more boring and flat. Shooting against the sun (backlight) is far more interesting but you run a serious risk of underexposing your climber buddy. In addition, focusing can be harder. Be aware when it’s cloudy: the light hitting your climber and the wall will be softer which can be a good thing. However when trying to obtain a correct exposure for the scene, your camera can be fooled by the large white blob which is the sky. Again, you run the risk of underexposing the action. Most cameras and even phones offer the option of telling it which part of the scene to expose for, check this in your manual. On most phones you just tap te part you want correctly exposed. Overall, try to experiment with your position in regard to the sun and strike without wasting a second when you see the light is hitting the scene gorgeously.
4 – Please, no more buttshots
If there’s a single category of climbing photos the world needs no more, it has to be buttshots. Shot from ground level, these photos offer an excellent view of the climber’s behind while obstructing the view from any of the action going on. The horrible thing about these photos is that we can’t see anything of the holds or the face of the climber, and get no feeling whatsoever for the epicness going on up there. At the very second you notice yourself pointing the camera up to the sky, please remember: you can do better! Bouldering enthousiasts will have an easier time here than sports climbers. By just stepping a few feet to either side or climbing on top of the same boulder or an adjacent one, aspiring climbing photographers are greeted with a much more compelling angle. Just make sure the crash pad area doesn’t look like a trash belt. If you really want to put some time and energy into getting a great photo, ask your mates to drop all their bags, bottles of water, climbing shoes and percolators somewhere else.
If sports routes are your thing, then you have a couple of options to steer away from butt shots. No more taking photos while you’re on belay, but you shouldn’t have been taking photos while your buddy’s life is in your hands in the first place, should you? In some crags, like the famous Berdorf area in Luxemburg, it’s quite well possible to get to higher ground without learning any special rope skills. Approaching the crag from the top, it’s easy to shoot the action from an adjacent peak. Just make sure you don’t take any unnecessary risks! In a lot of crags, ground level won’t be flat but instead rise along the wall, or some boulders may be present. Shooting from higher ground to stay at the same level or higher than the climber can improve your photos heaps. Finally, if you’re an experienced climber and have good rope skills, you’ll know how to get on the wall before the climber even starts climbing. This allows you the most freedom in choosing your exact position and is the weapon of choice for all top climbing photographers.
5 – Try shooting the climbing lifestyle
What makes climbing so incredibly captivating is not just the hardcore climbing action, but the entire lifestyle around it. Think of the travelling, walking through gorgeous landscapes, the frustration when you just can’t make the move in your eternal project and the sheer joy when you do finally succeed. All of these moments make climbing the lifestyle loved by millions of people. Shooting these moments can give your trip report a bit more depth and make it resonate with fellow climbers even more.
More info: Instagram
Tip 1: choose the right moment. Jan Hojer in Fontainebleau (France)

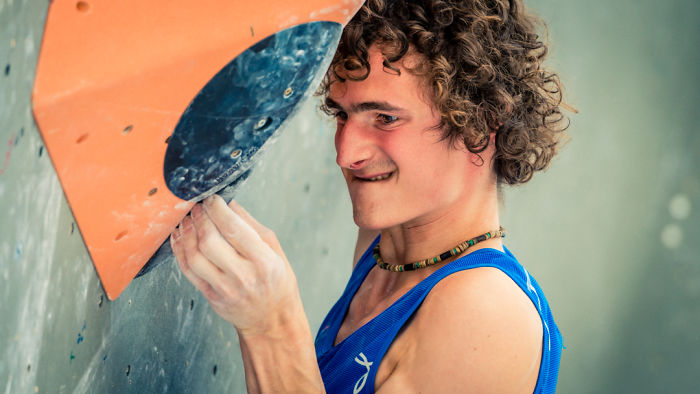
Tip 2: the right crop and framing. Adam Ondra during a World Cup

Tip 2: the right crop and framing. Climber in Switzerland

Tip 3: follow the light. Climber in Berdorf

Tip 4: no more buttshots!

Tip 5: shoot the climbing lifestyle. Climber walking up a hill in Magic Wood


4
0