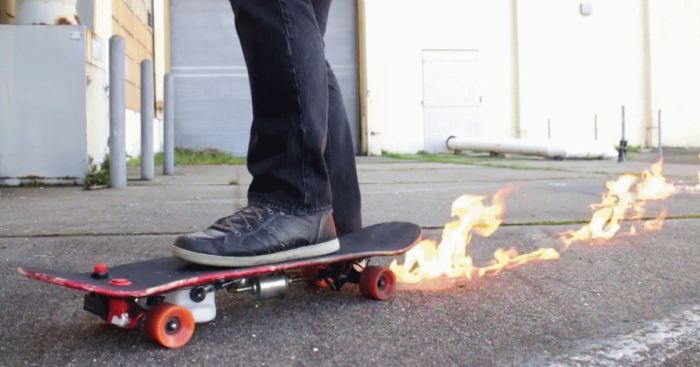
Arguably the most dangerous, reckless, and amazing thing on four wheels: a skateboard that spits fire!
Made from off the shelf components, and activated through two foot switches. One to lay the trail, the other to ignite. Maybe this should have been Marty Mcfly’s skateboard?
More info: instructables.com
This is the finished product – Flamethrower skateboard. Below you can find the explanation how to make it

Firstly, you need to get the matterials

There’s not much to make your skateboard pump flames, a simple fuel pump and a few other parts from the hardware store is all it takes:
Skateboard; 12V universal fuel pump; 12V rechargeable power supply; Arcade style push-button with microcontroller switch; Universal electronic spark generator; 10oz fuel canister; 1/4″ vinyl tubing; Hose barb reducer (to focus the fuel spray); Velcro tape; Hose staples; Multimeter(always a good idea to check your circuits).
Including the skateboard this project was under $100. Some of the components listed here are only sold in sets, where I only needed 1 – the price estimate accounts for only what I used.
Then you have to arrange the components

Before committing to mounting anything to the underside of the skateboard the largest components were arranged to see where things fit best.
The third step is attaching the components

Once all the components looked like they would fit, Velcro tape was placed on the fuel tank and battery with corresponding Velcro tape in select locations on the underside of the board.
Next – adding the operating switches

After locating where I wanted my switches, I used a hole saw to create an opening for the arcade style button (which would operate the fuel delivery) and a smaller hole saw for the spark generator.
Both switches are designed to be mounted with the flange at the top, and the button part protruding. A corresponding locking nut can be attached from underneath, sandwiching the board in between and secure the switches in place.
Then you have to work on electronics

The electronics for this project are very easy. The fuel pump operates on 12V DC, a very common voltage which has lots of options for a power supply. The pump wires were cut and the ends stripped. The battery had a plug which is used to both charge and supply power, the plug was cut off and the wires stripped.

The positive wire for the battery pack was labeled, so that was soldered to the pump. The negative wire was soldered to the foot switch, and then back to the pump and terminating at the battery.
Once all the wires were soldered I protected the connections with heat shrink.
And now you have to install the sparker

The electric spark generator works by having two electrodes that create a spark when they are close enough to each other for the electricity to jump the gap. To hold these in the correct position relative to each other, and close enough to the ground to ignite the fuel, I made a metal bracket from a scrap piece of steel.

The electrodes were bolted to the T-shape and bent so the ends of the electrodes would be close together. After taking this picture I trimmed down the electrodes and made a smaller T-shape to keep things compact.
Adding the fuel tank

There’s a few things going on with a fuel tank than just being a bottle to hold fuel. This tank has a cap with two openings in it, one for fuel transfer and the other to provide ventilation when the pump is engaged.
Barbed Adapters

The fuel tank was 1/8″ ID pipe and the pump was 1/4″ ID, so an adapter was needed.
These adapters have a barbed end, when inserted inside the pipe the barbs catch on the inside of the pipe and are held in place.
A small length of 1/4″ tube was put on the exit side of the pump and then another adapter was put on, which would push the fuel through the 1/8″ end and make a tighter more pressurized spray.
The layout

Here’s how all the components fit together when installed on the board. The velcro on the fuel tank and battery make removing these components easy to remove and refuel/recharge.
As you can see from this photo, there’s scorch marks near the nozzle and spark generator, the flames are intense and you need to keep moving while laying fire tracks.

The profile view shows there’s enough clearance to ride unhindered, even for everyday riding. the components were securely held in place without any rattling around. Wheel size is an important factor to consider, and beefier wheels really helped with providing a few extra millimeters of height.
And, once again, the finished item

21Kviews
Share on Facebook


82
16