People make a lot of cool stuff from colored pencils. And when Burls Art saw them, he decided to take it up an octave.
“I saw a lot of people online making bowls out of colored wooden pencils and I thought that those DIY projects were really cool but I wanted to make something that I can actually utilize and enjoy more so than a bowl when it’s finished,” Burls Art told Bored Panda. “Since I play guitar, I thought this would be a cool project that would accomplish that goal. I decided on making a (Fender) Stratocaster-styled electric guitar body… This was the first guitar design I’ve ever made”

“Making this cool guitar was surprisingly not as difficult as I would have imagined,” he said. “The only real struggles didn’t come as much with the actual guitar woodworking and building as much as it did with the colored pencil material. By that I mean, the color of the colored pencil would smear when sanded with high grit sandpaper and it looked awful. So I had to figure out a way to achieve good wood/lead color without the smear for my custom musical instrument (which I detail in the video at the end of this post).”

“That’s 1200 colored pencils. Bought the cheapest ones I could find on Amazon. They ended up being nearly identical to Crayola.”

“Cheap harbor freight mini miter saw cutting the pencils into 2″ pieces”

“Cutting the pencils was by far the most tedious portion of the build”


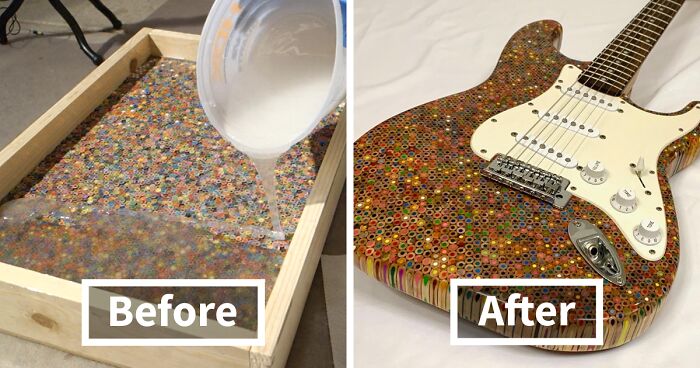
“In goes the epoxy resin”

“This is a milling jig that I made out of some spare wood I had. The router slides back and forth on here and the jig slides left to right so that I can take off about 1/8 ” off of the pencil slab. This essentially planes the slab for me”

“Tracing the template onto the slab”

“The epoxy resin / pencils combination was far too dense for me to cut with a jig saw alone, even using a diamond blade. Because of this, I had to drill out the pencil cores to make life a little bit easier on the jig saw”


“Super gluing the template on. I taped a few strips of masking tape onto the guitar and a few strips onto the template… Little bit of superglue on the masking tape and connect them together. Makes for an incredibly strong lateral hold that can easily be pulled off with no damage done to either the guitar or template”

“Routing the side of the body using a table router. This was another homemade jig using the wooden workbench and a 3×3 piece of melamine wood. Cut a hole in the middle of the melamine board and mount the router on the bottom side. Worked well. This 2.5″ router bit is a bit intimidating though, I cannot lie”

“Routing the edges gives me a near perfectly shaped body”

“Routing the cavities and neck pocket”

“This is an example of one of my struggles with the build. The entire block was sanded with 80 grit on the belt sander. Then the left side was progressively sanded up to 360 grit. So the higher grit I went, the more color smear would occur. Smearing was minimal until I went above about 220 grit. This left me with 2 choices.. either have a smooth surface and a grayish/smeared color tone… or… have good clean wood and led colors but at the cost of only being able to sand to 220. The choice was pretty obvious to me being that the colored pencils were the star of the build… I wanted to showcase their colors as much as possible”

“Fixing some tear-out I had when routing the neck pocket”

“Lots of sanding”

“Drilling the neck mounting holes. I also drilled the bridge mounts at this time. This is like a portable drill press btw… Not as good as the real thing, but it gets the job done”

“Throwing on some clear coat! I used a 2-part spray enamel, which is really nasty stuff… but it gives a beautiful finish. Dumped the entire can on it in 5 coats”

“The polishing compound I used”

“Easily the most satisfying part of the build”

“Mounting the tremolo”

Finished!!!!

“The more difficult portions of the build just had to do with figuring out ways to make use of the limited equipment and power tools that I had. For example, making a makeshift milling machine (ie: planer), making a router table out of my wooden workbench, etc.. But it goes to show that you can make a guitar in your garage with limited tools if you get a little creative.”


Burls Art couldn’t put an accurate number on the time it took him to complete his project. “I worked on it for 4-5 weeks for a few hours a day, like 2-4 hours probably. It took a long time, but for the most part, it was enjoyable. I think I could make one faster now though since I know the processes and things that I would do differently. I’d say I spent in the neighborhood of $500 on it, but some of that includes router bits and other pieces of equipment that I didn’t already have. I already had the guitar neck and hardware though so that saved some money.”

He was really happy with the final look of the guitar. “It’s a one-of-a-kind guitar as of now which I guess is pretty cool, though that’s probably soon to change now that the idea’s out of the bag.” He promised, however, that this won’t be his last unique guitar build. “I have a lot more ideas that I think will translate well that I’m going to take on in the future. Some that I think will even be more interesting than this colored pencil guitar.”
More info: YouTube


Okay, you're hanging around the house and decide to make a guitar out of pencils. Who the hell does that? I say that with amazement and admiration by the way.
Some people will miss the point, but color me impressed. This guy got the lead out and built a sharp-looking instrument! If there's a concert anytime soon, I'll pencil it into my schedule!
You are monarch of the parent joke, I applaud you :D
Load More Replies...I am doing something similar at the end of this month. I have some live edge wood scraps that I am putting into a mold and then pouring some metallic tinted resin into the voids. It will be a long project that will end up being a graduation gift for my brother. One of a kind high end guitar that nobody else in the world will have.
i was just thinking how cool that would be. would love to see it
Load More Replies...I think this one is far better than anyone in that budget. https://bestmusically.com/lava-me-2-acoustic-guitar/
Wouldn't it be cool if in the next one he controls the palette of colors? Maybe from cool (cold) colors to warm colors.
You are a very talented,creative craftsman.I love homemade projects like the table tops my brother made, one with marbles on top the other with pennies,
Impressive and fascinating work - hard to believe this is his first home built guitar though, but very nice job regardless.
Likely the tone is garbage is as well
Load More Replies...This is a far better use of resin than the making of vomit clocks, trivets or animals. Very creative. I wish there was a soundbite. See vomit items here, ie molded items made with kibble-like random bits and pieces and resin. https://www.facebook.com/groups/650812835102933/search/?query=vomit%20clock&epa=SEARCH_BOX
You know what else is a dumb waste of time? Trolling.
Load More Replies...Okay, you're hanging around the house and decide to make a guitar out of pencils. Who the hell does that? I say that with amazement and admiration by the way.
Some people will miss the point, but color me impressed. This guy got the lead out and built a sharp-looking instrument! If there's a concert anytime soon, I'll pencil it into my schedule!
You are monarch of the parent joke, I applaud you :D
Load More Replies...I am doing something similar at the end of this month. I have some live edge wood scraps that I am putting into a mold and then pouring some metallic tinted resin into the voids. It will be a long project that will end up being a graduation gift for my brother. One of a kind high end guitar that nobody else in the world will have.
i was just thinking how cool that would be. would love to see it
Load More Replies...I think this one is far better than anyone in that budget. https://bestmusically.com/lava-me-2-acoustic-guitar/
Wouldn't it be cool if in the next one he controls the palette of colors? Maybe from cool (cold) colors to warm colors.
You are a very talented,creative craftsman.I love homemade projects like the table tops my brother made, one with marbles on top the other with pennies,
Impressive and fascinating work - hard to believe this is his first home built guitar though, but very nice job regardless.
Likely the tone is garbage is as well
Load More Replies...This is a far better use of resin than the making of vomit clocks, trivets or animals. Very creative. I wish there was a soundbite. See vomit items here, ie molded items made with kibble-like random bits and pieces and resin. https://www.facebook.com/groups/650812835102933/search/?query=vomit%20clock&epa=SEARCH_BOX
You know what else is a dumb waste of time? Trolling.
Load More Replies...
472
58